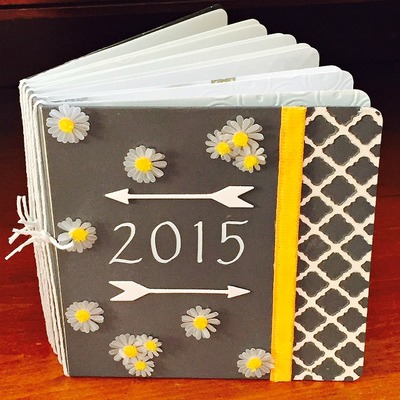
Quick & Easy DIY Planner

This Quick and Easy DIY Planner is great for keeping track of your craft projects and blog ideas. It goes together really quickly thanks to the miracle of die cutting. The die cuts the cover and pages so you can make multiple books for all different occasions. It is painted with chalkboard paint so if you want to use it for something else, simply wipe off the chalk and start over! Embellish your planner with scrapbook embellishments to give it a special touch! These journals make great last minute gifts and stocking stuffers!
Estimated Cost$11-$20
Time to CompleteIn an evening
Primary TechniqueMixed Media
Project or Page SizeCard
Type of Paper UsedCardboard

Materials List
- Mini Album Sizzix die
- Textured Impressions Folder
- Big Shot machine
- Extended cutting pads
- Plaid Folk Art Home Decor Chalkboard Paint in Arrowhead
- White twine
- 8 sheets white cardstock 6"x11" from Little B Paper Pack
- Floral embellishments from Little B
- Kitchen Labels die set
- Sand paper
Instructions
-
Die cut a Mini- Album from mat board and eight signatures made with white sheets from the Little B Paper Pack.
-
Paint the front and back cover of the album with Plaid Folk Art Home Decor Chalk paint. I used Arrowhead, a soft gray.
-
Emboss each edge of the album covers using the Textured Impressions Folder by Stephanie Barnard. When the paint is dry, take a piece of sandpaper and rub the embossed areas of the book cover until the design stands out. I embossed some of the book pages too for a little dimension.
-
To create each signature, fold a 6 x 12 sheet of Little B heavy white paper in half. Place fold just shy of the last score line on the die and run through Big Shot. This yields one book signature. You can cut two-three folded papers at a time.
-
Use twine to bind pages. Cut eight lengths of 14 of white twine. Tie each page into book by placing page fold inside book binding and tie on the outside in a double knot.
-
Die cut labels, arrows and accents to use in the book. Decorate the cover and store extra embellishments on the pages.
-
Write desired text on the front cover with chalk or a chalk marker. If you want to re-use the book for another project, simply wipe lettering off with a wet paper towel.
-
Add ribbon and embellishments.