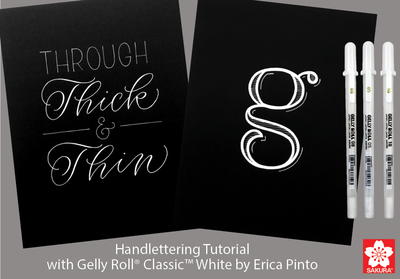
Gelly Roll Hand Lettering Tutorial

Learn how to write gorgeous letters with Gelly Roll pens! This hand lettering how-to will teach you how to write beautiful script with those childhood-favorite gel pens. Add gorgeous detail to cards and more with this hand lettering tutorial. Use brightly colored bold pens on a dark background for added pop with your fun letters! If you have an upcoming wedding to make some DIY invites for or you'd like to simply address gifts and envelopes in a fun way, give hand lettering a try. The best way to learn online is with video tutorials, and you'll be sure to gain greatly from this one.
Materials List
- Gelly Roll Classic White pens in 05 Fine, 08 Medium, and 10 Bold
- Strathmore Artagain Drawing Paper (Coal Black)
Instructions
Thick & Thin Lettering Phrase:
-
To create a piece with fine and bold letters, take a piece of black paper and draft your lettering in pencil.
-
Use Gelly Roll Classic White in Fine 05 for the word “Through” in a block print.
-
Next, use Gelly Roll Classic White in Bold 10 to write the words “Thick” and “Thin” in a cursive style script.
-
Make sure you use scratch paper as you go to protect the drying areas from smudging.
-
Again, use the Fine 05 to add in the ampersand symbol.
-
Now that the ink has dried on the words Thick and Thin, go back in with Bold 10 to add thicker lines to broaden the downstrokes (all of the lines written with a downward motion).
-
Touch up any corners or details with the Fine 05.
Contrasting Details Initial:
-
Choose a font style and shape of letter. Draft lightly in pencil.
-
Use Bold 10 to create the thick outline of your letter. Fill in outline only, leaving the inner part of the letter open.
-
Make sure you use scratch paper as you go to protect the drying areas from smudging.
-
Next, use Fine 05 to fill the inner part of the letter with thin evenly spaced horizontal lines. Leave some areas unfilled to create subtle shadow effect.
-
Last, use 08 Medium to create a dropshadow effect to lower right of letter. Try combining different lines and nib widths to create effects to make the letter pop off the page.
Do you create your own holiday cards or buy them?
Your Recently Viewed Projects
Thanks for your comment. Don't forget to share!
dskene2 1252205
Dec 20, 2017
I make my own cards for Christmas and all through the year. Thanks for the tutorial!
txmlhl 4916988
Dec 15, 2017
I make all of my greeting cards - for any holiday or occasion. I haven't been in a Hallmark store in years. I enjoy the creativity of making them and hearing the comments from the recipients. thanks.
dischlegel 4998001
Dec 11, 2017
I do make my own greeting cards to send and to share or sell. I've used the gold and silver jelly roll pens, purchase them at Michael's Crafts and would love to have a complete set to try them all. Thank you for the tutorial
apexfarms 6385196
Dec 07, 2017
Wow!! I love doing calligraphy...now...I hope I can win the kit for my Christmas! I have been battling with cancer, and thank the Lord, now able to relax a bit, what a perfect way to spend some personal time, learning a new craft.
ridiculosity 67303 43
Dec 06, 2017
I love to make cards but haven't done many recently, and most assuredly not for christmas.
kimlennie 9336847
Dec 06, 2017
I always buy at the moment. I am only just trying to get into making my own cards. It so far seems a lot of fun but still learning so nothing I would send out yet.
Knittingdancer on Ravelry
Dec 05, 2017
I usually buy my holiday cards but I have made some in the past.
Beth McC
Dec 04, 2017
I buy them. I no longer have time to make my own cards. I kind of miss it... but family obligations preclude this particular craft.
Report Inappropriate Comment
Are you sure you would like to report this comment? It will be flagged for our moderators to take action.
Thank you for taking the time to improve the content on our site.

![Pill Bottle Crafts: Reuse Pill Bottles [15 Ideas]](http://irepo.primecp.com/2017/06/334076/PILL-BOTTLE-CRAFTS-Header_Category-CategoryPageDefault_ID-2274135.jpg?v=2274135)