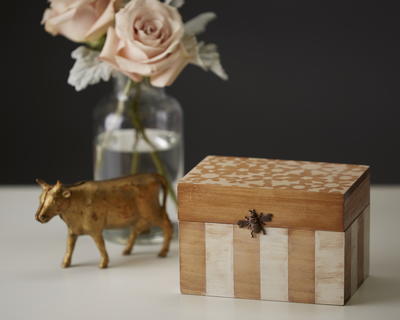
Heirloom DIY Keepsake Box
DIY keepsake box ideas like this one are elegant and lovely.

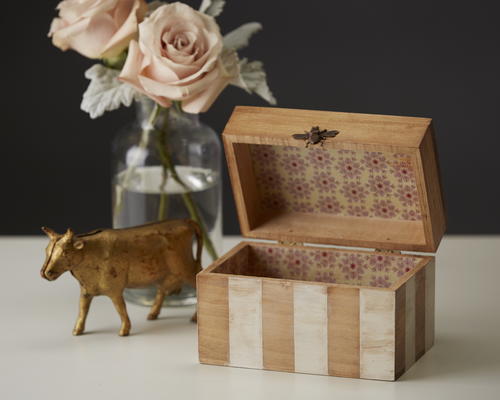
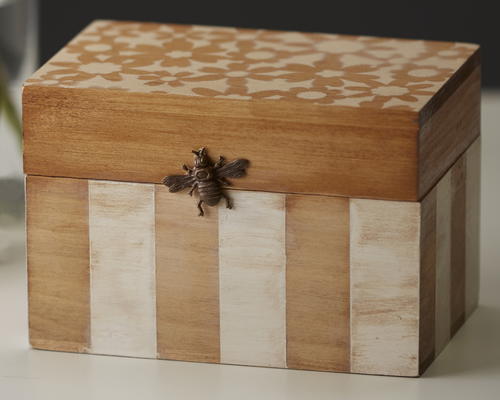
Make a DIY keepsake box worthy of becoming a new family heirloom. With tinted spray paints, you can easily create gorgeous designs in the wood. Antique and age the finish to create the look of a box that's already been handed down for generations. This is a lovely decoration to place on your dresser or the credenza in the hallway. You can store nearly anything in it, ranging from jewelry to other knick knacks. It also makes a fantastic gift! If you need an old-new decoration for any surface in your home, this is the project for you to make.
From the Designers: Whether storing heirloom recipes or remembered trinkets, treasured memories deserve safekeeping and accessibility. Vintage-inspired keepsake boxes are quick and easy to make using Design Master TintIT.® Sepia. Simple techniques with this quick-drying, transparent spray color can be used to instantly antique all types of surfaces.
Time to CompleteWeekend project
MaterialsPaint, Wood
Primary TechniqueWood Crafts
Project TypeMake a Project
Materials List
- Unfinished wood box, 5.75” x 3.75” x 3.75” or similar
- Design Master TintIT.® Sepia – 1
- Design Master übermatte® Crema – 1
- Folkart® painting stencil, Ditsy Floral or similar – 1
- Bronze bumblebee charm – 1
- Decorative paper (to line inside of box) – 1 sheet
- Painter’s tape
- Hot glue & gun
- Adhesive (for paper liner)
- Scrap paper
- Paper towel
- Scissors or craft knife
Instructions
-
Using a scrap piece of paper, sand the unfinished box to smooth the surface. If desired, disassemble the box to implement directions easier.
-
Closely spray TintIT Sepia on a section of the box to wet the surface. Immediately wipe the color into the grain with a paper towel. Repeat on other sections to completely stain the wood surface. Can reapply the color and wipe to even out overlap if necessary. Let dry for just a few minutes. Stain the exposed areas of the box interior as well.
-
If desired, deepen the stain color by applying Sepia in even strokes about 15” from surface. With transparent color, each additional coat will deepen the color. Let dry a few minutes between coats.
-
Place the stencil on the lid. Apply übermatte Crema spraying approximately 12” away. Remove stencil and let dry.
-
To the bottom section of the box, mask a stripe pattern with painter’s tape. Spray exposed stripes with übermatte Crema. Let dry. If needed, lightly paper-sand the surface of any impurities in the finish.
-
To the stencil pattern on box top, very lightly mist Sepia about 18” to softly antique the cream color.
-
Wrap some paper towel around the tip of your index finger. Wet the tip with TintIT Sepia then lightly wipe the striped section of the box to antique and age the finish.
-
Trim the decorative paper to line the box interior. Adhere paper in place.
-
Glue the bee charm to side of lid leaving bottom section free to overlap bottom of box.
What are some of your favorite homemade heirlooms?
Read NextHeirloom DIY Keepsake Box