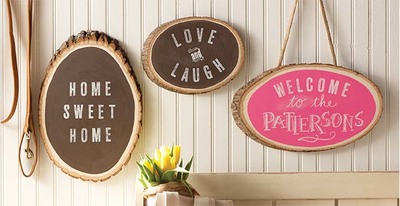
Welcome Wood Slices

Make your home more rustic and inviting with Welcome Wood Slices. This DIY wood craft shows you how to use chalkboard paint in a new way. As with many painting crafts, these wood signs will take you some time to make, but you can definitely finish them over the course of a weekend. You could even make these wood slices as housewarming gifts to welcome new neighbors. These decorations are easy to personalize with your family's name or simple sayings that you love and want to extend to guests.
Primary TechniquePainting

Materials:
- Martha Stewart Crafts ® Foam Pouncers Set - 6pc
- Martha Stewart Crafts ® Large Brush Set - 4pc
- Martha Stewart Crafts ® 2oz Multi-Surface Chalkboard Paint Acrylic Craft Paint - Vanilla Bean, Raspberry Ice
- Martha Stewart Crafts ® Adhesive Silkscreens - Striped Alphabet
- Martha Stewart Crafts ® 2oz Erasable Liquid Chalk, White
- 2 Large natural wood slices
- 1 Small natural wood slice
- White chalk stick
Instructions:
- Basecoat 1 large and 1 small wood slice with Vanilla Bean Chalkboard Paint. Leave a natural edge as shown in photo. Let dry.
- Basecoat 1 large wood slice with Raspberry Ice Chalkboard Paint. Leave a natural edge as shown in photo. Let dry.
- Cut out each letter and place on surface as shown. Follow direction on screen packaging.
- Using pouncer and Erasable Chalkboard paint- very little paint (dip in paint then remove most on paper towel) Screen words onto each wood slice. Let dry.
- Add personalization with white chalk stick.
Read NextHow to Turn a Door into a Desk