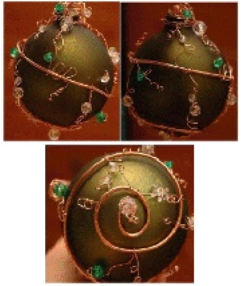
Elegant Emerald Ornament
Learn about wire wrapping and make Christmas ornaments from scratch with this festive tutorial. The Elegant Emerald Ornaments are easy to make Christmas ornaments that even beginners can try.

Materials:
- Wooden ball ornament
**Do not form/bend the initial shape over the glass ball. It will break from the pressure. You can cut yourself if you do not use the wooden ball as your template to shape the spiral.** Use the wooden ball to create the spiral shape. - Wire cutters
I use a pair from my husbands tool box but as you see in the pictures its not so handy. A set of jewellery making set will do you wonders. They won't mark the wire you work with. - Pen/Old wind chime
Any pen will do. You can use this for making circles. I also have a wind chime I use to wrap the wire around to make circles. - Beads/Ball ornaments
You choose what kind of bead/ball ornament you want. As long as the size of the bead match the ball size it will look good. Colour coordinate as shown with my example above. - Copper wire
Two gauges of wire are recommended for this to offset the thick wire making it more elegant. Recommended: 24-26 gauge for thin wire and a 14-16 gauge thick wire. When selecting wire place them next to each other and decide how thick and how thin you want.
Instructions:
- To begin you must have two sizes of wire, one much greater than the other as shown in the photo. It does not have to be copper; it can be any wire you have on hand to practice. Just make sure one is much thicker than the other and it should bend easily. It can not be wire that is too stiff to wrap around the wood ball ornament.
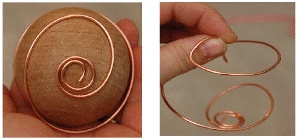
Thick wire: Cutting the wire length is subjective because there are many size balls and what size ornament you get will determine how much wire you will need. For size 60 mm ornament you will need approximately 60cm of wire. It is a forgiving project because if you cut too much the space between the swirl will be small. If you want the space to be bigger cut the wire and twist back into shape. This is an open concept you can decide how much wire you want to use.
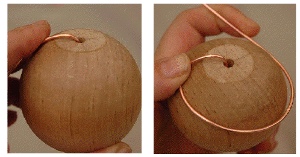
- Use the wooden ball to insert the wire in the hole at the top to make the first bend. Place your thumb to secure the first bend in the wire, then continue to form the spiral around the ball.
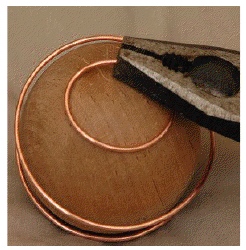
- Once you have completed this task you will continue the spiral until you have formed a spiral at the bottom by twisting it in the centre. You can use your fingers to fine tune the shape.
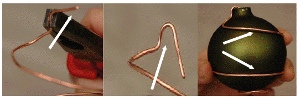
- Now that you have bent the wire to wrap around the wood ball and created your spiral, it is time to bend the wire to fit snug against the neck of the ornament.
- Take out the ornament from the wire to begin to make the neck. It needs to be parallel to the neck of the ornament. Place your pliers next to the neck of the ornament to see how much of the pliers you need to bend the wire. Bend the end of the wire to reform a hook to fit it back inside the ball as shown below, holding the newly formed neck. Try not to misshape the ornament again. This may take some practice.
- Before you put the thick wire on you will have to make the decoration around the neck to cover it. Thin wire is used for the neck piece.
- When you start working with the wire against the glass ornament you will have to try not to move sharp edges against the ornament. If you rub too hard it will remove the ornament finish. Practice on an old ornament you do not want to put on the tree.
- Open the wire spiral in the middle and fit the ornament between the wires then slightly bend the wires back in the spiral shape. Take the thick wire off without bending the top section of the wire, pulling it out between the middle wires.
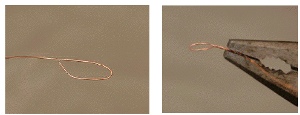
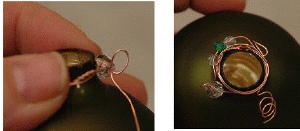
- The next part is adding the thin wire and beads around the neck of the ornament. You can choose how many beads and how many curly wires stick out. To start you have to make the hook shape shown above by using your pliers and wrap your fingers around the tip and start to wrap the wire around. At this point you will thread the straight end of the wire through the loop you created.
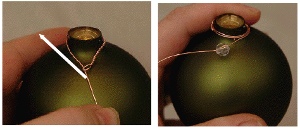
- Bend the wire in the opposite direction so it makes a loop around the neck of the ornament. Begin placing beads and wrapping the wire around the neck to hide the neck area.
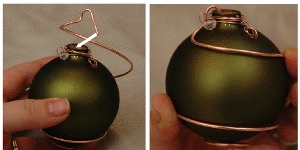
- It is time now to take the thick spiral wire and fit it over the neck section. As you can see below the wire spiral is out of shape but this is temporary. Once you wrap the wire back into shape make sure the thick wire is inserted inside the hole of the ornament for a snug fit.
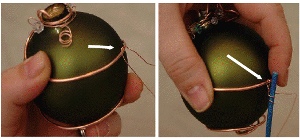
- Once you have completed this task you can begin beading the main section of the ornament. Cut a 10 cm piece of thin wire. Thread the thin wire, bending it over into hook on the wire. Twist to secure the first wire to hold the form of the wire, keeping the distance you want between the two thick wires. Use the follow method for the each rotation spiral.
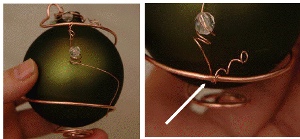
- I have used a small wire covered with plastic to wrap my thin wire around to make a small spiral after twisting it in place. Adding beads as you go along with twisting and shaping the thin wire makes interesting designs.
**Placement of the first wire is very important to keep the shape of the spiral uniform around the ornament. After the first wire is in place you can then relax your grip a bit as you continue adding more beads and wires.
- Inserting the wire under the thick wire, pull gently and try not to scratch the surface of the ornament. Once you have the desired spacing, pull up on the wire and tie it off, either wrapping the wire twice around the thick wire for securing the lower wire in its place. There are many ways to move the wire and experimenting with it to see how you can form it makes it a unique design only you could think of doing.
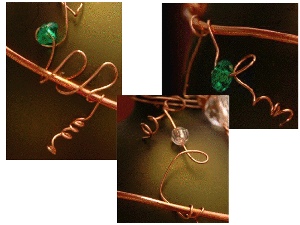
Here are some examples of wire wrapping I used in the project.:
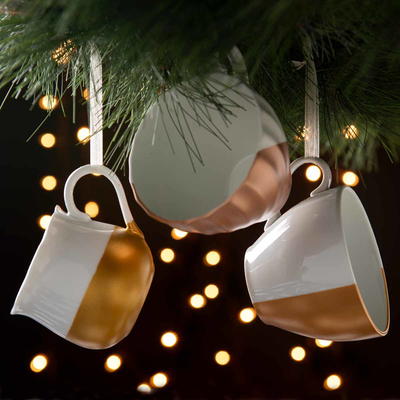
Read NextMetallic Teacup Ornaments