This project was submitted by one of our readers, just like you.
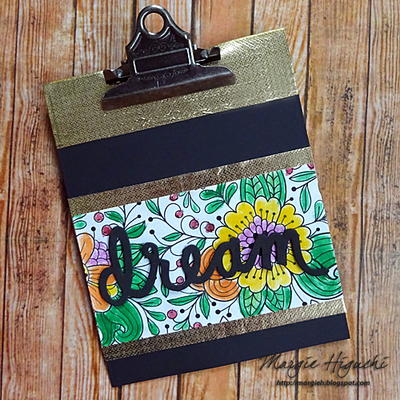
Gold Dream DIY Clipboard

Gold Dream DIY Clipboard
In the Designer's Words: "Bring that trendy gold element into your DIY project like this clipboard created with chipboard, paper and gold fabric. Just add an easel piece in the back and use it to display notes or photos on your desk. Not only beautiful but functional! I love creating these clipboards because you can customize the size, shape and color combination to fit your home decor or for your recipient."
Metallics are back with a vengeance. You cannot escape the shimmering silvers and glittering golds whenever you peruse Pinterest or walk the aisles of your favorite craft store. Jump on board with the gold craft ideas trend when you learn how to make a clipboard. The Gold Dream DIY Clipboard is a gorgeous clipboard that you can use in your office or even hang on the wall as DIY wall art. Featuring a sweet sentiment, gold hues, and coloring book pages, this is one of the trendiest crafts out there.
Estimated Cost$11-$20
Time to CompleteIn an evening

Project TypeMake a Project
Materials List
- Fairfield™ World (Oly-Fun™ Metallic Gold)
- Leisure Arts (Floral Wonders Color Art For Everyone Coloring Book)
- Testors® (0.25 oz Acrylic Paints)
- Sizzix® (Easel Die)
- Core'dinations ColorCore Cardstock® (Black Cardstock)
- Scrapbook Adhesives by 3L® (Girlie Grunge Art Medium and Extreme Double-Sided Tape 1/2")
- Spellbinders® Creative Arts (LF-132 Grand Rectangle Die #5)
- American Crafts (Dream Thickers by Amy Tangerine)
- Others: Chipboard; Foam Brush; Clip
Instructions
-
Die-cut three rectangles from Spellbinders® Grand Rectangle Die #5 (the smallest sized die is #1): one each of chipboard, Fairfield™ World Oly-Fun™ Metallic Gold material and black cardstock.
-
Apply Scrapbook Adhesives by 3L® Girlie Grunge Art Medium with a foam brush and adhere the rectangle chipboard and gold metallic material die cuts together.
-
While the clipboard base dries, die-cut another rectangle out of Leisure Arts Floral Wonders Color Art coloring book page.
-
Color the page with Testors® .25 oz acrylic paints and a paint brush for a vibrant accent to the clipboard.
-
After the paints dried, trim the page to the desired size and added the "dream" sticker in the center.
-
Trim the black cardstock rectangle to the desired size and adhere with Scrapbook Adhesives by 3L® Extreme Double-Sided Tape 1/2".
-
Use the gold metallic material scraps to cut strips to create a border on the top and bottom of the coloring piece. Secured with Extreme Double-Sided Tape 1/2".
-
Die-cut Sizzix® Easel Die with chipboard and secure with Extreme Double-Sided Tape 1/2" on the back. Add the clip on top and it's ready to be displayed!

Read NextDecoupaged Letters Decor

![Pill Bottle Crafts: Reuse Pill Bottles [15 Ideas]](http://irepo.primecp.com/2017/06/334076/PILL-BOTTLE-CRAFTS-Header_Category-CategoryPageDefault_ID-2274135.jpg?v=2274135)