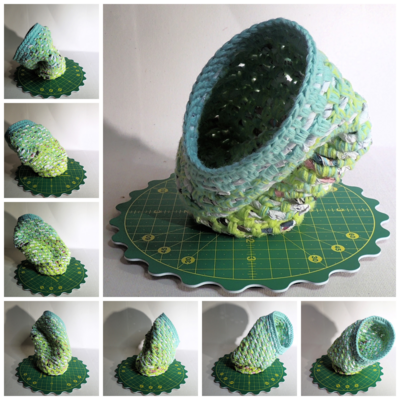
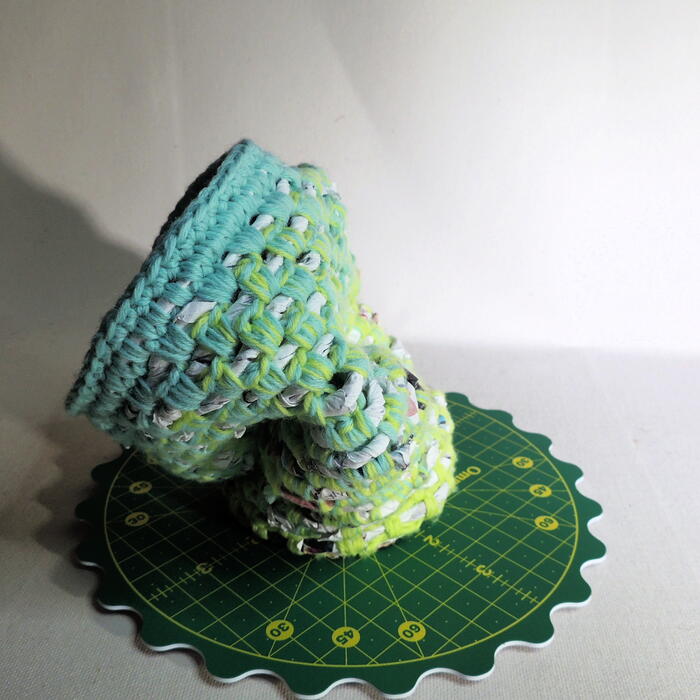
This project was submitted by one of our readers, just like you.
Paper Dreams

Paper Dreams
"Paper Dreams is the first creation of mine with paper cord. I've had this idea for some time, but only now have I made it a reality. After twisting lots of upcycled paper stripes, I crocheted around the cord to make a circular base. At that point, I still wasn't entirely sure what I would be creating. I started the sides and then just sat back with my yarn, hook, cord, and spray bottle and allowed the creation to take form. It was very relaxing and reminded me how much I enjoy the simple act of creating."
Primary TechniqueCrochet

Materials List
- Lots of 1 - 1.25" strips of paper
- 2 colors of Universal Yarn Curio (Curio Minis would be fine as well)
- Prym Ergonomics Crochet Hook size G/6, 4.0mm
- Spray Bottle with Water
- Yarn Needle
Instructions
-
Cut paper into 1 - 1.25" strips. Place a layer of strips in a container and spray lightly with water. Continue adding more layers and spraying so all the strips are damp but not soaked. With first strip, begin carefully twisting the paper. When about half way through the strip, add a second so that there are 2 layers and continue twisting. Each time one layer is almost gone, add another layer and keep twisting. Continue to desired length. It's a good plan to have something to wrap the paper cord around as it gets longer. A yarn swift works, as does a cardboard tube.
-
Place a layer of strips in a container and spray lightly with water. Continue adding more layers and spraying so all the strips are damp but not soaked.
-
With first strip, begin carefully twisting the paper. When about half way through the strip, add a second so that there are 2 layers and continue twisting. Each time one layer is almost gone, add another layer and keep twisting. Continue to desired length.
-
It's a good plan to have something to wrap the paper cord around as it gets longer. A yarn swift works, as does a cardboard tube.
-
Keep a spray bottle of water handy. The paper cord should just slightly damp so that it will form into the shape you want.
-
For this piece I used 3 strands of Universal Yarn Curio held together and treated as one yarn. I started with all 3 strands in a light green, then changed one strand at a time to a light blue to get an ombre effect.
-
Base: Fold the end of the cord over 1". Make 2 sc in the fold, [sc around both layers, sc one layer] 3 times, sc in the top of the fist sc to join piece into a spiral.
-
From this point on through the end of the base, spiral the cord so that it lays in a flat circle and work stitches over the cord and into the yarn below. If your work starts to cup, then you are pulling the cord too tight and/or you need to add more chains/sc. If your work starts to ruffle or leave holes, you are not pulling your cord tight enough and/or you have too many chains/sc.
-
[Sc, ch 1] in each sc until you get back around to the first ch 1.
-
[Sc in ch-1 sp, ch 1] until it's clear you need a space longer than a ch-1 between sts.
-
[Sc in ch sp, ch 2] until it's clear you need a space longer than a ch-2 between sts.
-
[Sc in ch sp, ch 3] until it's clear you need a space longer than a ch-3 between sts.
-
[Sc in ch sp, ch 4] until it's clear you need a space longer than a ch-4 between sts.
-
Continue in this manner until the base is the desired size. I stopped mine when it was just over 4" in diameter, which was at the point above.
-
Body: Now it's time to just have fun with shaping. If you do not add any stitches, you can bring your sides straight up. If you add a few stitches each round you can slowly bring the sides out, and if you subtract just a few stitches each round you can bring the sides in. You can also cross the cord from one side to the other, or catch previous stitches in a sc to shape your work. There are plenty of other ways as well, experiment! Here is what I did:
-
[Sc, ch 2, sc, ch 2] in each ch-4 sp. The ch spaces in this round were a bit ruffly as it was more stitches than needed, so I did:
-
[Sc in ch-2 sp, ch 2] until all the stitches lay flat, which was about 1.5" from the base.
-
[2 sc in ch sp, ch 1] for 2-3 rounds.
-
Place a marker on last ch-1 sp, [2 sc in ch sp, ch 1] 8 times, cross cord over marked chain and 2 sc over cord and into marked chain to make a figure 8. At this point, the larger loop of the figure 8 will have the back of the stitches facing out, and the smaller loop will have the front of the stitches facing out.
-
Continue working [2 sc in ch sp, ch 1] until cross over is reached, 2 sc in ch sp just before cross over, cross cord, ch 1, 2 sc in next ch sp, ch 1.
-
[2 sc in ch sp, ch 2] continuing to work the cross overs with the 2 sc in the in the ch sp just below the cross over, cross cord, then ch-2, then 2 sc in next ch-2 sp, ch 2, and so on.
-
I continued in this manner for an inch or two, then started re-shaping to make the smaller loop bigger and the bigger loop smaller. To do this I worked as before until I was working on the loop with the front of the stitches facing out, then:
-
*[2 sc in ch sp, ch 2] to cross over, 2 sc in ch-2 sp under cross over, cross cord, ch 2, [2 sc in ch sp, ch 2] to cross over, cross cord, 2 sc in ch-2 under cross over, ch 2; repeat from * until there are only 4 sets of ch-2 in the back side loop.
-
Repeat from * one more time, this time catch one of the stitches in the first round of the body in one of the chains about half way around the longer loop to fold the piece.
-
At this point the stitches are front-facing again. [2 Sc in chsp, ch 2] without making any cross overs to ch-2 sp that's joined to the first round of the body, place marker on ch-2 sp just made, sc in ch-2 space before join, sc in same ch-2 sp after join, ch 2.
-
[2 sc in ch sp, ch 2] to marked sp, place marker on ch-2 sp just made, using the next 2 spaces sc in first sp, sc2tog over both sps, sc in next sp.
-
[2 sc in ch sp, ch 2] to marked sp, 2 sc in marked sp, ch 2, place marker on ch-2 sp just made, 2 sc in ch sp, ch 2.
-
[2 sc in ch sp, ch 2] to marked sp, place marker on ch-2 sp just made, 2 sc in ch sp, ch 2.
-
[2 sc in ch sp, ch 2] to marked sp, place marker on ch-2 sp just made, using the next 2 spaces sc in first sp, sc2tog over both sps, sc in next sp.
-
[2 sc in ch sp, ch 2] to marked sp, 2 sc in marked sp.
-
[Sc in ch sp, sc in each of next 2 sc] until no chs remain.
-
Sc in each sc around.
-
Fasten off and weave in ends.

Read NextSimple Hot Glue Wall Art