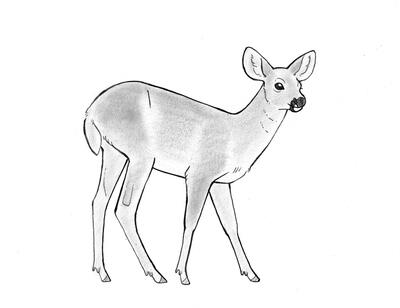
Dainty Doe

Female deer are often smaller and can appear slenderer, especially around the neck. They don’t need as much muscle strength as males need to support antlers, so take that into consideration. This tutorial could be used for a wide variety of deer species, as does tend to look pretty similar no matter what. An interesting thing to note is that as this doe is standing still, the pose shows off how a deer’s back legs are often longer than their front ones. This causes their rump to be much higher than their shoulders.
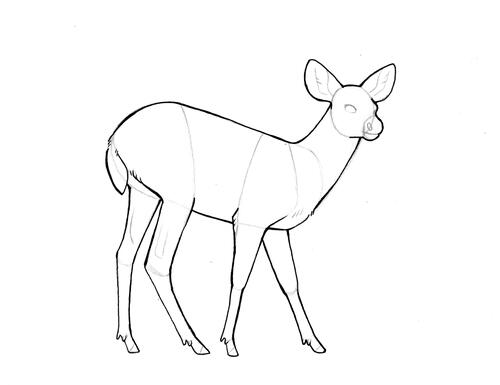
INSTRUCTIONS
-
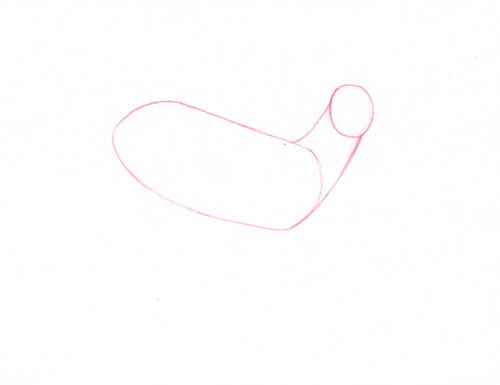
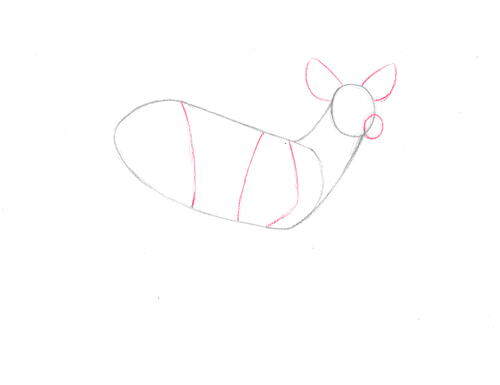
Step 1: Draw the main body, head and neck.
For the main body shape place a rounded rectangle or sausage-like shape in the middle of your page. This shape should be tilted with the left end pointing towards the ten o’clock direction and the right end more towards the four o’clock direction. For the left end of the shape, make it rounded like the end of a sausage. For the right end, make it a little flatter with rounded top and bottom corners. This will make the right edge a curve, the middle of the curves slightly farther to the right than the corners of the main shape. This shape should be twice as long as it is tall, so as a good guide, make the shape 3 inches (7.5 cm) long from end to end and 1½ inches (4 cm) tall.
Add the head by drawing an oval to the right of the main body shape. For proportions, if the body is 3 inches (7.5 cm) long, make the head ⅔ inch (1.7 cm) wide and ¾ inch (2 cm) tall. Place the head oval with the bottom edge just above level with the top right corner of the main body shape and the left edge of the head oval just to the right of level with the middle of the curve of the right edge of the main body shape.
Draw the neck by attaching the head oval to the main body shape with two lightly curved lines. For the top line of the neck, attach it just above the nine o’clock mark on the head oval. Curve it down in a seven o'clock direction and meet the top edge of the main body shape one-sixth of the way along, ½ inch (1.3 cm) from the middle curve of the right edge. For the bottom line of the neck, start it just right of the six o’clock mark of the head oval. Curve it down in a seven o’clock direction until you meet the right edge just below the middle. This lower neck line should run smoothly into the lower curve of the right edge of the main body shape. -
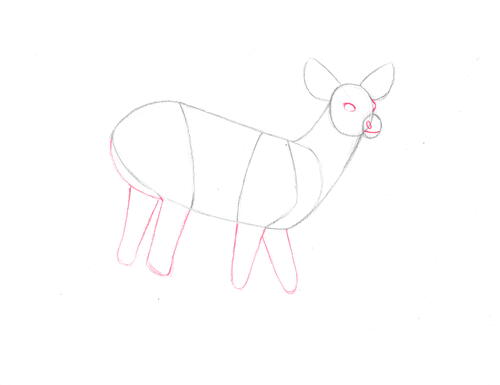
Step 2: Draw the ears, muzzle, shoulder and thigh shape.
Draw the ears by adding two inverted shapes that are a cross between a “U” and a “V.” The length of the ears should be almost the same as the width of the head oval. Attach the left ear with the right edge leaving the eleven o’clock mark of the head oval and the left edge leaving where the top neck line meets the head oval. The right line should be almost straight and aimed up to the left in a ten o’clock direction. The bottom should be curved with the one-third closest to the head being almost horizontal before curving up to meet the end of the top line. For the right ear, draw the opposite shape of the left ear with the left edge leaving from the one o’clock mark and the bottom edge leaving from the two o’clock mark.
Draw the muzzle by adding a smaller oval at the bottom right of the head oval. The muzzle oval should be one-quarter the size of the head oval. The muzzle oval should overlap the head oval with the twelve o’clock of the muzzle oval sitting on the three o’clock of the head oval. The eight o'clock of the muzzle oval should sit on the five o’clock mark of the head oval.
Start the shoulder shape by drawing a line that connects the top line of the main body shape to the bottom line. This line should connect one-third from the right on both of the long lines of the main body shape. Create the front of the shoulder by adding a curved line to the right of the first shoulder line. This line should be like a backwards “L” with the short edge of the “L” being half the length of the long edge. The bend in the “L” should be 110 degrees. Draw the top end of the backwards “L” just to the left of where the top neck line meets the main body shape. Make the bend of the “L” level with where the bottom neck line meets the main body shape. Attach the end of the short section of the backwards “L” halfway between the end of the first shoulder line and the bottom right corner of the main body shape.
Draw a line to create the thigh shape, which will then look like a guitar pick. Draw a slightly curved line from the top of the main body shape, one-quarter of the way along from the left point of the main body shape. Then, draw it to the middle of the bottom edge of the main body shape. -
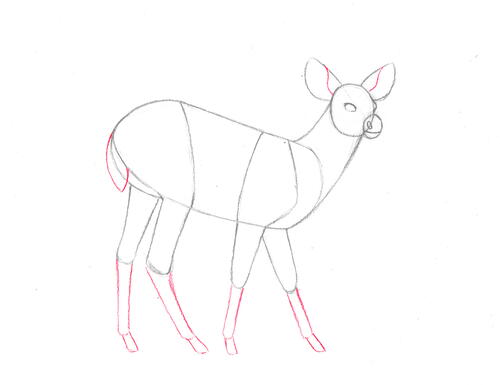
Step 3: Draw the facial features and start the legs.
Draw the eye shapes. For the far-side eye, draw a small backwards “C” shape between the base of the right ear and the top of the muzzle oval that’s twice as tall as it is wide.
Draw the near-side eye within the head oval. Create an almond shape that is the same height as the far-side eye “C” shape. Make this almond twice as wide as it is tall and place it just left of the exact center of the head oval.
Draw the nostril by placing a very small almond shape in the top quarter of the muzzle oval. Have this small almond shape tilted just shy of vertical, pointing in the eleven o’clock direction.
Add the mouth by drawing a gently curved horizontal line across the bottom quarter of the muzzle oval.
Begin the upper portions of the legs with the near-side foreleg. Draw a narrow “U” shape that is four times as tall as it is wide, narrowing at the bottom to half the width of the top. Extend the top of the “U” down from the points where the two shoulder lines meet the bottom of the main body shape. Have this “U” pointing just to the left of the six o’clock direction.
Draw the upper portion of the far-side foreleg, by repeating the “U” drawn for the near-side foreleg. This “U” shape should be the same width and length as the upper portion for the near-side “U,” this time angled towards the five o’clock direction. Have the top left end of the far-side “U” meet one-sixth the way down on the right of the near-side foreleg upper portion.
Draw the near-side hind leg, by adding another “U” shape. This “U” doesn’t narrow but remains the same thickness all the way down, which is the same thickness as the top of the upper portion of the near-side foreleg. Make the right edge of the near-side hind leg extend down from the point where the thigh line meets the bottom edge of the main body shape. Have this “U” pointing in the same direction as the upper portion of the near-side foreleg.
Draw the far-side hind leg, beginning with the rump. For this, draw a curved line that leaves from the very left tip of the main body shape. Curve this line down until it meets the point where the left of the upper portion of the near-side hind leg meets the main body shape. This rump shape should appear narrow, almost like a willow leaf.
Add a “U” shape for the upper portion of the far-side hind leg. This “U” should be similar to the “U”s drawn for the upper portions of the forelegs, only a little bit longer. Have this “U” point in the same direction as the upper portions of the two near-side legs. Connect this “U” to the rump line, leaving a tiny gap between it and the near-side hind leg. -
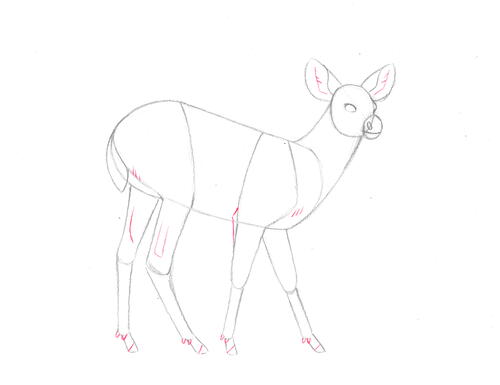
Step 4: Draw the folds of the ears, the tail and the lower portions of the legs.
For the right ear, draw an “S” shape from the top edge down to the head oval. Start the “S” one-third of the way along from the tip of the ear. End the “S” halfway between the two points where the ear attaches to the head oval.
For the left ear, do a backwards “S” for the ear fold from the top edge of the left ear down to the middle, where the edges of the ear meet the head oval.
Draw the tail, creating a petal-like shape at the left end of the main body. Continue the curve of the left end of the body downwards to create the left edge of the tail shape. The left tail line should be an extension of the back of the animal and appear continuous in one smooth line. Draw the left line down until the end is level with where the left line of the upper portion of the near-side hind leg meets the main body shape. To finish the tail shape, draw the right side in an opposite curve until you meet the main body shape halfway between where the left tail line meets the body and the left line of the upper portion of the near-side hind leg meets the body.
Add the lower portions of the legs starting with the far-side foreleg. Add a narrow “U” shape to the bottom end of the upper portion of the leg. This “U” should be only a little shorter than the upper “U” and half the width. Point the lower “U” in the same direction as the upper “U.” At the end of the lower “U,” draw the hoof “U” shape. The hoof “U” should be the same width as the lower leg “U” and one-third the height. Point the hoof “U” more to the right ever so slightly. The hoof “U” will be the same for all four legs.
For the near-side foreleg, add the lower leg “U” by repeating the same size “U” drawn for the far-side leg. Have this “U” pointing in the same direction as the upper portion. Add the hoof “U,” pointing a little to the right of the lower leg “U.”
Add the lower portion of the near-side hind leg. The “U” shape will start wider at the top. It will then taper down the same width as the lower portions of the forelegs. Aim this “U” down towards the five o'clock direction and end level with the bottom of the “U”s drawn for the forelegs. Attach the hoof “U,” pointing in the same direction as the lower “U” for the near-side hind leg.
Draw the lower leg for the far-side hindleg. This “U” will start at the bottom end of the far-side upper hind leg and continue down until level with the bottom of the lower portions of the previous three legs. It will be similar to the “U” drawn for the near-side hind leg. Add the hoof “U,” pointing a little more to the right. -
Step 5: Add some extra details.
Add the inner ear fluff to the ears. Draw an “L” shape that runs centrally in the space, left of the ear fold. Then, draw little ticks off the long edge of the “L” pointing towards the ear fold. This creates fur definition. Do the mirror image for the right ear.
Add some fur just right of the reverse “L” drawn for the shoulder shape. Just below where the “L” bends, draw three small ticks side by side.
Add the elbow on the near-side foreleg by drawing an upside-down backward “L” to the left of where the upper portion of the near-side foreleg meets the left shoulder line. Draw the short edge of the “L” ⅛ inch (3 mm) up from the bottom edge of the main body shape, pointing in an eight o'clock direction. Then draw the long edge of the “L” down in a six o’clock direction until you meet the middle of the left edge on the upper portion of the near-side foreleg.
Draw some definition for the muscles and tendons on the hind legs. Add an angular “U” within the upper portion of the near-side hind leg. This “U” should be a smaller version of the upper portion of the near-side hind leg. It should be half the height and one-quarter the width, with twice as much space on the right of the small “U” as the left. The same distance on the left of the “U” should be below it too. For the far-side hind leg, draw a curved line. Position it similarly to the “U” within the near-side hind leg.
Add some fur to the near-side rump. Just below where the right edge of the tail meets the main body, add three small ticks along the line for the near-side rump.
At the bottom of the lower portions of the legs, draw the dewclaws and toe sections. Repeat this process for all four legs. Attach two tiny “U” shapes at the bottom of the lower leg “U” shapes: one on the very bottom of the left edge of the “U” and the second in the middle of the curved bottom of the “U.” For the toes, draw a diagonal line across the hoof “U”s. Draw from two-thirds of the way down the right edge of the hoof “U” to the bottom left of the hoof “U”. -
Step 6: Draw the outline of the doe with a thicker pen.
Start with the head by going over the right eye curve and around the muzzle oval. Then when you meet the top of the throat line, draw a horizontal line along the bottom edge of the main head oval. This creates the doe’s jaw.
Draw over the ear shapes, and then connect the two top edges of the ear by drawing over the section of the head oval between them. Carry on from the bottom of the left ear by drawing over the left line of the neck, over the back and down towards the tail. At the points where the tail meets the body, draw a few tick marks to indicate fur. Draw over the rest of the tail.
Draw over the outside lines of the far-side hind leg. Make sure to draw over the dewclaws. Then do the same for the near-side hind leg, making sure to draw over the ticks drawn for the fur definition. Where the right edge of the near-side hind leg meets the main body, draw only slightly over the bottom of the thigh guideline. One-eighth of the line should be enough to show where the knee of the doe is.
Draw over the tummy and elbow, adding a couple of tick marks to the long edge of the “L” added in step 5 to indicate fur. Continue down and over the near-side foreleg. Where the right of the near-side foreleg meets the shoulder shape, draw partially over the short edge of the backwards “L” added in step 2. Draw the far-side foreleg.
Add the lower right end of the main body shape, drawing a couple of ticks where the lower neck line meets the main body. Then draw the lower neck line. -
Step 7: With a thinner pen, add the details.
Draw the inner ear fur and ear folds by drawing over the ear fold “S” shapes. Then go over the inner ear fur.
Draw over the eye almond shape, and add a short line in the middle of the far-side eye curve, creating eyelashes.
Over the top and below the bottom of the eye almond, add two opposite curved lines. This emphasizes the structure of the eye. Do a similar small curve at the top of the far-side eye curve.
Along the left edge of the head oval, draw a series of ticks and apostrophes. This adds fur along the jawline.
Draw over the nostril and the mouth line. Also, add detail for the muzzle. To the left of the nostril, draw two parallel lines that run through the mouth line until they meet the lower part of the muzzle oval. Then draw a curve from the middle of the right edge of the nostril oval until you meet the right edge of the muzzle oval. Draw a little line from the bottom end of the oval to the mouth line. This forms the nose.
Along the throat, do two parallel rows of ticks and dashes for fur. They should be below the bottom left of the head oval and equally spaced. Draw over the three short ticks for the fur to the right of the shoulder curve.
Draw the toes for all of the hoof “U” shapes. Then, go over the smaller “U” and curved lines in the upper portions of the hind legs. At the tops of these shapes, make the line broken into dots to soften the look.
Erase all your pencil guidelines. -
Step 8: Shade your doe (optional).
Fill in the doe with a lighter pencil. Make her slightly lighter along the bottom edge of the neck and tummy section.
With a darker pencil, fill in the eye. Leave a small white circle at the top of the eye almond for the shine in her eyes. Again, with the darker pencil, fill in the nose structure. The doe’s nose is typically completely black. Leave the section below the nostril and along the chin white.
Add some darker areas to the body. Good places to shade are the ear folds, a little within the face area and down the back of the neck. Leave the space around the eye where the curves are as lighter fur. Continue the shading along the doe’s back, within the middle of the shoulder shape and down the upper portion of the near-side foreleg. Shade the middle of the animal and within the middle of the thigh shape, down the upper portion of the near-side hind leg. Leave bands of lighter fur along where the shoulder and thigh guidelines were placed. Shade the toes and dewclaws a little darker than the main body.
For a smoother finish, take your finger or a tissue and blend together the pencil shading.


Credit:
Reprinted with permission from The Animal Drawing Primer by Jennifer Rae Phillips. Page Street Publishing Co. 2023. Artwork by Jennifer Rae Phillips.
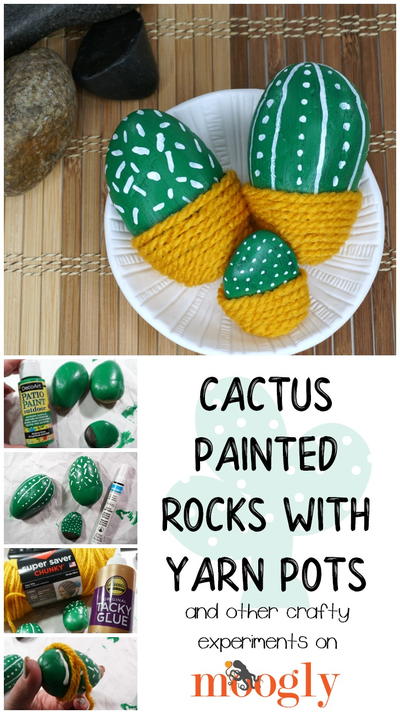
Read NextCactus Painted Rocks with Yarn Pots