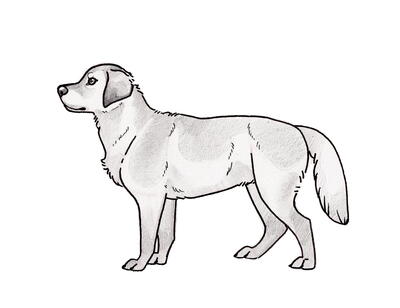
Labrador Side View

We are going to start with a simple pose for our faithful friend and companion, the domestic dog. Simple poses are great when just starting out as they allow you to get an idea of form and structure before moving on to something more dynamic. To begin with, I have chosen a Labrador. This breed bears all the hallmarks of the creature we imagine when we think “dog,” from their friendly floppy ears and smile to their smooth and pettable coat.
We will keep it straightforward so you can get an idea of proportions by drawing a simple standing pose.
INSTRUCTIONS
-
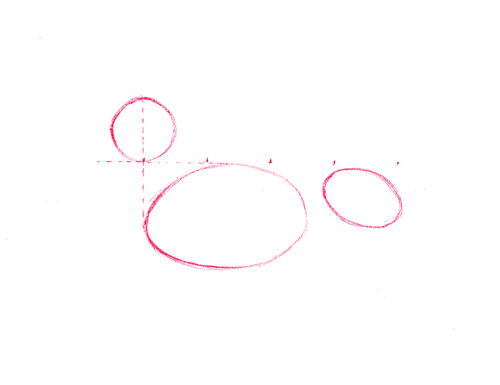
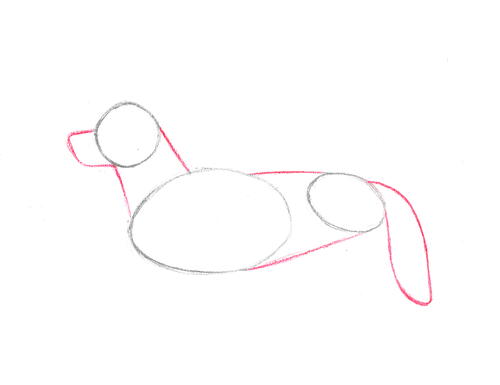
Step 1: Draw the ribs, head and hips.
Place the largest, central oval shape in the middle of your page. Give yourself plenty of space around this shape so you have enough room for the rest of the drawing. This oval is for the ribs and chest. The ribs are the largest part, so draw them first to centralize the illustration so you can build up other body parts around it.
Place the circle for the head. Draw your guidelines first. Sketch a horizontal line directly level with the top of the rib’s oval and a vertical line up from the front. Start the base of the head circle where these lines intersect, and have the vertical line be its exact center.
Draw the oval for the hips. A good size for the hip oval is if you took the same size circle used for the head and squashed it slightly.
Tip:
A useful measure to tell whether the proportions are right while you're drawing these round shapes is that the front of the rib oval to the end of the hip oval is exactly four times the length of the head circle. For example, if the circle for the head is 1 inch (2.5 cm) across, then the body from the front of the ribs to the end of the hips should be 4 inches (10 cm) long. Feel free to include guide marks to help with proportions. -
Step 2: Connect the ovals and add the snout and tail.
Connect the head circle. From the back of the head circle, extend a straight line that connects to the rib oval. This line should meet roughly two-fifths along the rib oval. At the seven o’clock mark of the head circle, draw a line that connects the head to the chest. This will be the dog’s throat.
For the back, connect the rib oval to the hip oval with a lightly curved line. This line starts at the three-quarters point on the rib oval and connects to the highest point on the hip oval. Dogs have a curved spine, and by drawing this curve now, it’ll become easier when we finish the illustration later.
Connect the lower part of the rib oval to the lowest point on the hip oval. This becomes the dog’s tummy.
Add the snout. At the front of the head circle, place an angular “C” shape. The top of the snout, or angled “C” shape, should fall roughly halfway down on the head circle. The bottom line should run horizontal, level with the top of the rib oval. The snout should be one-third of the Labrador’s entire head length.
Draw the tail and attach it to the hip oval. The tail sits just lower than the top of the hips. Tails are extensions of the spine, and the hip bones sit on either side, so bear this in mind. The tail can be almost a sausage shape or like the shape of a peapod. Try to avoid drawing any straight lines for the tail. Dog tails are very flexible, and curvy lines help to show this. -
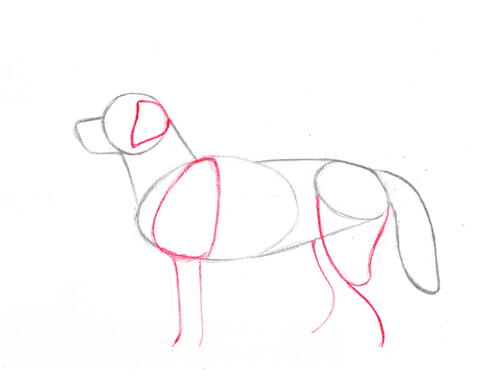
Step 3: Add the ear and start the legs.
Add the ear by drawing an inverted tear or triangle. Labrador ears are floppier than other breeds, so the tip of the ear typically points down. The widest point of the ear is where it attaches to the head.
Draw the shoulder. A good shape to use is an oval or egg shape that is more narrow where it sits closer to the back and widens toward the part where it meets the dog's chest. Leave a little crescent of space between the shoulder and front of the ribs where the throat is. When a dog walks or runs, this shoulder shape pivots, so it shouldn't be placed too far forward.
For the near-side back leg, draw a curvy “V” shape that connects the front of the hip oval to the back. The length of the “V” is approximately the same as the longest part of the shoulder oval. This “V” shape is for the Labrador’s thigh and knee. The side of the “V” closest to the front legs should curve to form the front of the thigh. The side of the “V” closest to the tail shape should form a gentle wave, creating the dog’s buttocks and back of the thigh.
The remainder of the dog’s legs will be roughly the same as the height of the rib oval.
Finish off the near-side back leg by extending the front of the thigh down so that the knee or tip of the “V” shape drawn earlier is halfway between the tummy of the animal and the paw.
For the far-side back leg, draw a soft “S” shape.
For the front legs, draw two straight lines vertically, curving a little at the bottom where the paws will go. These lines will become the front parts of each leg. The near-side leg should connect to the middle of the egg used for the shoulder. The far-side leg should be placed slightly to the right. As we won’t see the far-side shoulder, this placement can be just a guide, and the far-side leg will mostly disappear behind the near-side leg. -
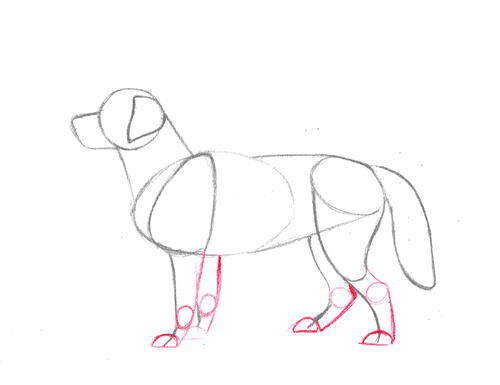
Step 4: Finish the legs.
Place a semicircle to represent the paws at the bottom of each line drawn for the legs. Make sure that the lines of the legs drawn in step 3 meet exactly at the middle of the semicircle. This will help you to draw the toes.
Draw the leg joints. For the front legs, place a circle on the back of the lines that connect to the shoulder, one-third of the way up. This circle is the dog’s wrist and should be two-thirds of the width of the paw semicircle. As this is a joint, circles are useful to show volume and help you remember where the wrist joint pivots if the animal is moving.
For the back legs, place a circle directly behind the part of the line that bends backwards. This joint is thicker than the joints for the front legs, so it should be the same width as the hind paw semicircle. This circle becomes the dog’s ankle.
Connect these shapes by drawing the backs of the legs. For the front legs, extend a line that joins the base of the shoulder egg shape down past the wrist circle and connects to the back of the paw semicircle shape. For the back legs, connect the near-side leg from the back of the thigh or “V” shape to the top of the ankle circle. Then connect a line from the ankle circle to the back of the paw semicircle on both back legs. -
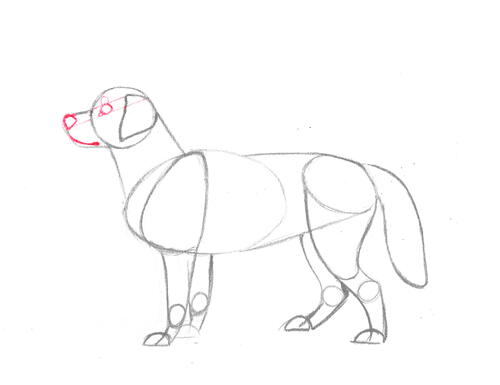
Step 5: Add the facial features.
To draw the nose, sketch in a diamond-like shape at the top corner, farthest from the dog’s face on the snout’s angular “C” shape.
Add guidelines for placing the eye. You can use the ear triangle and the nose diamond to help with position. You will get two parallel lines by placing a faint line that connects the top corner of the ear triangle to the top of the snout, and then placing a second line between the back of the Labrador’s head to the bottom of the nose diamond.
Draw the eye between the previously placed guidelines in the top quarter of the Labrador’s head circle. You can finish the eye with a semicircle above for the eyebrow and a smaller one below towards the snout for the tear duct.
Draw the mouth. This will be an upturned curve in the bottom third of the snout. Where the corner of the mouth sits near the head circle, draw a slightly thicker line to represent the edges of the lips, which forms the typical dog “smile”. -
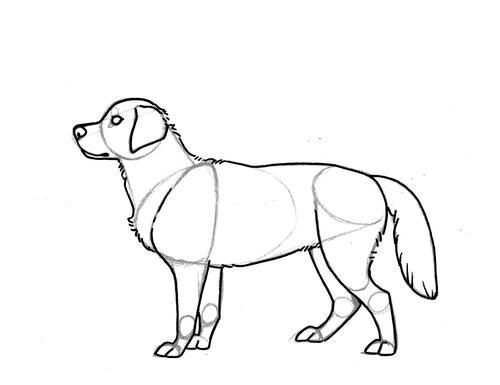
Step 6: Outline the main features.
Tip:
It can be helpful to take your time with these next steps. We will be refining the parts of the dog we want to keep, using some of the lines drawn already to bring out the finished drawing. Other construction lines we will ignore for now.
With a thicker pen, start with the dog's face. Draw over the nose diamond and, towards the middle, add a line to place the nostril. Connect the bottom of the nose diamond to the curve of the mouth, going over the line you drew already in step 5.
Draw the jaw, taking the line from the end of the snout along the guideline towards the throat.
Draw along the top of the snout, towards the head circle and over the top of the edge towards the back of the head. Extend that line down towards the shoulders, leaving gaps and ticks or apostrophe shapes to indicate fur.
Draw over the eye circle and go over the ear triangle, leaving a gap at the top where the ear folds and meets the head.
Go over the throat and extend over the front of the rib circle, again adding ticks to show fur.
For the shoulder, partially draw over the front of the shoulder egg shape, and then extend that line down along the edge of the front near-side leg. Draw the toes by going over the front half of the paw semicircle, along the base of the paw, and add another toe. To finish the front leg, take the line from the back of the paw and extend it up toward the base of the shoulder egg shape. Do the same for the far-side front leg.
Draw the chest and tummy, as well as the back line using the guides in step 2. Add some tick marks behind the front leg and before the back leg for fur.
For the back legs, do the same as you did for the front leg. Make sure the thigh line starts near the hip oval, and extend that line down for the rest of the leg. To complete the rump of the Labrador, continue the back line down, adding tick lines for the fluffy rear, and end towards the ankle joint.
Outline the tail. Draw one smooth line over the top of the tail and underneath. Draw fur with more tick lines. -
Step 7: Finish the outline.
Draw over the eyebrow and tear duct with a thinner pen.
Add a handful of tick marks and short lines around the round shapes you drew for the head, ribs, shoulder and hips to indicate fur and add texture. These show muscles and edges of the skeleton that lay underneath the skin. You can draw as much or as little as you like, making sure to use the edges of the guide shapes to assist the placement of your tick marks.
Erase all the construction lines. -
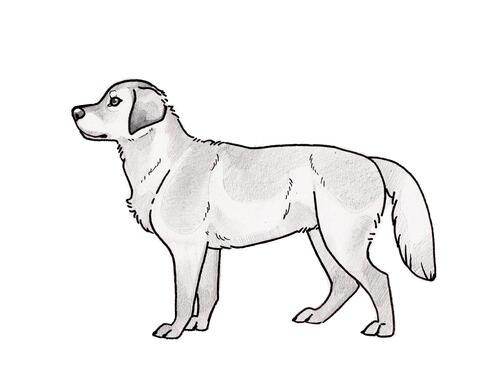
Step 8: Add shading (optional).
Take this Labrador to the next level by adding some shading. Start off by filling in your dog completely with a layer using your lighter pencil.
Fill in the eye. Leave a small circle at the top of the eye blank for the highlight, and do a very dark circle at the front of the eye of the pupil.
For the nose, leave the top half empty for the shine, and fill in the lower part with a dark layer of shading.
For the ear, shade all of it, but go darker towards the tip and along the lower edge.
Add shading along the top of the head and along the back. This will be the darker fur that some lighter-colored Labrador shave. Extend this shading below the eye, around the back of the neck and over a large portion of the shoulders, ribs and hips. Leave a lighter edge to show depth and help define those darker areas.
Shade in the lower part of the animal. Shadow under the jawline, along the throat and below the tummy, works well here.
For the legs,add darker shading at the paws and gradually fade into a lighter shade as you go up the leg. The joints at the wrist and ankle can also be a darker shade.
Add a patch of shading around the rump to emphasize muscles and fur at this part of the dog.
To finish,add a darker patch of shading at the base and tip of the tail, connecting with some shading underneath the tail too.
If you want to smooth this shading, lightly run your finger or a tissue over the pencil to blend these darker areas together.

Credit:
Reprinted with permission from The Animal Drawing Primer by Jennifer Rae Phillips. Page Street Publishing Co. 2023. Artwork by Jennifer Rae Phillips.