This project was submitted by one of our readers, just like you.
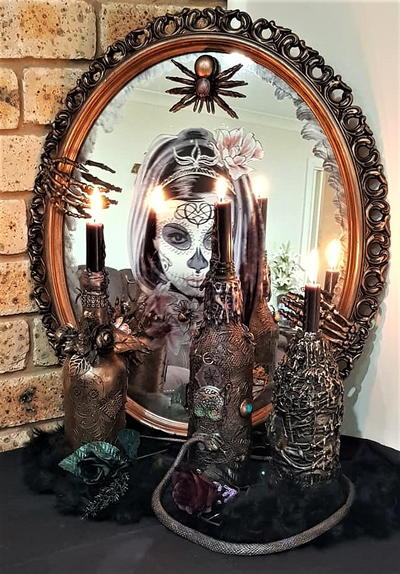
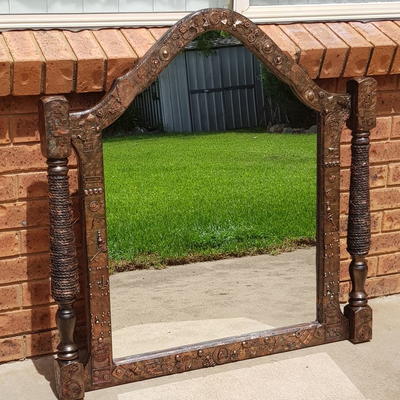
Steampunk Mirror Makeover

Steampunk Mirror Makeover
"I am the go to lady in town when you want to get rid of free furniture, this mirror was my latest "Gift". In my opinion it was the mirror off an old dresser. I wanted to play around with this mirror and give it a mixed media makeover. I chose a steampunk theme because I knew I would be able to find bits and bobs in my workshop and home. Mixed media is all about adding different art mediums into one piece of art, but I chose furniture instead of art."
Primary TechniqueMixed Media

Instructions
-
Cover the mirror with some paper to protect the surface from glue and paint. Remove the shiny surface of the frame with a sanding block so the Mod Podge has something to stick too.
-
Add a layer of mod podge to the frame. For this step you can use paper napkins, toilet paper or any thin tissue. Push the paper into the mod podge and use your fingers to add creases like the image above. You can add another thin layer of mod podge if the tissue still looks dry. This step will add extra effects to the final results.
-
Paint the frame with a coat of black gesso or acrylic paint.
-
I added some rope I had at home to hide the old fashioned spindles on the sides. The rope was attached using a hot glue gun. Paint the rope with the gesso making sure to get into all the creases. It does help if you spray the rope with some water, this will help the black gesso get into all the gaps.
-
This is the fun part of this project. I went around my shed and house and gathered up bits and bobs that I knew would look good with this theme. For the steampunk theme keys, thumbtacks, nuts, coins and charms are always and easy option. There are so many items used in this project I would be naming them all day. If you want to see all the item you can try zooming in on the images or visiting my website.
-
To add some texture and height to the frame I used some thick card stock. I cut them into smaller piece and joined them together again to look like tiles.
-
Add some split peas to the corners of all the pieces of card stock. Once painted these will look like studs. Glue the card onto the frame with multi purpose glue. The keyhole is a decal which will show up great in the end.
-
Cover the whole frame with elements and embellishments, adding layers where possible. Putting gear unto of gears changes the look straight away. There is no need to be perfect gluing all the pieces on, any blemishes add to the look.
-
Paint the frame again with the black gesso making sure to cover all areas, including under the charms.
-
This is where the magic happens. I used these 4 colours of metallic wax paste.
-
Dip the tip of your finger into the wax paste and lightly rub over some of the raised areas. Don't try and cover all the black gesso or paint you do want some black to show through. Go through each colour and do the same thing. Once you have randomly added all the colours, blend any dark areas with a clean paint brush.
-
Seal the frame with 2 coats of spray polyurethane to make the surface durable for cleaning and to preserve the colours.

Read NextSimple Hot Glue Wall Art
Your Recently Viewed Projects
Thanks for your comment. Don't forget to share!
Report Inappropriate Comment
Are you sure you would like to report this comment? It will be flagged for our moderators to take action.
Thank you for taking the time to improve the content on our site.