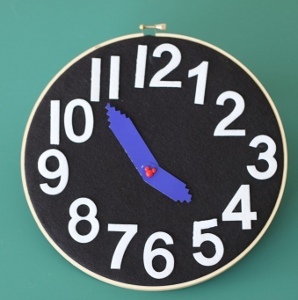
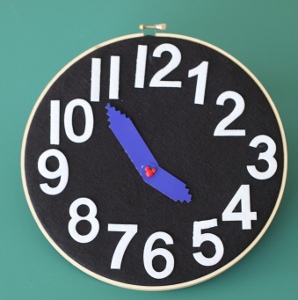
Child's First Learning Clock
Educational toy clocks can be used to easily teach children how to tell time. The best part is, kids think they're just playing! Make this Child's First Learning Clock from Marla Canfield Clark to use at home using our free felt craft patterns.
You can find this project and more kids' crafts in our free eBook, Family Fun Crafts: 16 Craft Ideas for Kids!
Materials:
- Embroidery Hoop (we recommend a 10 or 12” hoop)
- Felt or Fabric of your choice to fit the hoop (we used craft felt)
- Self adhesive felt numbers (1 or 2” depending on hoop size)
- Coated or Laminated Paper
- A scrapbooking brad
- Hot Glue Gun
- Ruler
- Scissor
- Fabric Marker or tailors chalk
- Paint for the embroidery hoop
- Decoration for your brad (we used a Mickey Mouse brad head)
Instructions:
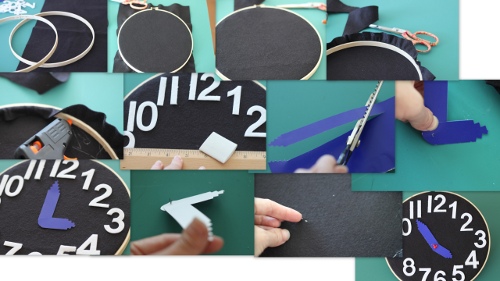
- Recycled an old embroidery hoop or buy an inexpensive 10 or 12” wooden hoop.
- Find a piece of felt or use scrap fabric that is slightly larger than your embroidery hoop.
- Fit the felt or fabric over the bottom hoop and put the top hoop back on over the felt. Make sure the felt is stretched tight.
- Turn the hoop over and trim some of the access felt. Leave about ½” of felt.
- Hot glue the felt so that it sticks flat onto the inside rim of the embroidery hoop.
- Turn over to work on the “front” of the clock.
- Using a ruler, measure down about ½ from the top middle and mark lightly with a fabric pen or chalk. You can find the middle directly under the “tightener” on the embroidery hoop. The tightening screw can serve as the top of the clock.
- Continue marking using your ruler for the number positions. Mark top and bottom (12, 6), across the middle (9, 3) and so on for (1, 2, 4, 5, 7,8, 10, 11). Position your self adhesive numbers around the clock where your marks are. Find the middle of the clock and make a small mark.
- Make the hands of the clock using a strong and stiff laminated or coated paper. We used an old file folder.
- Cut one long strip of the paper and angle the tips like an arrow. We used pinking sheers.
- Cut the strip making one “longer” arm and one “shorter” arm. Lightly position on the clock over your “mark”.
- Take the arms off the clock and carefully poke a small hole in both. We used the sharp pointy end of our regular scissor.
- Push a scrapbooking brad through the arms.
- Gently push the brad through the face of the clock, taking care not to rip the felt or distort the clock. It helps to put one hand over and one hand under the clock face while doing this step. Open the brad to secure on the back side of the clock.
- We added a Mickey Mouse decoration to the top of our brad. Decorate as desired.
Additional ideas: Allow your child to paint the outside ring of the embroidery hoop before making the clock. Make sure the paint is fully dry before assembling the clock.
Green Crafting: Make this clock 100% eco friendly by using an old, repurposed embroidery hoop, eco craft felt or scrap fabric and recycled paper.
Read NextHouses Coloring Page