Day of the Dead ATCs
Learn how to make artist trading card with this Day of the Dead tutorial from Kara Jones. This mixed media project involved paper craft, sewing, clay, and more.

Materials:
- heavy weight watercolor paper or cardstock
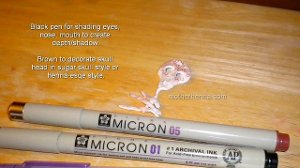
- waterproof ink pens - I used brown, black, silver, gold
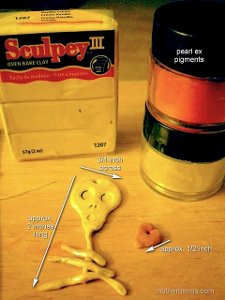
- sculpey clay or any brand of the polyclays - I used white vanilla cream and rose pink
- acrylic paint - I used a basic red
- paint brush - I used a tiny, stiff bristled AND a soft, larger one for different things
- pearl ex pigments - I used silver and rose
- wooden cooking skewer or round chop stick
- needle, thread, scissors
- scrap fabrics
- small stamp -- hand-carved or commercial -- whatever shape you like
- versamark stamp pad
- trading card sleeves
- optional: heat gun
Instructions:
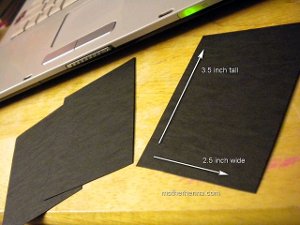
- Cut your paper: First thing I did was look through my card stock and papers to find a sturdy stock that would suit what I had in mind for these ATCs. I settled on a thick, black paper, and cut it up into ATC size cards, 2.5 x 3.5 inch each. If you really like ATC format like I do, you can cut up a half dozen additional cards beyond what you need for the current project. Set them aside in your paper stock. If you do that each time you cut paper for projects along the way, eventually you build up a whole stack of pre-cut ATCs for yourself. Then in the future when you want to play with ATCs, you just grab a few and start playing!
- Shimmer, color, shape to the first layer: Then I wanted to add a bit of shape and color and shimmer to the paper cards. You can use any little stamp, any shape you want, hand-carved or commercial bought. For me, I had this hand-carved spiral stamp I carved out a while ago. Again, this is something I've built up along the way. Each time I worked a project that needed a stamp I didn't own, I would hand-carve it. Set it aside, and now I have a whole jar of carved stamps of various shapes and sizes that I really like!
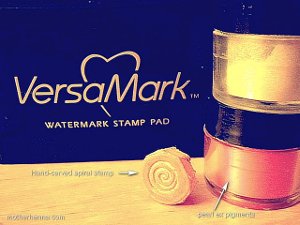
- Anyway, I decided to use my spiral stamp on the black paper. Wanting to get the paper shimmering, I decided to use the versamark stamp pad which is just a translucent watermark ink. You press the stamp onto the pad, and then stamp on the card paper as you would with any colored stamp ink. But when you stamp with this, it just make a sort of clear, wet mark in the shape of your stamp. Then I dip a soft, dry paint brush into my pearl ex pigments to pick up a little of the shimmery powder. You brush it over the wet mark, and voila!
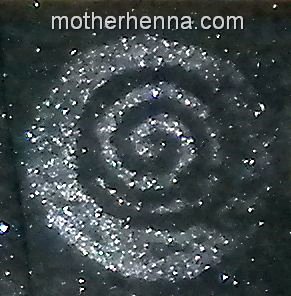
- Close up of the shimmer, color, shape: So this is an extreme close-up of how the spiral stamp turns out using the versamark and after you paint over it with the pearl ex pigment. I repeated this process randomly over the cards. Some of the spirals fully on the paper, some 1/2 off and such. Just to make a random pattern and shimmer on that first layer. Set the cards aside for a bit to totally let the versamark dry.
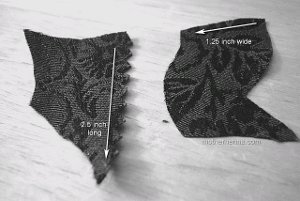
- Cut your fabric pieces: While the cards are drying, I started poking around thru my bag of fabric scraps. You don't need huge pieces of fabric when you are working in small format like ATC, so scraps are *great* for this kind of thing. I found a textured fabric I liked and then started to just free-hand cut out pieces of it. You can see the first two pieces above that I cut out to be approximately 1.25 wide x 2.5 tall. Once I had them in a shape I liked and a size that fit the card, then I, again free-hand, just tried to repeat that approximate size and shape multiple times till I have two pieces of fabric for each card I was creating. Set the cut fabric aside with your needle and thread to be used later.
- Sculpt, shimmer, bake your clay pieces: Then I took out my Sculpey clay -- you can use any brand of poly-clay. I wanted to do some sort of skeleton shape and a heart. So I used a white vanilla cream and a rose sculpey. I played around by hand with amounts and various shapes and sizes to see what look I liked best. When I found what I liked, then I tried my best to replicate that size and shape multiple times, so that I had one set of Skellie and heart for each card. When I finished each one, I placed them on a parchment paper off to the side and kept sculpting more pieces.
- Once they were all on the parchment paper, I took out my cooking skewer and chop stick. I used the point of the skewer to poke holes in each piece so that I'd later be able to stitch them onto the paper stock. I used the round end of the chopstick to imprint the eye sockets. I used the pointed end of the skewer to carve the mouths and noses.
- And then I took my soft, dry paint brush and again dipped it into my pearl ex pigments. Then I softly brushed shimmery pigments over my sculpey pieces. I used the silver on the skellies. I used the rose pink on the hearts.
- Then you just pick up the whole piece of parchment paper and stick it in the oven to bake the pieces as directed on the clay package. When done, take them out, set aside, let them cool before you play!
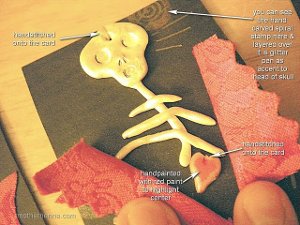
- Accent & deco your baked clay pieces: Once the clay pieces are baked and cooled, you'll find that even the thinnest parts stick together and are very easy to hold and work with as you paint or color them. For the skellie heads, I used the black and brown Micron pens because the points are so small and fine, and the ink is waterproof. I used the black to shade the eyesockets, nose, and mouth on each, and I used the brown to simulate the henna style decorations I often do on my sugar skulls.
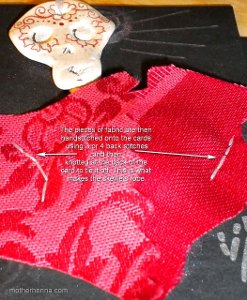
- Stitch clay pieces to paper + other accents: Then I take my needle and thread and hand stitched the skellie and the heart onto my cards. You can see that after I had the skellies stitched onto the card, then I could see exactly where they would hang. Then I could take a silver marker and do lines out from the head to accent it and do a layer over the shimmery spirals. Also after the hearts were stitched on, I felt they were not red enough. So I took my small, stiff bristled brush and painted red paint accent in heart shape over center of it. OPTIONAL: You can just let that paint dry OR if you are impatient, like me, I took out my heat gun and blasted it a bit. It makes an interesting burnish and texture of the paint and pigment on the clay heart.
- Stitch fabric pieces to the card: Then I grabbed my stack of fabric pieces and re-threaded my needle. You can play with placement of the fabric over your skellie and clay heart to see where you like it. You want it to give the impression of a robe the skellie is wearing. Once you figure out how you like them placed, then you just do 3 or 4 backstitches to attach each piece of fabric to the paper. Turn the card over and knot the stitch off at the back.
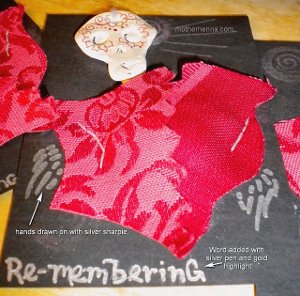
- Adding hands and word: Once the pieces are all stitched onto the paper, you can now see where it might look right to draw or paint on the bony hands of the skellie! I used a silver sharpie to draw the hands and also to writing the word "Re-Membering" on the bottom of the card. You could alternatively use that word space to writing name of the person you are remembering for Day of the Dead. I did add some accent to the word with a gold gel pen.
Read NextGame of Thrones mixed media Lamp