This project was submitted by one of our readers, just like you.
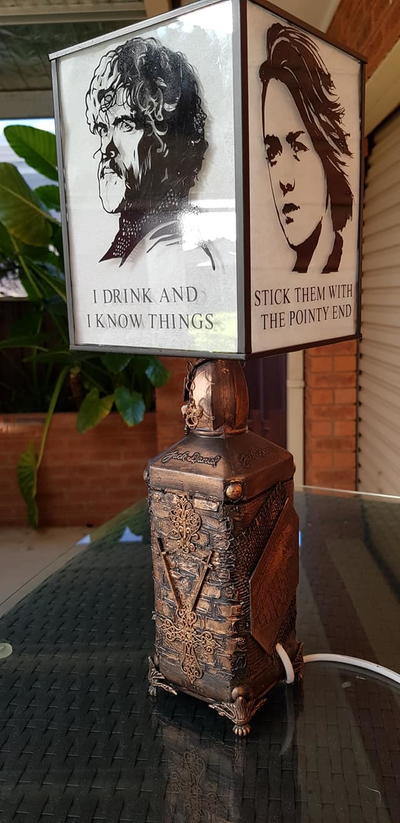
Game of Thrones mixed media Lamp
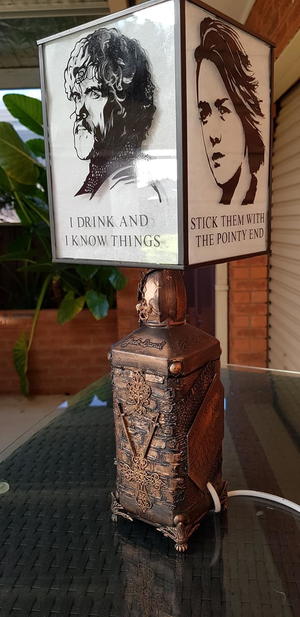
"I recently started decorating wine bottles using mixed media. They turned out so lovely I wanted to find a useful way to display them around the house. Because I am still new at mixed media I need a theme for a bottle or I battle to come up with ideas. being a big fan of Game of Thrones they were the most obvious choice for me. I used an old Jack Daniels bottle, a tealight candle box and a recycled light fitting. All the graphics were made using a Cricut."
Primary TechniqueMixed Media

Instructions
-
It is a good idea to cut the hole into the bottle first for the light fitting. I used a diamond-tipped hole cutter.
-
It is a good idea to cut the hole into the bottle first for the light fitting. I used a diamond-tipped hole cutter.
-
To add texture to the bottle I used stencils and texture paste. You can use any design it is just to add some character to the bottle. Tape the stencil to the bottle and spread a layer a texture paste over the stencil. Remover the stencil straight away and wash it. The texture paste does not need to look perfect, the imperfections make it more appealing once the bronze is added. Use a heat gun or hairdryer to speed up the drying time.
-
I went for a brick wall design because any fan of Game of Thrones would know what it means. I did change the design of this bottle a few times because some of my ideas looked good and others did not. But the joy of mixed media is that you can just cover it up with something else.
-
The 3D images were made using a Cricut and cardstock. Add the graphics into the design space (Cricut software) and repeat the design 6 times. Glue them all together to get the shape. Scuff up the edges with a nail file to remove the hard edges, it looks better.
-
I added a small piece of burlap to give added texture, you can use whatever you have at home. I had previously made some chess pieces out of epoxy resin. The king and queen were added as a 3D effect. I cut the pins off some tack to go on the corners. I used some bendable charms on the edges. The extra bits and bobs I added were broken jewellery and studs from my workshop. The more textures the better the outcome.
-
Once you are happy with everything you have glued on, added 2 coats of black Gesso. Using bronze wax paste, dip your finger in the paste and rub your finger over the surface of the black Gesso. Don't add bronze to all the nooks and crannies or the effect will be lost. To make the vinyl stand out more like the dragons and the night king you can cover the whole area with the bronze paste. The legs were ordered years ago from wish without checking the description and when they arrive they were tiny. But they worked great for this project. They were glue on using contact glue.
-
You can stop here and buy a lamp shape or you can make one like this. I used a tea light candle holder and recycled an old lamp fitting. I had to come up with a way to fit the lampshade to the bottle. I found this solar light in Kmart for $4 which worked perfectly. Fit the cord through the bottle. I got my electrician husband to wire the lamp up for me. I used the lid from the bottle and drilled a hole the size of the fitting and pushed the fitting into the lid. The basket for the solar light came with a rubber seal which fit perfectly over the bottle lid to hold it in place. All the graphics were made using a Cricut. To duplicate this lamp you can buy the graphics off Etsy and get one of the many crafters on Etsy to make them for you. I don't know why I didn't think this would happen when it should have been common sense. Once all the images were added it was a hot mess. All the images mashed up together.
-
I tried lining the glass with paper at first, but it blocked out too much light and could be a fire hazard. Then I came up with baking paper. My thinking was, if it can go in an oven it can withstand the low heat for the modern light bulbs. I cut the baking paper to size and fitting it into the gap between the glass and the frame. I also taped it inside for extra measure.
Read NextMixed Media Steampunk Heart


