Craft Lovers DIY Macrame Plant Hanger

Make a DIY macrame plant hanger with crafty embellishments! Wood buttons, spools, and flowers add cheery flair to your otherwise standard macrame hanging planter. Don't get caught up if you can't find the right color cord you're looking for. A plain white cord becomes vibrant pink with the help of spray paint! Color your wood shapes to match, and you have the tools at your disposal to put together this lovely project. There aren't too many knots on this hanger, making it a great macrame tutorial for beginners. Have fun and create a gorgeous new decoration to brighten up any home!
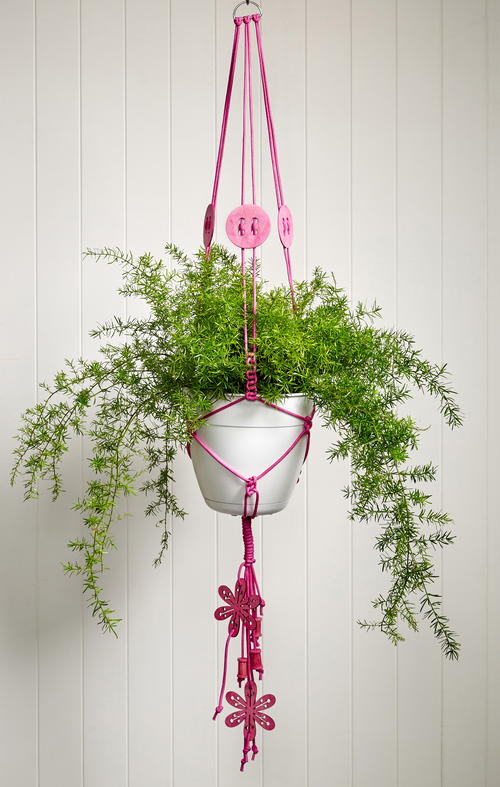
From the Company: 1970s macramé plant hanger gets a modern remake with custom colored cording and wood accessories.
Time to CompleteWeekend project
Primary TechniqueHome Decor

Project TypeMake a Project
Materials List
- Any Design Master color spray: TintIT.® Pinkolicious is shown here – 1
- White parachute cord – 32’
- D-Ring – 1
- Wood button cutout – 3
- Wood flower cutout – 2
- Wood spools 2 – 5
- Latex gloves
- Paper towel
- Lighter
- 8”x 8” Pot
- Plant
Instructions
-
Protect your hands with latex gloves. Gather all the cord into a wad and spray Pinkolicious TintIT closely, wetting the cord. Toss and turn the cord while spraying to completely color the cord. Run the cord through your fingers to straighten then let dry.
-
On the wood cutouts and spools spray TintIT close, wetting the whole surface. Quickly wipe the TintIT into the wood with a paper towel. This accentuates the wood grain. Let dry. If desired, lightly mist the items to darken the color. Let dry.
-
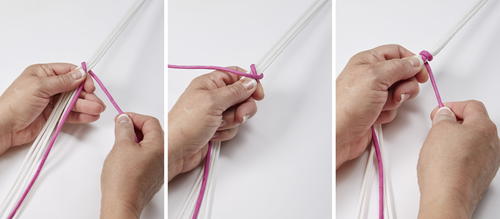
Cut 3 lengths of cord 10’ each. Reserve the remaining 2’ for tying off the hanger. Singe the cord ends with the lighter to prevent fraying.
-
Fold the 3 lengths in half and attach to the D-ring using a lark’s head knot. To make knotting easier, hang the D-ring.
-
Thread each button cutout thru one set of cords, place them approximately 12” from the D-ring.
-
About 5” down from the D-ring tie a series of 5 square knots on each set of cords. To make a square knot place the right end over the left, then the left end over the right.
Note: click the image(s) for larger versions. -
Gather 1 cord from each neighboring set and tie 2 square knots about 3” down from the previous knots. (If using a larger pot, adjust the distance from the previous knots to accommodate its size.)
-
Gather 2 cords back together from original sets and tie 2 square knots about 3” down from the previous knots.
-
To tie off the hanger gather all the cords about 3” down from the last knot. Using the reserved piece of cording, lay one end next to the tails of the hanger. Wrap the other/top end around all the gathered tails including the lower portion of the tying cord. Wrap the cord for about 3” or desired length. Secure by tying 2 half hitch knots to the bottom section of the wrapping cord.
-
Thread some of the cord tails with flower cutouts and spools. Tie overhand knots on all the ends at varying lengths then trim ends. Singe cut cords with a lighter.
-
Insert planted pot, hang and enjoy!


Have you tried macrame before? What did you make?