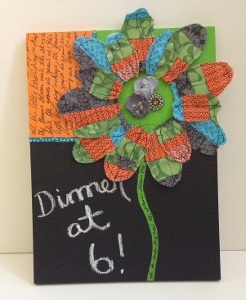
Fabric Scrap Chalkboard
 Visit Melony at Mel Designs.
Put your sewing room's scraps to good use with this Fabric Scrap Chalkboard. This piece of DIY home decor is as functional as it is adorable. With a little bit of chalkboard paint and a lot of creativity, you can achieve this precious patchwork look. The text on the top half of the chalkboard is totally up to you. Copy the lyrics to a favorite song or jot down a well-loved poem. Make your own chalkboard sign to write notes and reminders. Keep it in reach of the kids, and they can add pictures to this cute blackboard.
You can find this project, as well as many other fabulous blogger projects, in our new eBook, The Best Blogger Craft Ideas 2014: Decoupage, Sewing, Jewelry Making, and More free eBook. Download your own free copy today!

Materials:
- Darice adhesive rhinestone sheet
- Amplify scissors
- Aleene's Tacky Glue
- Folk Art Acrylic Paints in Vivid Orange, Lime Green, and Chalkboard
- Sizzix Bigz flower petal die cut
- Walnut Hollow Basswood Silhouette Circle
- Coordinating fabric scraps in 4 patterns and colors
- Thread
- Ruler
- Sandpaper
- Lint free cloth
- Paint brushes
- Iron
- Assorted embellisments
- Black fine point marker
- Pencil
- 6" sqaure of recycled chipboard
Instructions:
- Lightly sand the plaque and wipe with lint free cloth.
- Use the ruler and pencil to measure and trace horizontal line 7 1/4" down from the top of the plaque. From the top of the plaque, measure and trace 3 1/2" from left side. Use the pencil to draw a vertical line.
- Follow manufacturer's instructions to paint bottom of plaque with chalkboard paint. Paint left side of the plaque Vivid Orange. Paint the right side and chipboard square Lime Green.
- Cut nine 2 1/2" x 4" strips from each of the fabrics. Press and pin right sides together, creating nine different patchwork pieces. Sew seams and steam open with iron.
- Place each piece on the die cut, covering the petal shapes. You should have 9 large petals and 9 small petals. Use the sewing machine and thread to outline each of the petal shapes, sewing a straight stitch 1/4" from the edge.
- Arrange the petals around the circle on the board. Glue in place, keeping large petals on bottom and small petals on top. Let dry.
- Glue chipboard to back of canvas.
- Place assorted embellishments in center of chipboard and glue in place.
- Paint stem under flower. Use a black marker to write script on Vivid Orange and on stem.
- Adhere gems as shown.
Read NextDIY Lazy Susan