Decoupaged Canister Set
These canisters were purchased at the thrift store for $3 and given a new life by decoupaging them with fabulous paper. Spray paint completes the trash into treasure redo.
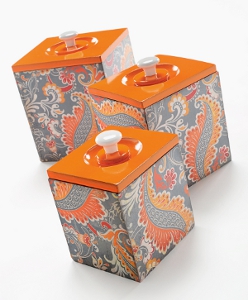
Materials:
- Wooden canisters
- Mod Podge Matte
- Scrapbook paper, 3 to 4 sheets – I used the Basic Grey Ambrosia Collection
- Orange spray paint
- Ceramic knobs, 3
- Gray ink pad
- Cosmetic wedge
- Epoxy
- Sandpaper
- Mod Podge Clear Acrylic Sealer – Gloss (optional)
Instructions:
- Remove any original embellishments from canisters. Sand smooth.
- Trace your containers onto the backs of the scrapbook paper and cut out. Set these pieces aside.
- Spray the top of each canister with orange spray paint.
- Use scrapbook paper to cover the entire base of each canister, adhering with Mod Podge while smoothing out any air bubbles with your hands. Allow to dry.
- Use sandpaper to sand off excess paper until smooth; sand downward in one direction to prevent the paper from lifting or tearing.
- Use the cosmetic wedge and dab onto the gray ink pad, then distress the edges of each canister until desired look is achieved.
- Apply two coats of Mod Podge to each canister. When applying the coats, go in one direction then the other and let dry 15 – 20 minutes between coats. Allow to dry between coats.
- Attach knobs to each canister lid with epoxy.
- If desired, seal canisters with Mod Podge Clear Acrylic Sealer.
Find this and 11 other great decoupage crafts in our FREE "Quick and Easy Decoupage" eBook.
Read NextFun n' Colorful Glass Canisters
quanahs 5032097
Mar 07, 2016
Pretty canisters, I could imagine using the same technique in the bathroom for storage around the sink. Just make sure your final finish is waterproof to protect the paper from splatters. Or perhaps a dresser set is more to your liking.
Report Inappropriate Comment
Are you sure you would like to report this comment? It will be flagged for our moderators to take action.
Thank you for taking the time to improve the content on our site.


