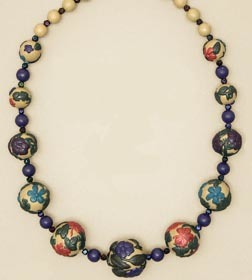
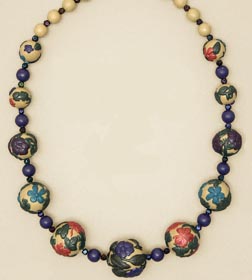
Filigree Overlay Bead Necklace & Earrings
Simple rounds beads are adorned with flowers and leaves, with no painting skills required!
By Sue Lee for AMACO
Materials
- FIMO® Polymer Clay, Colors of choice (Sahara was used for the large beads and Plum for the small beads in this project)
- FIMO® Decorating Gel
- Release Agent
- Spacer Beads
- AMACO® Tools: Pasta Machine
- Bead Roller – Large Round
- Professional Bead Roller – Set 8
- Round/Oval Bead Roller
- Bead Piercing Pins
- Bead Baking Rack
- PolyBlade
- Molds – Small or Tiny Flower and Leaf
Steps:
- For rolling beads that will be overlaid with filigree, measure conditioned clay according to the instructions with the Bead Roller. After rolling the beads, pierce them using the bead piercing pins included with the Bead Baking Rack and bake according to FIMO® package instructions. Allow to cool completely. Apply a very thin layer of FIMO® Decorating Gel around the bead, place onto bead piercing pins, and suspend on Bead Baking Rack. The gel will help adhere the filigree elements to the bead, and yet is nearly invisible after curing.
- To create the flowers and leaves, start with plenty of clay, press into the mold, then shave off the extra clay from the mold with the PolyBlade. To remove flowers and leaves from mold, use a small amount of scrap clay as a ‘handle’ to lift the molded flower or leaf out of the mold. Use the PolyBlade to carefully slice a thin piece of the embossed clay to lay across each bead. The blade can help you place the filigree onto the beads. Hold the bead by the pin it is suspended on, and handle the filigree with the blade.
- Place the decorated beads back in the oven on the Bead Baking Rack for an additional 20 to 30 minutes to cure the flowers and leaves and allow the FIMO® Decorating Gel to permanently adhere them to the bead.
- String the necklace and earrings with the clay beads on wire, string or fish line and incorporate spacer beads as shown in the photo or use your own design for bead arrangement.
Read NextHow to Make Shrink Plastic Jewelry

