Mosaic Beaded Bracelet
You will be surprised how easy it is to make these mosaic beads with step by step pictures from AMACO.

Materials:
- One 2 oz. block of each color FIMO soft polymer clay: plum, mandarin, metallic red
- 4 gold tone 2" eye pins
- 5 gold tone 1" eye pins
- One gold tone 12 mm lobster clasp
- Gold tone jump rings: (1) 3/16", (1) 1/4"
- 10 orange e-beads
- 10" Beadalon .015 bead stringing wire
- 2 gold tone crimp tubes
Tools:
- Work Surface (granite, marble or glazed ceramic tile recommended)
- AMACO polymer clay and craft oven
- AMACO pasta machine
- AMACO PolyBlade
- Crimp pliers
- Round nose pliers
- Wire clippers
- AMACO Set #7 bead rollers with bead piercing pins
- AMACO professional bead baking rack
- Oven thermometer
- Oven mitts
- Ruler (optional)
Steps:
- Measure clay for bead roller: Preheat your oven and use an oven thermometer to check correct temperature. Condition the plum clay. Roll it into a 5/8" thick snake and press it into the larger section of the bottom half of the bead roller. Keep pressing until the clay fills the groove and is flush with the top of the bead roller Trim off excess clay so that it is level with top surface of the bead roller groove. Remove the clay gently from the bead roller and place flat side down on your work surface.
- Mark your clay: Use the ridged ruler on the side of the bead roller to make measurement imprints in the clay. Cut four 5/8" slices. Roll each slice into an oval (photo #1- slice sections).
- Roll beads: Lay one oval into the larger bead groove. Snap the top of the bead roller in place. Roll the bead until it is oblong (photo #2- roll beads). Repeat with the three ovals of plum clay. Insert one oblong bead back into the bead roller, align it with the bead piercing hole, set the top of the bead roller in place, and pierce the bead with a bead piercing pin. Repeat for the other three plum beads.
- Prepare red and mandarin clays: Condition 1/4 of a block each of the metallic red and mandarin clays. Roll the red clay into a sheet on the fifth thickest setting on the Amaco pasta machine. Repeat this step for the mandarin clay (photo #3- roll sheets).
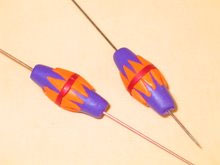
- Add red stripes: Trim the edges of the red clay sheet so that they are straight. Cut a 1/16" wide strip of red clay. Carefully wrap this strip around the raised center line of one of the plum oblong beads. Trim excess clay, and blend the seam with your fingertip. Repeat forming the center red stripe on the other three plum beads (photo #4-add red stripe).

- Add mandarin triangles: Trim the edges of the mandarin clay sheet so that they are straight. Cut a 1/4" wide strip of mandarin clay. Cut the strip into isosceles triangles that are 1/4" tall and approximately1/8" wide. Place the triangles on the plum bead, facing outwards from the red center line, with the flat edge on the red line and the points facing out toward the ends of the base bead. Place triangles next to each other with no space in between until you have gone all the way around the bead. Repeat this process on the other side of the red center line. Add the mandarin triangles to the other three plum beads (photo #5- add triangles).
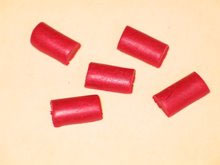
- Roll red beads: Repeat steps 1-3 to make five metallic red round beads. For the round beads, make sure to measure your clay in the smaller round groove of the bottom half of the bead roller. Roll the snakes so that they are 1/4" thick to press into the groove (photo #6- measure clay). You should end up with five red round beads pierced with pins.
- Bake beads: Place all nine of the bracelet beads in the bead baking rack. Bake for 30 minutes at 265 degrees (F), and then cool completely.
- String bracelet: Take the 3/16" jump ring and open it by bending ends away from each other perpendicular to the loop. Hook the loop of the clasp onto the jump ring, and close the jump ring. Slide a crimp tube onto one end of the bead stringing wire. Slide the wire through the jump ring attached to the clasp, and then back through the crimp tube. Pull the wire loop to 1/16", crimp the tube in place with the crimp pliers, and trim the excess wire. Start beading the bracelet with and orange e-bead, then a red round clay bead, an orange e-bead, and an oblong plum bead. Repeat this pattern until you have used all five red round beads and all four of the plum oblong beads (alternating all the way around with e-beads in between). Finish the pattern with an orange e-bead. Slide on the second crimp tube. Close the 1/4" jump ring with pliers. Slide the end of the beading wire through this jump ring and then back through the crimp tube. Pull the end of the wire to remove space between beads (leave a little for movement in the bracelet), and form a 1/16" loop around the jump ring. Crimp the tube in place. Trim the excess wire. Your bracelet is complete. You can adjust the length of the bracelet by adding and subtracting e-beads or clay beads. (photo #7-finished bracelet)
Read NextQuilled Bird Necklace
Your Recently Viewed Projects

Thanks for your comment. Don't forget to share!
nangy
Feb 03, 2011
CUTE!! Love the colors,and I think on my next sleepover with the grands we will pull out our stash of polymer clay and make some beads!!
Report Inappropriate Comment
Are you sure you would like to report this comment? It will be flagged for our moderators to take action.
Thank you for taking the time to improve the content on our site.