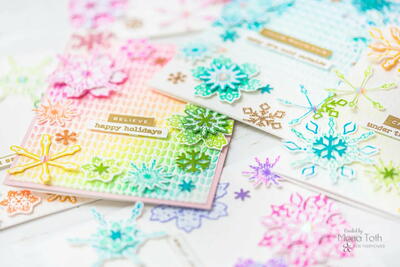
Seasonal Snowflake Holiday Cards

Spruce up your holiday greetings this winter with these decorative and festive Seasonal Snowflake Holiday Cards! Using the Baby It’s Cold Outside StampnFoil Collection called for in the instructions, your holiday cards will surely be merry and bright. No two snowflakes are alike. Why should your holiday cards look the same as everyone else’s too? This craft promotes creativity through colorful and shiny decor. Get your friends and family together for a cozy night in making holiday cards, or surprise your loved ones with a special Seasonal Snowflake Holiday Card that you made just for them!
Be sure to check out the Fabulous Therm O Web Holiday Crafting Supply Giveaway as part of our Christmas in July celebration! You'll also want to enter to win the Christmas in July Sleigh of Prizes!
Type of Paper UsedCardstock
SeasonWinter
HolidayChristmas, Winter
Materials List
- White A2-sized card base (4.25”x5.5”)
- White cardstock, 110lb
- Gina K. Designs Baby It’s Cold Outside StampnFoil Products: Clear Stamps, Dies
- Gina K. Designs Electro-Pop Neon Ink Pads
- Gina K. Designs White Glitz Glitter Gel
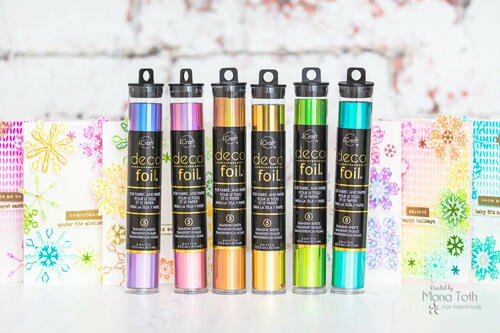
- Deco Foil Fairytale Foils Transfer Sheets: Enchanted Rose, Peach Princess, Lily Pad, Glass Slipper, Prince Periwinkle
- Deco Foil Foam Adhesive Sheets
- Deco Foil Stencil Pal
- iCraft Pixie Tape
- iCraft Adhesives: UltraBond Liquid Glue, 3D White Foam Tape (1/16”), XL Tape Runner · Paper Rose Cable Knit Stencil
- Paper Rose Cable Knit Stencil
- Tiny iridescent gems or sequins
- Lawn Fawn Mini Snowflakes Dies
- Christmas Wordfetti Stamp Set
- Clear embossing ink pad
- Detail embossing powder: white, gold
- Heat tool
- Manual die-cutting machine
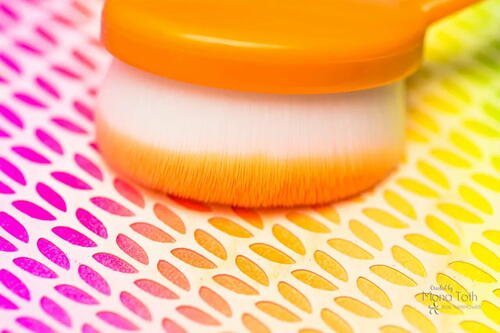
- Blending brushes
Directions
-
Cut a 6”x6” piece of white cardstock. Tape stencil to cardstock with removable Pixie Tape. Dry emboss cable knit pattern onto cardstock by running it through a die-cutting machine.
-
Leaving tape in place, partially ink blend a rainbow of Electro-Pop Neon Inks across stencil openings. Let dry, leaving tape in place.
-
Using the Stencil Pal, spread a layer of Gina K. Designs White Glitz Glitter Gel evenly across stencil openings. Return excess to jar; wipe rim and close tightly. Remove tape and carefully remove stencil; let dry completely. Wash tools immediately in warm, soapy water.
-
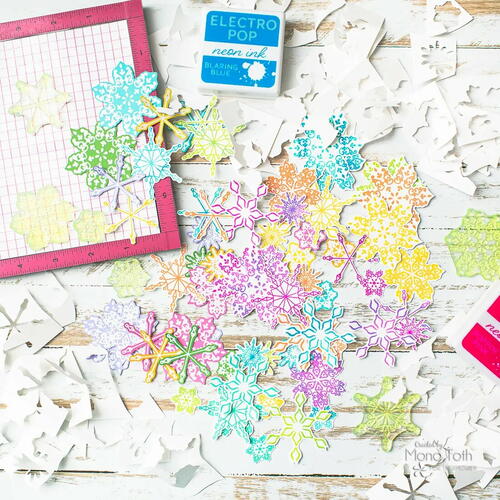
Use matching inks to stamp a variety of Baby It’s Cold Outside snowflakes. Tip: For reverse snowflakes, ink blend cardstock scraps and then stamp snowflakes with clear embossing ink; heat emboss with white embossing powder. Die cut snowflakes or fussy cut, as desired; set aside.
-
For foiled snowflakes, die cut Lawn Fawn Mini Snowflake shapes from Deco Foil Foam Adhesive Sheets. Peel top liner from shape and place, sticky side down, onto dull back side of foil sheets. Turn over and burnish well with fingertips; do not use fingernails or any type of tool. Gently peel foam snowflakes from foil sheet and set aside; do not remove back liner yet.
-
Stamp sentiment onto white cardstock with clear embossing ink; heat emboss with gold embossing powder. Fussy cut sentiment strips.
-
Trim stenciled panel to 4”x5.25” and adhere to card front. Using photo as guide, adhere stamped snowflakes and sentiment to card with liquid glue or tape runner. Use 3D Foam Tape to add dimension behind some snowflakes.
-
Peel back liner from mini snowflakes and stick directly to card front or centers of larger stamped snowflakes.
-
Add tiny gems or sequins here and there using UltraBond Liquid Glue.


Read NextSuper Dad Father's Day Card