Hi Friend Card
Here is an “out of the pillowbox” way of using the Fiskars Fuse Creativity System® Large Design Sets for something other than a box! This letterpressed "Hi Friend" card is great for any occasion, and it's a fun way to send a nice greeting to a friend! Made with a variety of colorful papers and embellishments, this cute card is sure to brighten anyone's day!

You can find this project, as well as many others, in our free downloadable eBook, Fuse Creativity System Project Guide: Fun Party Themes, Ideas for Handmade Cards, and More Paper Crafts from Fiskars!

Materials:
- Fuse Creativity System® Starter Set
- Large Expansion Pack 101040 - Pillowbox
- Alphabet stickers – American Crafts and October Afternoon
- Cardstock – Bazzill
- Decorative brad – American Crafts
- Ink – Colorbox
- Patterned paper – Echo Park
Instructions:
-
Trim cardstock to 4” x 12”. Fold it in half so the dimension of your card is 4” x 6”.
-
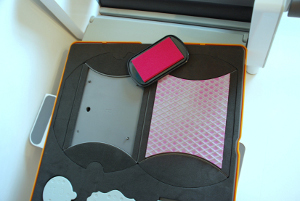
Apply your desired ink color to the letterpress plate on the Pillowbox Design Set.

-
Place the folded edge of your card just outside the letterpress plate area, face down. Pass the cardstock through the Fuse.
-
Choose three different, yet coordinating, patterned papers and trim them to 3” x 12”. Place all three pieces over the embellishment tags on the Pillowbox Design Set and pass the patterned paper through the Fuse. Choose one of each tag design to use on this card.

-
Trim two coordinating patterned paper pieces to 4” x 6”. Glue one piece of patterned paper to the back of the cardstock base and the other patterned paper to the inside back flap of the cardstock base.
-
Using the Flower Mini Design Set, ink the letterpress plate and cut a flower to embellish the front of your card. Place a large fabric brad in the center of the flower.
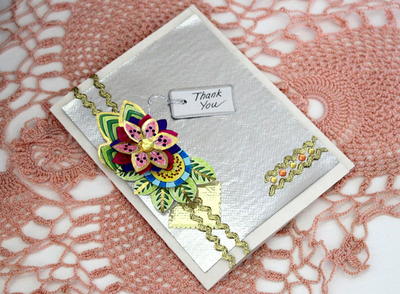
- Arrange the three tag embellishments and adhere them to the front of the card. Add the cardstock flower as shown in the photo. Finally, add a sentiment to the card using alphabet stickers.
Read NextFoiled Butterfly Notecards