This project was submitted by one of our readers, just like you.
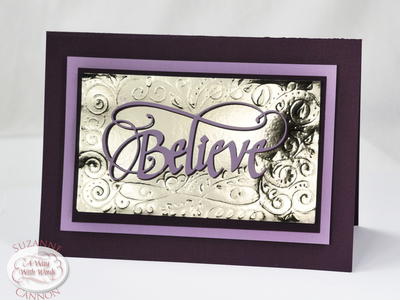
Believe Flourished Homemade Card

Believe Flourished Homemade Card
In the Designer's Words: "This one word can mean so much. The special person who receives this card will think of you and smile every time the reflected shimmer catches their eye. Have fun with your flourishing - it's your special personal embellishment!"
Handmade cards are a brilliant way to cheer up a friend! If you have a buddy who needs a little pick-me-up or some encouragement as they embark into a new phase of their life, learn how to make cards like the Believe Flourished Homemade Card. This gold card is embellished beautifully, instantly brightening up anybody’s day. Once you have created this card, you can fill it with a special note or sentiment for your friend. If you want to be extra inspirational, you could even transcribe your favorite quote onto the DIY card, encouraging the receiver to reach for the stars.
Estimated Cost$11-$20
Time to CompleteIn an evening
Primary TechniqueGeneral Paper Crafting
Project or Page SizeCard
Type of Paper UsedCardstock

Materials List
- Elizabeth Craft Designs Believe die
- Core’dinations cardstock: Purple Grandeur and Wisteria
- Thermoweb iCraft Deco Foil Transfer Gold
- Thermoweb iCraft Easy-Cut Adhesive
- Thermoweb 3D Foam Squares
- Glue Dots
- Ball Stylus
- Smooth Cardstock
- Diecutting machine
- Mouse pad or flower-shaping foam pad
Instructions
-
Form a 7.5 x 5.5” card base from dark purple cardstock. Cut one panel measuring 6.5 x 4.25” from light purple and one panel measuring 6 x 3.75” from dark cardstock.
-
Die cut one Believe from dark and one from light cardstock. Adhere them together, using Glue Dots, with the light coloured diecut on top and the dark diecut slightly offset behind so it appears as a drop shadow.
-
Cut a panel of smooth cardstock measuring approximately 6 x 3.5”. Cut a piece of Easy-Cut adhesive to 5.75 x 3.5”. Remove one side of the release paper and adhere it to the smooth panel. Run this through your diecutting machine for even adhesion.
-
Remove remaining release paper and lay foil, gold side up, over the whole adhesive surface. Place this panel inside a folded sheet of copier paper to protect it and run it through your die cutting machine again. Trim to 5.75 x 3.25”.
-
Adhere Believe into the middle of the foiled panel using Glue Dots.
-
Place foiled Believe panel onto the foam pad and use your stylus to emboss the surface by pressing firmly. Draw flourishing designs and leaves and dots around the diecut.
-
Assemble panels as shown in the photo using foam adhesive.

Read Next64 Handmade Cards for Every Occasion