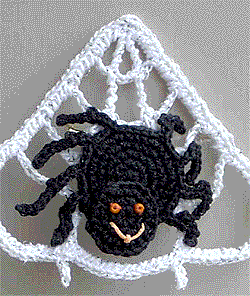
Spider Web Crochet Pin
Crochet a spooky spider sitting on a web for the perfect Halloween pin. This Halloween crochet spider even has a smiling face made with orange beads. This is a sweet and cute way to liven up everything from a jacket to a hat. You could also give away these cute crocheted pins to a few special trick-or-treaters!

Materials:
- Crochet cotton size 20: Small amounts each black (A) and white (B)
- Kreinik Blending Filament (55 yd per spool): 1 spool each black #005 (BFA) and silver #001HL (BFB)
- Kreinik Medium (#16) braid (11 yd per spool): 1 spool tangerine #051F (C)
- Size 9 steel crochet hook or size needed to obtain gauge
- 2 small orange seed beads
- 1-inch long pin back
- Sewing needle and orange sewing thread and white sewing thread
- Embroidery needle
- Tapestry needle
- Spray starch
Gauge: Rnds 1 - 3 = 5/8 inch. Check gauge to save time.
Pattern Stitch:
- Sl st dec: Draw up a lp in next ch, sk next ch, draw up a lp in next ch, yo, draw through all 3 lps on hook.
Instructions:
Size: 3-1/2" wide x 2=1/2" long
Join rnds with a sl st unless otherwise stated.
Head
Back
Do not join rnds unless otherwise stated. Mark first st of each rnd with safety pin or other small marker.
- Rnd 1 (RS): With 1 strand A and 1 strand BFA held together, ch 2, 7 sc in 2nd ch from hook. (7 sc)
- Rnd 2: 2 sc in each sc around. (14 sc)
- Rnd 3: [Sc in next sc, 2 sc in next sc] rep around, join in beg sc, fasten off. (21 sc)
Front
- Rnds 1-3: Rep Rnds 1-3 of Back; at end of Rnd 3, do not fasten off.
- With sewing needle and orange sewing thread, using photo for a guide, sew 2 beads to Front for eyes. With embroidery needle and C, embroider mouth beneath eyes.
Join Back and Front
- Holding Front and Back with WS together, working through boththicknesses at once, sl st around, join in beg sl st, fasten off.
Body
Back
- Rnds 1-3: Rep Rnds 1-3 of Back for Head, at end of Rnd 3, do not join in beg sc, do not fasten off.
- Rnd 4: [2 sc in next sc, sc in each of next 2 sc] rep around. (28 sc)
- Rnd 5: [Sc in each of next 3 sc, 2 sc in next sc] rep around, join in beg sc, fasten off. (35 sc)
Front
- Rnds 1-5: Rep Rnds 1-5 of Back; do not fasten off at end of Rnd 5.
Join Back and Front
- Holding Back and Front with WS tog, working through both thicknesses at once, sl st in first st, *ch 8, sl st in 2nd ch from hook, sl st in each of next 2 chs, [sl st, ch 1, sl st] in next ch, sl st in each of next 3 chs (leg worked)*, [sl st in each of next 3 sc, ch 10, sl st in 2nd ch from hook, sl st in each of next 3 chs, {sl st, ch 1, sl st} in next ch, sl st in each of next 4 chs] twice (two legs worked), sl st in each of next 3 sc, rep from * to *, sl st in each of next 6 sc, **ch 8, sl st in 2nd ch from hook, sl st in next ch, sl st dec, sl st in each of next 2 chs (leg worked)**, [sl st in each of next 3 sc, ch 10, sl st in 2nd ch from hook, sl st in each of next 2 chs, sl st dec, sl st in each of next 3 chs] twice, sl st in each of next 3 sc, rep from ** to **, sl st in each of next 10 sc (opening for head worked), join in beg sl st, fasten off.
- With tapestry needle and A, using photo as a guide, tack head to body at opening for head so that front half of head extends over edge of body.
Web
- Row 1: With 1 strand B and 1 strand BFB held together, ch 1 (center ch), ch 6 more (counts as first tr, ch-2), [{dtr, ch 2} twice, tr] in center ch, turn. (3 ch-2 sps)
- Row 2: Ch 9 (counts as first tr, ch-5), dtr in next dtr, ch 4, dtr in next dtr, ch 5, tr in 4th ch of turning ch-6, turn.
- Row 3: Ch 12 (counts as first tr, ch-8), dtr in next dtr, ch 7, dtr in next dtr, ch 8, tr in 4th ch of turning ch-9, turn.
- Row 4: Ch 15 (counts as first tr, ch-11), dtr in next dtr, ch 10, dtr in next dtr, ch 11, tr in 4th ch of turning ch-12, turn.
- Row 5: Ch 18 (counts as first tr, ch-14), dtr in next dtr, ch 13, dtr in next dtr, ch 14, tr in 4th ch of turning ch-15, do not turn.
- Rnd 6: Ch 4, sl st in 2nd ch from hook, sl st in each of next 2 chs; working over ends of rows, sc in top of last tr worked, 4 sc over side of same st, *[5 sc over side of end st of next row] 4 times*, [sc, dc, sc] in rem lp of center ch, rep from * to *, 4 sc in turning ch-18 sp, **ch 4, sl st in 2nd ch from hook, sl st in each of next 2 chs**, 14 sc in same turning ch-18 sp, sc in next dtr, rep from ** to **, 13 sc in next sp, sc in next dtr, rep from ** to **, 14 sc in next sp, join in first sc, fasten off.
- Steam press web lightly. Using photo as a guide, place spider on web. With sewing needle and white thread, tack back of spider's body to web at several points. Tack each of spider's legs to web at any one point where leg touches web, taking care not to come through to RS. Sew pin back to back of spider. Spray spider and web with spray starch.
Find this project and more in 9 Beginner Crochet Patterns for Halloween.
Your Recently Viewed Projects

Thanks for your comment. Don't forget to share!
Spider Chick
Jun 04, 2012
This is quite cute and I appreciate the effort that went into it However I wanted to let you know that spiders legs are attached to the front portion of their bodies- what you would consider the head The back bigger round section of a spider is her abdomen Attaching the legs there would be kind of like if people had arms sticking out of our bellies I know that lots and lots of Halloween decorations have spiders the way you made yours and I know many people would never notice or care But I am a spider ecologist I do spider education in classrooms and I feel it is important to teach kids real science not just cartoon versions of things It would probably be quite simple to change this project to be more anatomically correct If you just instead attach the legs to that front portion with the face…Read More then you're all set I know I seem like a stickler but I figure that once people know how something should be it is not too hard to do it correctly
alixoxo
Sep 03, 2011
Just a heads up... there is someone on Etsy selling this same pattern for $10 http://www.etsy.com/listing/79902555/halloween-spider-on-spider-web-crochet I dont believe she is the person this pattern is accredited to, and she has been doing the same to a number of other individuals.
Report Inappropriate Comment
Are you sure you would like to report this comment? It will be flagged for our moderators to take action.
Thank you for taking the time to improve the content on our site.