This project was submitted by one of our readers, just like you.
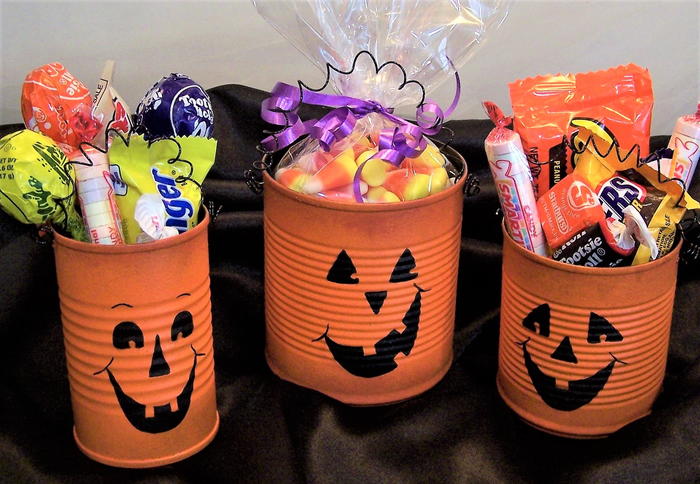
Uncanny Pumpkin Treat Holders
Decorating tin cans for Halloween has never been easier or more fun.

Uncanny Pumpkin Treat Holders
From the Designer: "Use recylced tin cans to make adorable treat holders for your Halloween party! You don't need to be a great painter to make these fun favors. This project uses just three colors of multi-surface paints which require no primer or sealer. You may already have the paint brushes, tools, and wire on hand. This project would make a great mom and me paint night! Use the patterns supplied to make the faces or free-hand your own jack-o-lantern faces!"
Primary TechniquePainting

SeasonFall
HolidayHalloween
Project TypeMake a Project
Materials List
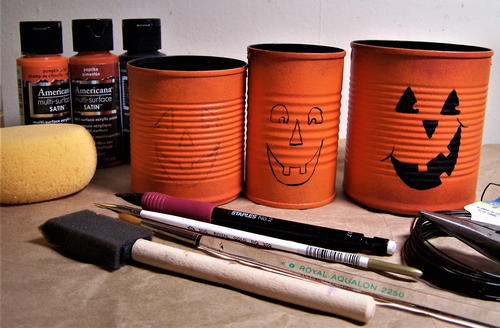
- DecoArt Multi-Surface Paints: Black Tie, Pumpkin Patch, Paprika
- Royal Brushes: Pottery Sponge (Item #R2005) Soft Grip Liner Brush 5/0 (#SG595), Soft Grip Round Brush #3(SG250, 1" foam brush
- foam plate or palette paper
- black craft wire and wire cutter/pliers
- transfer paper (graphite paper)
-
electric drill
-
pencil and white eraser
- painter's tape or masking tape
- Optional: blow drier, hand sanitizer or rubbing alcohol
Instructions
-
Remove labels and glue from cans and wash thoroughly. Run the empty can through the can opener several times to smooth any rough metal edges. Drill two holes in each can near the upper edge for the wires.
-
Use the foam brush and Black Tie to base the insides on all cans. Use a stippling or pouncing motion for best coverage. Repeat until opaque.
-
Dampen the pottery sponge slightly with water. Load the sponge with Pumpkin Patch and stipple or pounce the color onto the outsides of the cans. Pat a clean area of the sponge over the wet paint to smooth the paint. Let dry then repeat until opaque.
-
(Optional) Load the sponge with Pumpkin Patch then load one edge with Paprika. Tap the sponge on your palette to blend the colors where they meet. Tap the sponge lightly at the top and bottom edges of the cans to shade them. Let the cans dry thoroughly before going to the next step. You can speed up drying time with a blow dryer.
-
Painting Tip: It is best to allow paint to dry several hours or overnight before transferring a pattern or free handing the designs with a pencil.
-
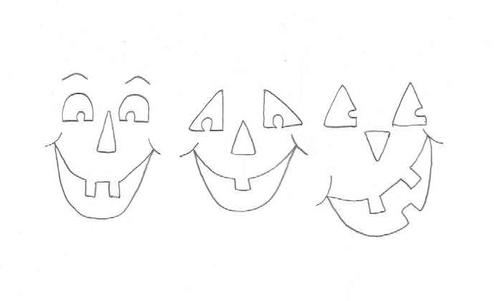
Patterns: Use a copier to reduce or enlarge the patterns as needed to fit your cans. Make a tracing of the patterns. Center the pattern over the front of the can and affix with painter’s tape on one edge. Slip the transfer paper under the pattern and use the stylus to trace over the lines lightly to transfer the bandages to the can. Lift the pattern and transfer paper to be sure all lines were transferred. Remove the pattern and erase any unwanted graphite marks.
Note: click image for larger version. -
Use the liner brush and Black Tie to outline the faces. Use the round brush to fill in the areas. Repeat until opaque. Use a wet paintbrush to remove any mistakes immediate. Use rubbing alcohol or hand sanitizer to remover stubborn, dried paint.
-
Erase any graphite lines not covered by paint.
-
Cut 3 lengths of wire at least 12” each. Wrap wires around a paintbrush handle leaving 2” at either end to fit through the holes in the cans. Insert ends into holes from the inside of the cans then carefully curl ends.
-
Fill with wrapped treats for your guests to enjoy!
Why You'll Love This Recycled Craft
Are you looking for a fun and easy craft project to get into the Halloween spirit? Look no further than the Uncanny Pumpkin Treat Holders! Here are the top 3 reasons why you should give this project a try:
1. Eco-Friendly: This craft project encourages you to upcycle tin cans, giving them a new life as adorable treat holders. Not only does this project help reduce waste, but it also allows you to get creative with materials you already have on hand. Plus, you'll feel good knowing that you're contributing to a more sustainable lifestyle by repurposing items that would otherwise end up in the trash.
2. Beginner-Friendly: Don't consider yourself a great painter? No worries! This project is perfect for crafters of all skill levels, as it only requires three colors of multi-surface paints that don't need a primer or sealer. Using the provided patterns or free-handing your own jack-o-lantern faces allows for personalization and creativity without the pressure of being a professional artist. This project is a great way to get in touch with your inner artist and have a blast in the process!
3. Family Fun: Looking for a fun activity to do with your kids this Halloween season? The Uncanny Pumpkin Treat Holders project is perfect for a mom and me paint night! Get the whole family involved in creating these adorable treats holders, and bond over a shared love for arts and crafts. This project is a fantastic way to spend quality time with loved ones while making memories that will last a lifetime.