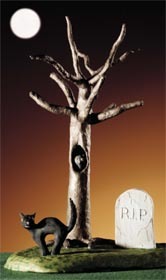
Halloween Scene
Create and display a spooky Halloween scene made from PlasterForm, Diamond Mesh and Rub n Buff paints. The scary scene from AMACO can be inside or outside of your home.

Materials:
- 1 Box of Marblex™
- 1 Mini Pack of WIREFORM® Diamond Mesh
- 1 Roll of PlasterForm®
- Rub n’ Buff®:
- Ebony
- Antique White
- Spanish Copper
- Olive Gold
- Emerald
- Chinese Red
- Gold Leaf
- Pewter
- Craft Knife
- Glue
- Cardboard
- Scissors
- Small Round Paint Brush
Steps:
- Cut WireForm® with scissors to about 31/2" x 8". Roll into a tube and fasten by making a folded seam (see diagram A).
- Cut one end of the tube from the bottom upward about 11/2" four or five times. Roll the flanges into “roots” and bend to desired shape (see diagram B).
- Cut the other end of the tube downward about 3" four or five times. Roll these flanges into “limbs” and bend into desired shape (see diagram C). Limbs can be made to fork by cutting from the end in two places and rolling into separate limbs.
- Roll another tube from a 31/4" x 6" piece of WireForm® and fasten with a folded seam as before.
- Cut from the top downward about 3" four or five times, and roll these flanges into “limbs.” Insert uncut bottom of this tube into the top of the base tube and crimp the wire together (see diagram D).
- Secure with moist strips of PlasterForm®. Allow to dry until sturdy and then wrap entire tree with moist strips of PlasterForm® and let dry.
- Cut a hole in the trunk of the tree with scissors or a craft knife and roll the rough edges inward.
- Apply Rub n’ Buff® (Spanish Copper) straight from the tube and spread with a paint brush to cover the entire tree. Let dry for 20 minutes.
- Press the Marblex™ on a flat section of cardboard and create a large kidney shaped base (see diagram E) about 3/4" thick.
- Press the roots of the tree into the base while the clay is still wet also filling the cavity of the tree with wet clay until it fills the tree to within 1/2" of the opening (make sure the clay is smooth and flat to create a seat for the owl).
- Sculpt the owl, cat and headstone from Marblex™. Press the cat and headstone to the base. Set the owl aside and let everything dry overnight. NOTE: The base may dry slower than the cat and headstone causing them to break free from the base – if so, just glue them back in place. If any cracks develop after drying, soften a small amount of Marblex™ and press into the crack and smooth with finger. Allow to dry completely before decorating.
- The cardboard will absorb moisture from the clay base. Replace the moist cardboard with a fresh dry piece to ensure complete dryness.
- Cover entire base with Olive Gold Rub n’ Buff®. Decorate the cat with Ebony Rub n’ Buff® and the owl with Pewter Rub n’ Buff® and let dry.
- Accent the eyes and beak of the owl with Gold Leaf Rub n’ Buff® and glue it to the base inside the tree. Accent the eyes of the cat with Gold Leaf Rub n’ Buff® and mix Chinese Red and Antique White Rub n’ Buff® to create a pink color for the nose and mouth. Use Emerald Rub n’ Buff® to give the base an irregular grassy appearance.