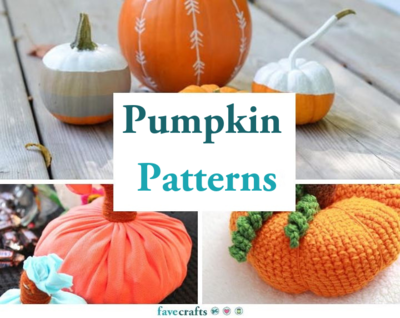
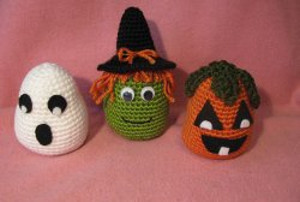
Easy Halloween Crochet Trio
This adorable trio is definitely the next crochet project you should make. These are such easy crochet patterns perfect for Halloween. They're spook-tacular. Create an Easy Halloween Crochet Trio for some instant holiday delight. This free crochet pattern is great for beginners and will help you create adorable Halloween decorations that you will enjoy as much as your kids. The only free Halloween crochet pattern you need is right here with these three little buddies.

Materials:
- Red Heart Soft – Tangerine (For Pumpkin & Witch)
- Red Heart Soft – Dark Leaf (For Pumpkin Leaves)
- Red Heart Soft – White (For Ghost)
- Red Heart Soft – Guacamole (For Witch)
- Red Heart Soft – Black (For Witch)
- Size US-F/3.75mm Crochet Hook
- Black Felt (Small Amount)
- White Felt (Small Amount)
- Aleene’s Tacky Glue
- 15mm Wiggle Eyes (For Witch)
- Polyester Fiberfill
- Blunt darning needle
- Black Embroidery Floss
- Sewing Needle
Abbreviations:
- SC = Single Crochet
- TR = Treble Crochet
- DC = Double Crochet
- HDC = Half Double Crochet
- Ch = Chain
- Rnd(s) = Round(s)
- Beg = Beginning
- St(s) = Stitch(es)
- 2tog = Crochet 2 stitches together (decrease)
- * = Repeat stitches from * to end of *
- 2nd = Second
Instructions:
I utilized felt and glue for the facial features – if you do not want to use felt, you can crochet or embroider the face pieces. You can also use glue-on wiggle eyes.
Body (Same Body for Pumpkin, Ghost and Witch – Use Color Yarn specified in pattern)
- Ch 2
- Rnd 1: Work 5 in 2nd ch from hook = 5 sc
- Rnd 2: Work 2 sc in each sc = 10 sc
- Rnd 3: *Sc in first sc, 2 sc in next sc*, repeat from * around = 15 sc
- Rnd 4: *Sc in next 2 sc, 2 sc in next sc*, repeat from * around = 20 sc
- Rnd 5: *Sc in next 3 sc, 2 sc in next sc*, repeat from * around = 25 sc
- Rnd 6: *Sc in next 4 sc, 2 sc in next sc*, repeat from * around = 30 sc
- Rnds 7-10: Sc in each sc
- Rnd 11: *Sc in next 5 sc, 2 sc in next sc*, repeat from * around = 35 sc
- Rnd 12: *Sc in next 6 sc, 2 sc in next sc*, repeat from * around = 40 sc
- Rnds 13-18: Sc in each sc
- Rnd 19: *Sc in next 6 sc, sc 2tog*, repeat from * around = 35 sc
- Rnd 20: *Sc in next 5 sc. sc 2tog*, repeat from * around = 30 sc
- Rnd 21: *Sc in next 4 sc, sc 2tog*, repeat from * around = 25 sc
- Rnd 22: *Sc in next 3 sc, sc 2tog*, repeat from * around = 20 sc
- Rnd 23: *Sc in next 2 sc, sc 2tog*, repeat from * around = 15 sc
- Fasten off, leave a tail long enough for sewing. Stuff body. Sew opening closed. This will be the bottom. Weave in yarn. Shape body into a cone, flatten the bottom so body can stand.
Spooky Halloween Pumpkin
- Crochet 1 body in Tangerine Color Yarn following directions above.
- For The Pumpkin Leaves (Make 4):
- With Dark Leaf Color Yarn, Ch 11
- Row 1: Sc in 2nd ch from hook
- Row 2: 1 TR in next 2 ch
- Row 3: 1 DC in next 2 ch
- Row 4: 1 HDC in next 2 ch
- Row 5: 1 sc in next ch
- Row 6: Sl st in last ch
- Fasten off, leave a tail long enough for sewing. Sew leaves on top of Pumpkin, one on each side, one in back and one in front; weave in yarn.
- TIP: I overlapped the front leaf over the 3 leaves to cover any open spots on top of head.
Face
- Cut 2 triangles in black felt for eyes.
- Cut 2 half circles for the center of the eyes in white felt.
- Cut 1 large half moon for the mouth in black felt.
- Cut 1 small rectangle for the tooth in white felt.
- Glue the white center eye on the bottom of the black felt eye. Glue the face felt pieces on face and allow to dry.
- TIP: To control the amount of glue applied, I use a toothpick.
- NOTE: Depending on the yarn you use, the body size may vary slightly. Cut felt pieces to accommodate size of body.
- Your Halloween Pumpkin is done! Pumpkin measures 3-1/2” tall.
Spooky Halloween Ghost
- Crochet 1 body with White Color Yarn following directions above.
Face
- Cut 2 circles in black felt for the eyes.
- Cut 2 small circles for the center of the eyes in white felt.
- Cut 1 oval in black felt for the mouth.
- Glue the white center eye on the bottom of the black felt eye. Glue the face felt pieces on face and allow to dry.
- NOTE: Depending on the yarn you use, the body size may vary slightly. Cut felt pieces to accommodate size of body.
- Your Halloween Ghost is done: Ghost measures 3-1/2” tall.
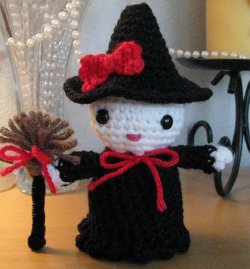
Spooky Halloween Witch
- Crochet 1 body with Guacamole Color Yarn following directions above.
Hair
- With Tangerine Color Yarn, measure 6 strands of yarn 7” long. Cut another piece of yarn about 8” long (leave one piece slightly longer – you will use this piece of yarn to sew the hair on to the witch’s head). Tie in center of 6 strand bunch, knot to secure. Make 3 bunches. For the bangs, measure 6 strands of yarn 4” long. Cut another piece 5” long (leave one piece slightly longer – you will use this piece of yarn to sew the hair on to the witch’s head).
- To attach the hair, place one yarn bunch, with knot on center of top of head;
- Have one half of yarn bunch fall on right side, the other half on the left side. Thread needle with yarn and sew hair on top of head. Place second yarn bunch next to the first, sew on head. Place last yarn bunch on back of head and sew on to head. Secure stitches. Now lay the yarn bunch for the bangs on front of head and sew on to head. Trim ends of hair.
Hat
- With Black Yarn, ch 2
- Rnd 1: Work 5 sc in 2nd ch from hook = 5 sc
- Rnd 2: Work 2 sc in each sc = 10 sc
- Rnd 3: Sc in each sc
- Rnd 4: *Sc in first sc, 2 sc in next sc*, repeat from * around = 15 sc
- Rnd 5: Sc in each sc
- Rnd 6: *Sc in next 2 sc, 2 sc in next sc*, repeat from * around = 20 sc
- Rnd 7: Sc in each sc
- Rnd 8: *Sc in next 3 sc, 2 sc in next sc*, repeat from * around = 25 sc
- Rnd 9-11: Sc in each sc
- Rnd 12: Work 2 HDC in each sc = 50 HDC
- Rnds 13-14: Sc in each HDC
- Fasten off, leave a tail long enough to sew the hat on her head.
- To shape tip of hat, gently push the end of your crochet hook to bring the tip to a point. Be careful not to poke a hole through the tip of the hat.
- Stuff tip of hat lightly. Thread needle with yarn and weave yarn to where you started the HDC. Position hat on witch’s head and sew hat on head.
- Weave in yarn.
- To finish hat, cut a piece of Tangerine color yarn long enough to go around the base of the hat and to tie a bow. Wrap the Tangerine color yarn around hat base and tie into a bow. Using a toothpick, apply a tiny dot of glue on 4 spots around yarn to keep it secure.
- Position and glue the wiggle eyes. Thread sewing needle with black embroidery floss and sew a smiley mouth.
- Your Spooky Halloween Witch is done! She measures 5” tall to tip of hat.
Variations
Ornaments
- You can make these cute Halloween toys as ornaments. Crochet a chain long enough to hang - attach crocheted chain on top of head.
Mantle Toppers
- These cute Halloween toys can also be made to place on a mantle for a quick and easy decoration. Crochet a chain for legs as follows:
- Row 1: Ch 16 with same yarn color as body
- Row 2: Sc in 2nd ch from hook, sc across = 15 sc
- Row 3: Ch 1
- Row 4: Work 4 DC in same ch
- Fasten off, leave a tail long enough for sewing. Thread needle with yarn and run through chain and bring to top of leg. Secure with a knot. You will use this piece of yarn to sew the legs on to the body. Weave in yarn after legs are sewn onto body.
Notes:
- This pattern is worked in continuous rounds; do not join and do not
- turn unless specified.
- Use stitch marker to indicate beginning of rounds.
- Make your stitches tight so stuffing won’t show.
- Yarn listed is what I used – size may vary with other yarn.
Find this project and more in 9 Beginner Crochet Patterns for Halloween.
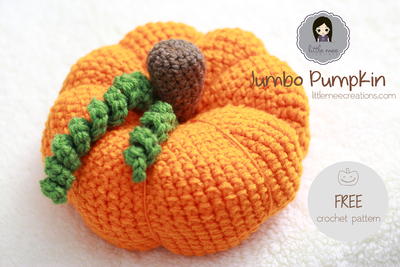
Read NextJumbo Pumpkin Crochet Pattern
Your Recently Viewed Projects
Thanks for your comment. Don't forget to share!
princess6860504
Jun 05, 2017
These little guys are perfect for the craft fairs. It's just the kind of thing that folks who are not looking to buy anything in particular will buy just for the heck of it. I'd sell the set for 10$. The pattern is an easy read and it is featured right above- no bother to have to click on a separate link.
tralyn 8849932
Sep 28, 2014
could there be a little more about sewing the bottom closed. I think my stitches were too big to close right.
gramchek2001 47768 12
Oct 23, 2011
I really like the trio and will try to make them. I had a great deal of trouble getting the directions to print out. I'm sure they will be worth the trouble i had. Thank u for your great patterns. Keep them coming
Report Inappropriate Comment
Are you sure you would like to report this comment? It will be flagged for our moderators to take action.
Thank you for taking the time to improve the content on our site.