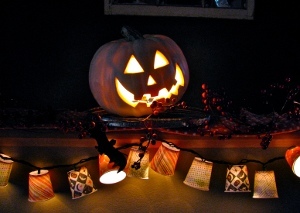
DIY Halloween Lights
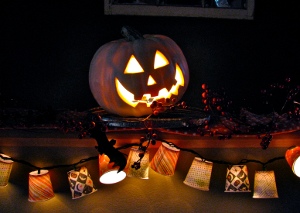
Using a string of Christmas lights and some inexpensive paper cups, you can create tiny holiday themed lampshades for spooky Halloween decor. These Halloween craft ideas from Maureen Wilson can also be modified to fit any holiday.
Materials:
- Christmas lights (regular, not LED)
- Holiday scrapbook paper (thin, not heavy cardstock)
- Tiny paper cups (3 oz, white)
- Glue dots
Video:
Instructions:
- First make a template from one of the cups. Cut it along the seam, and remove the circle bottom. Trim off the lip of the cup as well. Trace it onto a sheet of paper, adding about a half inch to one end so that you can overlap the paper.
- Cut out your template and make sure it’s a good fit by wrapping it around a paper cup. Then trace it onto the back of the patterned paper.
- Adhere the paper to the cup with glue dots. I have tried this project using a double-sided tape runner as well, but the edges didn’t hold as firmly as they did with the glue dots. When attaching the paper, focus on lining up the paper evenly along the rim of the cup. Overlap the ends of the paper and rub firmly. Repeat these steps until you have as many little lampshades as you’d like for your display.
- Punch a hole in the bottom of each cup with a pencil. Insert a light into each cup, and they look like festive little lampshades. You can leave a strand of lights up year-round, and trade out the shades for each holiday. They’re inexpensive to make and easy to store. For safety reasons, it’s a good idea to unplug the lights when you leave the room.