Radiant Black Butterfly Hubcap Art
A decorative project in anyone's garden, porch, or yard.

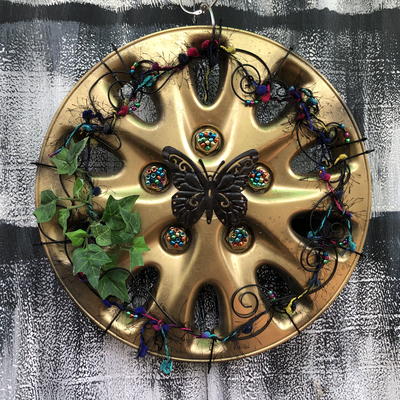
Learn how to make hubcap garden art that will add color and joy to your decor! This beautiful project would also make a great hubcap wreath for your door in the summertime. It's amazing what you can create when you transform trash into treasure. A little paint, some leftover beads and wire, and a dollar store butterfly are your tickets to beauty when you sit down to create this project.
From the Designer: "I am Mandala crazy and started collecting Hubcaps to display just as they were in my yard. Since then I have started to decorate them in unique ways. This one is my favorite right now as I love butterflies and I found the perfect one to place in the middle while at the Dollar Store recently. I like the idea that I can create my own unique garden art with not only hubcaps but all my favorite materials. Beads are another favorite of mine and the beads in this piece I had around the house for who knows how long. Creating this hubcap was the perfect project for these beads to shine! I hope you find the experience of decorating a hubcap an enjoyable one too!"
Main MaterialRecycled Materials
Primary TechniqueGreen Crafting

Project TypeMake a Project
Materials List
- Hubcap of your choosing
- Bailing Wire
- Dollar Store Steel Butterfly or centerpiece of your choice
- Beautiful beads: I chose to work with pony beads due to their large hole for placing though the wire.
- Spray Paint - Rust-Oleum Gold & Black
- Wire cutters
- Needle nose Pliers
- Scissors
- E6000 Glue
- Lion Brand Yarn - Fun Fur
- 12” ruler
Instructions
Choose your hubcap, centerpiece (Butterfly) spray paint, beads, wire, yarn and gather your tools.
-
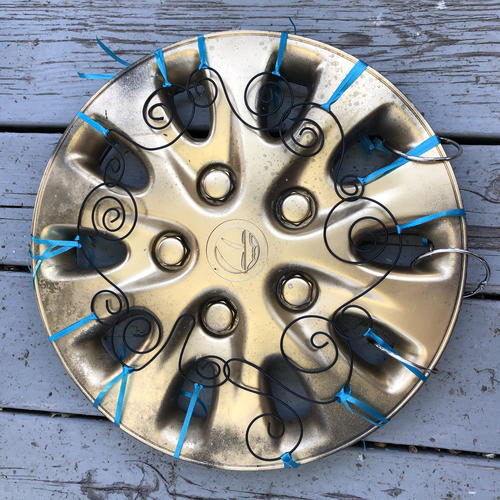
STEP 1: Clean your hubcap with soapy water. Rinse and dry. Spray paint black, let dry, top with gold and come back with black, spray lightly. Spray your Butterfly black at this time too.
Hint: I placed the butterfly on top of a plastic cup and sprayed the underside and when dried turned the butterfly over and sprayed the top.
Cut your bailing wire into approximately 12” strips. I started with 8 strips. Depending on the size of your hubcap you may need fewer or more. Spiral one end and spiral the other end. Make enough strips to go around the hubcap’s almost outer rim. Intertwine each spiral to the other 8” spiral.
Hint: Before I secured the entire wire spirals with the zip ties I used curling ribbon to bring it taut and secure. I did this over and over until I found the right shape and position. I added the beads to the wire and then I secured the wire with the zip ties. I put 3 small zip ties together to make it long enough to be secured on the back of the hubcap. I then cut the curling ribbon off. -
STEP 2: I next took the glue and dabbed a glob onto the lug nuts of the hubcap. I pressed several beads into the glob of glue to bring more color and texture onto the design. I also glued the butterfly in place and held it flat with a rock until it dried securely.
-
STEP 3: I had some silk ivy laying around and when I added it to the hubcap the whole design just felt right! I then intertwined the fun fur yarn in, out and around the wire and ivy and the piece was done!
-
NOTE: There exists so many sizes, styles and variations of hubcaps. They are all beautiful in their own way. I am sure you will find one that resonates with you!
-
For more of Carol's beautiful artwork, visit varyCarol.com.

Why You'll Love This Trash to Treasure Craft
1. It's a unique way to upcycle old hubcaps: Instead of throwing away your old, worn-out hubcaps, why not transform them into stunning works of art? This project gives new life to old materials and allows you to showcase your creativity in a fun and eco-friendly way.
2. It's a great outdoor decor piece: The Radiant Black Butterfly Hubcap Art project is perfect for adding a pop of color and whimsy to your outdoor space. Hang it on a fence, tree, or shed to instantly brighten up your backyard or garden.
3. It's a fun project for all skill levels: Whether you're an experienced crafter or a beginner looking to try something new, this project is accessible to crafters of all skill levels. The step-by-step instructions make it easy to follow along and create your own beautiful butterfly hubcap art.
4. It's a creative way to add personality to your home: Tired of generic mass-produced decor? Making your own Radiant Black Butterfly Hubcap Art allows you to infuse your home with your own unique style and personality. Plus, it makes for a great conversation piece when guests come over!
5. It's a budget-friendly DIY project: Instead of splurging on expensive home decor items, save money by making your own radiant black butterfly hubcap art. With just a few simple materials and a bit of creativity, you can create a stunning piece of art that won't break the bank.
Read NextTin Can Transformed
![Pill Bottle Crafts: Reuse Pill Bottles [15 Ideas]](http://irepo.primecp.com/2017/06/334076/PILL-BOTTLE-CRAFTS-Header_Category-CategoryPageDefault_ID-2274135.jpg?v=2274135)