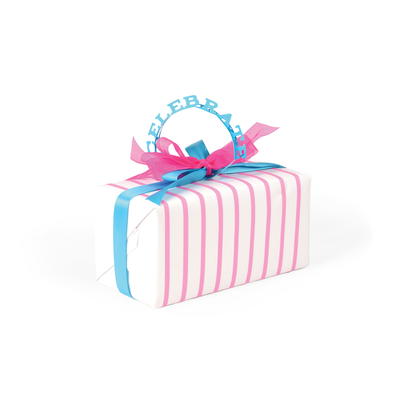
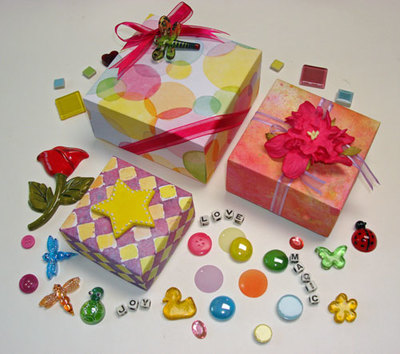
Homemade Holiday Gift Boxes and Ornaments

Half the fun of giving others Christmas presents is wrapping them! Put your very own festive twist on your wrapping skills this season with these Homemade Holiday Gift Boxes and Ornaments. Everyone will be "ooh" and "aahing" over your impressive wrap job. Add a fresh rustic feel to your presents with faux pine branches, pine cones and other nature embellishments to top off your gift wrapping. Not only will your DIY gift boxes be jaw dropping, but the ornaments on top will add an extra gift that your special someone can use every Christmas.
Be sure to enter for a chance to win an Extravagant 3L Scrapbooking Supply Kit during the 12 Days of Christmas in July! This giveaway runs until July 30th and you can receive an extra entry just by commenting below on this page.
Estimated Cost$11-$20
Time to CompleteIn an evening
MaterialsNature Material, Paper
Primary TechniqueDIY Craft

SeasonWinter
HolidayChristmas
Project TypeMake a Project
Materials List
- E-Z Runner® Ultra Refillable Dispenser
- Dodz Adhesive Dots Small
- Dodz Adhesive Dots Medium
- Dodz Adhesive Dots 3D
- Dodz Adhesive Dots 3D
- Adhesive Sheets 4 x 6ʺ
- E-Z Dots® Permanent Refillable Dispenser
- 3D Foam Squares White Regular
- Donna Salazar with Scrapbook Adhesives by 3L®: Girlie Grunge Art Medium, Texture Ribbons and Pigment Powder Gold
- Clearsnap Colorbox Pigment Ink
- Gold Embossing Powder
- Buttons Galore & More buttons
- Teardrop Crystal
- Gold Flower Stamens
- Gold Opaque Glitter
- Gold Cord
- Red Ribbon
- Holiday Greens and Oval Dies
- Cardstock: Dark Green, Light Green, Brown and Kraft
Instructions:
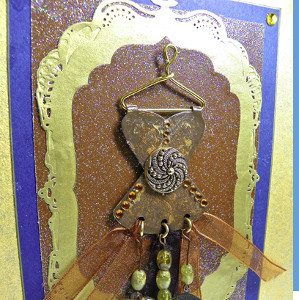
Ornament Tutorial:
-
Apply Adhesive Sheets 4 x 6ʺ to dark green, light green and brown cardstock.
-
With Adhesive Sheet liner side up, die cut different greenery from each color of cardstock.
-
Remove liner of Adhesive Sheet, sprinkle exposed adhesive with glitter and press into adhesive. Remove excess. Repeat for all greenery pieces.
-
Fasten gold cord to tear drop crystal.
-
Wrap Dodz Adhesive Dots Medium around end of greenery branch. Press onto cord above crystal. Cut greenery length as needed. Continue adding branches of greenery with Dodz Adhesive Dots Medium.
-
Wrap 1 or 2 Dodz Adhesive Dots Medium around all greenery ends and cord.
-
Dip flower stamens in Girlie Grunge Art Medium. Sprinkle with gold glitter. Allow to dry. Fasten over greenery with Dodz Adhesive Dots Medium.
-
Form bow and tie with cord. Fasten to greenery with Dodz Adhesive Dots Medium.
-
Thread gold cord through one buttonhole. Wrap cord around greenery and ornament cord just below bow. Thread cord through other buttonhole. Place Dodz Adhesive Dots Small on back of button. Press button in place over bow. Pull cord snug. Tie in bow or knot cord. Trim cord ends.
-
On back side of ornament, brush Pigment Powder Gold over exposed sticky areas of adhesive.
Box Embellishment Tutorial:
-
Cut Texture Ribbons sheer organza ribbon to fit box top with extra to lap inside. Apply E-Z Dots® Permanent Refillable Dispenser along edge of ribbon. Sprinkle with gold glitter. Remove excess. Repeat along other edge.
-
Apply adhesive with E-Z Runner® Ultra Refillable Dispenser inside edge of box lid. Press ribbon end over adhesive. Wrap ribbon over box top and fasten at other end with E-Z Runner® Ultra Refillable Dispenser
-
Repeat Step 2 to fasten two lengths of dark red ribbon over sheer ribbon using E-Z Runner® Ultra Refillable Dispenser.
-
Place 2 lengths of gold cord over dark red ribbon. Fasten ends with E-Z Runner® Ultra Refillable Dispenser . Dust any exposed adhesive with Pigment Powder Gold
-
Follow Ornament Steps 1-3 for greenery.
-
Fasten greenery stems to one Dodz Adhesive Dots 3D. Continue to fasten greenery with Dodz Adhesive Dots Medium. Fasten to box top.
-
Follow Ornament Step 6 for flower stamens. Fasten over greenery with Dodz Adhesive Dots Medium.
-
Thread gold cord through button, tie in a knot and trim ends. Fasten over greenery with Dodz Adhesive Dots Medium
-
Dust Pigment Powder Gold over any visible adhesive
-
Die cut oval from Kraft cardstock. Stamp greeting with pigment ink. Heat emboss with gold embossing powder. Apply ink to edge of oval and heat emboss with gold.
-
Fasten oval tag to box with 3D Foam Squares White Regular
Contest Rules:
- There is a maximum of one extra entry per person. The extra entry will be based upon a comment left on this project. Duplicate comments will be deleted and are not tallied.
- The winner will be selected at random from the comments on this page and the entries on the contest page.
- The winner will be contacted on the morning of July 31, 2017.
- Email Address provided in their account (please do NOT leave your email address in the comments--you already provided it when you created your account)
- You have until Sunday, July 30, 2017 at 11:59pm EST to leave your comment on this post. Comments posted after that will not be counted.
- Contest open to anyone 18+ in US and/or Canada. Excludes Quebec and Puerto Rico.
Read NextUpcycled Can Gift Containers
Your Recently Viewed Projects

Thanks for your comment. Don't forget to share!
flowergirl
Jul 20, 2018
This is fabulous. This gift box is decorated and ready to use, no need to buy wrapping paper and ribbons. You just make a couple of these and save yourself some cash all year. I can't believe all it takes is some cardstock and adhesive sheets. If I knew how easy it was I could be making all sizes and shapes for my family and friends.
Weberme
Jul 23, 2017
I have always wanted to make my own gift cards but never thought to make my own gift boxes. What a great idea this is. These Holiday and Gift boxes are so beautiful and just the right thing to make a gift that much special.If you are like me you spend hours or days finding just the right way to wrap your gift so it looks great. I love the way you can embellish the boxes and I am going to go to my stash pile and use buttons,ribbon, some metal embellishments,glitter depending on whether a boy,girl,woman or man. This is going to be fun. Thanks for great project.
karensuewaldner 91 70666
Jul 23, 2017
I use handmade gift tags and sometimes 3D flowers and ribbons.
ratgirl
Jul 21, 2017
I like to make pretty stamped tags with bells and ribbon, and also add faux holly branches from the craft supply store.
karenladd
Jul 21, 2017
I always make my own gift tags, but love the idea of also making a handmade ornament for someone to use on their tree
kimlennie 9336847
Jul 21, 2017
I love this idea and thank you for the inspiration. I usually just do handmade tags but this takes it to a whole new level and seems simple enough to do.
chph4evr 8912717
Jul 21, 2017
I like to use kraft colored paper and stamp images onto it with colored inks. Also make my own tags and cards. Carla from Utah
lolyborda 1209844
Jul 21, 2017
I sometimes use just craft paper but I embellish everything with handmade tags and die cuts poinsettias and some green leaves. Thanks for the chance!
Member 6948666
Jul 21, 2017
Gorgeous box with ornament. I do think that my friends would be impressed with this as a gift. Thanks for the wonderful idea and directions!
aketch
Jul 11, 2017
I like to go big. Depending on the project, I will sometimes purchase a big flower or entire bouquet from the dollar store and attach it to gift bags or wrapped boxes. I like to borrow from nature. Depending on the season, I attach, boughs, bright fall leaves and even pine cones to gifts. Fall leaves and fancy ribbon look especially nice on wine gift bottles.
Kim K 12345
Jul 10, 2017
Thank you for this great tutorial! I like using satin ribbons to jazz up my gift wrapping.
Report Inappropriate Comment
Are you sure you would like to report this comment? It will be flagged for our moderators to take action.
Thank you for taking the time to improve the content on our site.