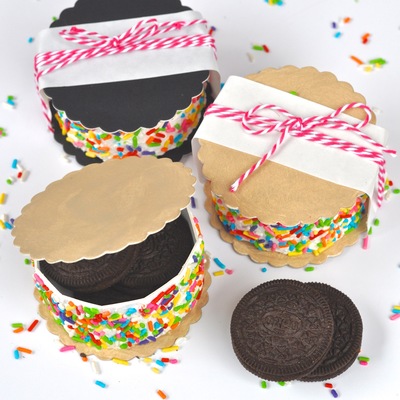
Ice Cream Sandwich Boxes

These cute gift boxes look just like ice cream sandwiches, and are so fun and easy to make! They are great for gift giving- simply fill with cookies or a gift card! Made using dies and Collage Clay from Plaid, these precious little sandwich boxes are sure to please sweet lovers of all ages. These are also great for packaging cookies for bake sales or even giving other small gifts, like jewelry or makeup. Let the kids help out with these fun and sweet boxes! They're sure to love decorating the boxes with colorful sprinkles!
Estimated Cost$31+
Time to CompleteUnder an hour
Primary TechniqueGeneral Paper Crafting
Type of Paper UsedArtBoard

Materials List
- SIzzix Cookie Box Die
- Sizzix Big Shot
- Sizzix Little Sizzles Mat Board
- SIzzix Extended Cutting Pads
- Plaid White Collage Clay
- Glue Gun
- Sprinkles
- Plaid Country Tan Paint
- Paintbrush
- Optional: Wax Paper and Baker's Twine
Instructions
-
Start by making a Sizzix sandwich. Stack an extended cutting pad, the mat board, the cookie box die cutting side down, then the other extended cutting pad on top. Roll it all through the Big Shot, and pull out the pieces. Repeat for as many cookies and pieces that you need in your desired colors.
-
To assemble the ice cream sandwich box, take the longest piece, and bend the end tabs down.
-
Use a glue gun to glue the tabs down and around the piece with 11 sides.
-
Glue the small tab to the inside back of the box, and fold along the score line.
-
Hot glue the scalloped top and bottom of the box.
-
Apply your preferred tip to the Collage Clay. I used the star tip (since it let the most clay come out at a time), and squirted a large dab at a time.
-
I started by using a plastic spoon to spread the Collage Clay onto the middle ice cream part of my sandwich, but quickly realized that it was easier and faster (and a whole lot more fun) just to use my fingers. The great part about this is that it really doesnt have to be perfect, since there will be sprinkles covering it anyway.
-
I applied the Collage Clay a section at a time, then sprinkled sprinkles onto that section. I used a clean finger to gently press down on the sprinkles so they stayed in place, and then moved on to the next section and repeated. My first box took me about 20 minutes for this part, but my third box took less than 5 minutes- it really does go quickly! Now comes the hard part- waiting. The Collage Clay needs time to fully dry, and you dont want those sprinkles falling off when you finish the rest of the steps! Definitely follow the waiting time recommended on the box.
-
If you used white mat board for the top and bottom of the box, you might want to paint the cookie part a dark tan/light brown color so it looks more realistic. I used a foam brush to paint on the Apple Barrel color Country Tan on the top cookie, which I thought was the perfect cookie color. I used a smaller paintbrush to paint the smaller edge of the bottom cookie. For one of the cookies I used black mat board, which looked great too, and required no painting.
-
To finish off a couple of the boxes, I cut a thin strip of freezer paper (since somehow I was out of wax paper), wrapped it around the ice cream sandwich, and used a tiny dab of hot glue to secure the piece at the bottom. I wrapped a piece of Bakers twine around the center of the freezer paper a few times, then tied a bow around the top.
Read NextCelebration Homemade Gift Wrap