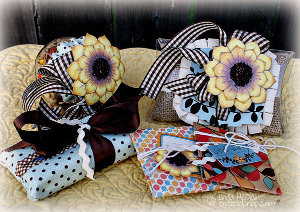
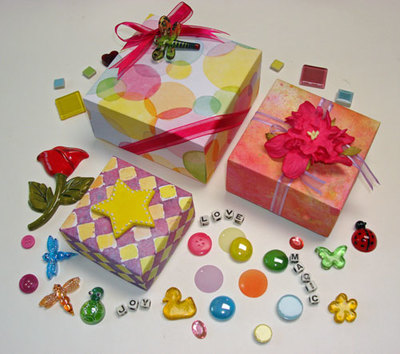
Clearsnap Friendship Box Tutorial
Looking for a last-minute gift for a friend can be difficult, especially if said friend is difficult to shop for. Make a personalized and easy homemade craft with this Clearsnap Friendship Box Tutorial. It's a free craft project idea that will truly make your friend feel so special.

Materials:
- Aqua Colorbox Full Size Pigment Ink
- Canary Colorbox Full Size Pigment Ink
- Scarlet Colorbox Full Size Pigment Ink
- Black Colorbox Full Size Pigment Ink
- Harbor Cat's Eye Pigment Ink Pad
- Top Boss Thick Clear Embossing Powder
- Lost and Found brads My Mind's Eye
- Close to My Heart Acrylic Stamp
- Apple Barrel Acrylic Paint
- Prima Flower
- Close to My Heart Chipboard
Instructions:
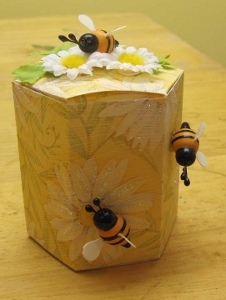
- Find a small cardboard box with a lid. A wooden or Paper Mache box can be purchased at a craft store.
- Paint the entire box, including the inside of the box with white or off white acrylic paint.
- Once the paint is completely dry, begin adding a stamped image one at a time using Colorbox Pigment Ink. Colorbox Pigment Ink is great for this project because the ink sits on top of the paper and gives plenty of time to emboss the image.
- Immediately after stamping the image, sprinkle Clearsnap Thick Clear Embossing Powder over the stamped image. If you are using a tidy tray, gently tap the corner of the box on the tray to remove all the excess embossing powder. A folded piece of paper works just a well. If any stray bits of embossing powder still remain on the surrounding image, use a small paint brush to gently remove the stray embossing powder.
- Using a heat gun, hold the heat gun approximately six inches from the paper sweeping backward and forward until the embossing powder starts melting. Do not over heat the image with the heat gun, because the paint will bubble and embossing powder will burn. Continue to repeat the stamping and embossing process around the sides and top of box.
- Ink the edges of the box corners with Colorbox Fluid Chalk. Inking the edges of the box will give the box a professional finished look.
- Cut out a rub-on flourish image. Using the applicator, rub the entire flourish image on the outside of the box lid. Peel away the plastic covering, if all of the image has not transferred, carefully place the covering back down and keep rubbing.
- Adhere the decorative brad, chipboard and silk flower to the outside of the lid.
- Measure a piece of ribbon to fit the circumference of the box lid, cut the ribbon and adhere to the box lid.
Read NextRecycled Soap Box Christmas Gift