Our Favorite Garden Crafting Ideas
Crafts for the garden are a great way to decorate your home while still going green. Why not make something useful by using your garden plants for crafts? We have included everything from our favorite garden pot to the ultimate gardening gift. There are even some easy garden crafts for kids so you can make a family project out of these garden crafts. Check out these how-to garden crafts for some fun crafting ideas this summer!
Table of Contents
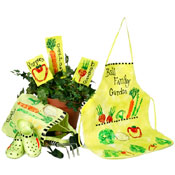
Stamp the perfect gifts for a gardener using vegetables and Tulip® 3D Fashion Paint™!
Designed and decorated by Cheryl Ball
Materials:
- Tulip® 3D Fashion Paint
- 65000 White
- 65032 Leaf Green
- 65038 Black
- 65049 Orange
- 65130 True Red
- 65134 Crab Apple
- 65408 Gold Metallics
- Tulip® One-Step Tie-Dye Kits™
- Vibrant Colors
- Aleene's® Platinum Bond™ 7800 All-Purpose Adhesive
- Apron, white or natural all cotton
- Sponges, make-up wedges
- Vegetables, assorted
- Garden shoes, plastic
- Corrugated cardboard
- Pinking shears
- Chalk, white
- Foil
- Plastic trash bags
- Dowels: ¼” x 12” or scrap wood desired number for garden stakes
- Paper towels
- Knife
- Tote bag, light color
- Scissors
- Iron
- Canvas fabric, ¼ yard 100% cotton
Steps:
1. Cover work surface with trash bag. Wet apron, tote and fabric then wring dry. If desired, use spin cycle of washer. Place on work surface and crumple following tie-dye instruction sheet.
2. Wearing gloves from kit, fill Lime dye bottle with water then shake until thoroughly mixed. Squeeze dye on apron, tote and fabric, turning and squeezing fabric to desired look. Cover with plastic and let stand 4-6 hours. Fill washer with full load of water and a small amount of laundry soap. Wash pieces then dry in dryer or line dry. Iron smooth.
3. Place tote and apron on work surface. Cut vegetable in half lengthwise as straight as possible. Place cut side down on several layers of paper towel to remove excess moisture.
4. Squeeze a puddle of 3-D Paint on foil. Tap flat end of sponge into paint then pounce an even coat on vegetable. Immediately stamp where desired. Hold vegetable in one hand then slip other hand under fabric and press from behind, this will ensure good detail. Stamp vegetables with the following colors: Onion – Stamp White detail with Gold Metallic. Beet - Stamp and detail with True Red and Leaf Green. Lettuce - Stamp with Crab Apple and Leaf Green detail with Leaf Green. Asparagus - Stamp and detail with Leaf Green. Bell Pepper - Stamp and detail with True Red, Orange and Leaf Green. Carrot - Stamp with Orange detail with Orange and Leaf Green. Artichoke - Stamp and detail with Leaf Green. Jalapeño Pepper - Stamp with Orange, True Red detail with True Red, Orange and Leaf Green. Let dry.
5. Shoes: Use Orange to create carrot then use Leaf Green for leaves. Add equally spaced Black squares along top edge.
6. Use chalk to lightly draw on desired lettering. Fill in with Black and let dry. Add squares of Black along top edge of pocket and apron. Let dry.
7. Tote: Repeat steps for stamping vegetables then use white chalk to lightly draw on words. Add Black to words and wide stripes along top edge. Let dry.
8. Garden Stakes: Stamp and detail desired vegetables on dyed fabric. Determine size then cut edges with pinking shears. Cut cardboard slightly smaller than fabric piece. Apply a thin even coat of adhesive to back of fabric. Press onto cardboard then smooth fabric to adhere. Glue dowel to back and let dry.
Our Favorite Flower Pot: Chalk Paint Garden Pots
By: Tiffany Windsor for Inspired at Home
Spruce up garden pots in minutes with a coat of chalkboard paint, compliments of Tiffany Windsor of Inspired at Home. These make quick and easy Mother's Day gifts or hostess gifts. Say "Happy Birthday" or "Thanks" with a bit of chalk.
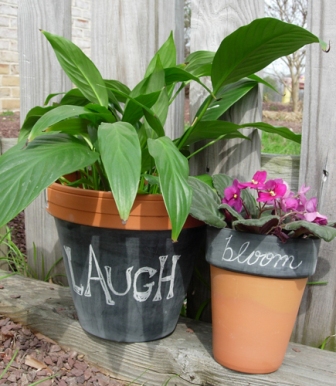
Materials:
- Clay pots
- Spray or brush on chalkboard paint
- Blue painters tape
- Chalk
Instructions:
Use tape to block off any areas that you do not want painted. When using the spray, I use paper towels and tape to block off any larger areas that I do not want oversprayed. Following label directions, spray pot with chalkboard paint. Let each coat dry completely. Let set 24 hours. Rub entire surface of paint with chalk and wipe off. Then you’re ready to write any message. Change it up whenever you like!
Tiffany’s Designer Tips: I make these up by the dozen so that they are ready for any occasion. Since you can change the message, you can personalize them for any gift giving. Want to have some real colorful fun? Brush-on chalk paint is available in a variety of colors like red, pink and blue! What fun you and the kids will have making these pots!
More Decorative Garden Crafts:
- Butterfly Garden Stake
- Falling Leaves Mosaic Garden Stone
- Fun with Terra Cotta Pots
- Aged Terra Cotta Plaques
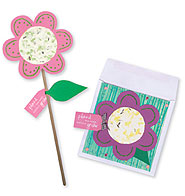
The Ultimate Gardening Gift: Seed Paper Flowers
Courtesy of Arnold Grummer's
'Seed Paper' is paper you make with seeds in it. Plant the paper, watch it grow into flowers!
Supplies:
* Arnold Grummer's Seed Paper Flowers Activity Set
* Empty 16 oz sport drink or water bottle
* Sponge
* Bowl, 4" wide
* Kitchen terry towel
* Gluestick
* Scissors
Steps:
- Add 1 rounded teaspoon of paper pulp to bottle 3/4 full with water. Tear 2" x 3" piece of colorful tissue in small pieces and place in bottle as well.
- Shake pulp, water and tissue for 30 to 40 seconds.
- Add seeds, shake again for 10 seconds.
- Pour pulp into strainer placed in center of flower tool.
- Remove wet seed paper from tool by pushing strainer up and out of the flower tool.
- Use a sponge to remove water from wet pulp.
- Move strainer with pulp to terry towel. Press out water. Move to dry spot on towel. Press again.
- Peel pulp off strainer. Lay on counter top to dry.
- Repeat steps to make more seed paper discs.
- Use kit supplies to create flowers or cards.
- Add leaf and tag with planting instructions.
- Send or give your 'Seed Paper' flowers to people who will enjoy getting paper they can plant from you!
Location, Location, Location!
- To first set up your indoor garden, make sure you have an appopriate location where your plants will be in sunlight. Small plants are a great decoration for the kitchen counter, while you can set larger plants by the window. When you are just starting to plant, these bud vases are a great craft to try.
Appearances Count
- If you are going to have plants in your house, they need to look good. For example, try this daisy vase in any room that needs a little bit of color. If silver foil fits in with your home decor better than the gold foil called for, just make the swap. You can even try using a colored vase to brighten up the room even more.
Get the Kids Involved
- Having a garden or plant can almost be like having a pet. It takes a lot of responsibility and care, but the rewards pay off in the end. Get your kids interested in helping out by giving them a plant of their own. This mohawk lamb is a great way to start. You can help your kids make this adorable lamb and watch it grow its "hair"!
Stay Organized
- If you are planting some seeds inside and some outside, you need to remember when you put everything. You also should make a note for plants that need to be started inside but moved outside as the weather improves over the summer. This garden clipboard is a great way to stay organized, and it's so cute that you'll want to save it forever!
For more great garden crafts, click here for our garden crafts eBook!
Read NextDawn Powerwash Refill Recipe

Thanks for your comment. Don't forget to share!
Report Inappropriate Comment
Are you sure you would like to report this comment? It will be flagged for our moderators to take action.
Thank you for taking the time to improve the content on our site.