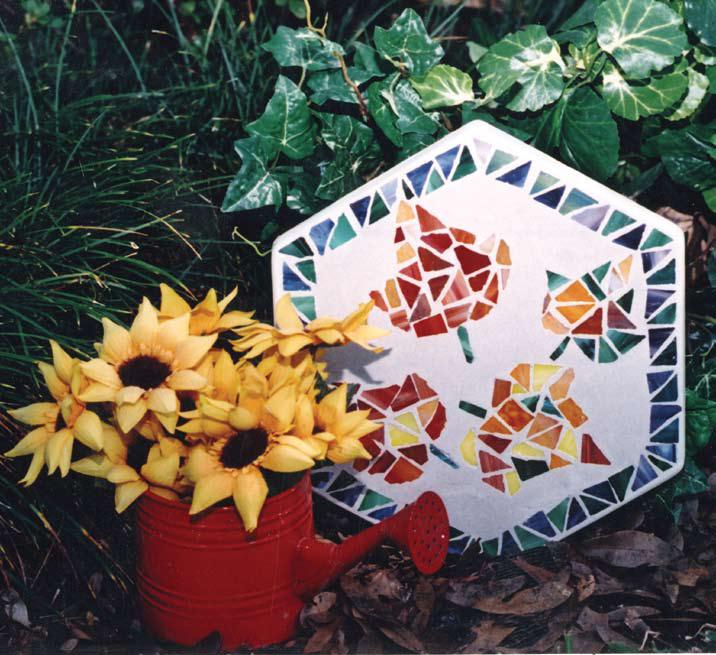
Falling Leaves Mosaic Garden Stone
The brilliant display of the colorful embedded glass in this mosaic garden stepping stone from Diamond Tech reflects the amazing colors of autumn. You will fall in love with the beautiful fall pattern and texture of the mosaic project.
Materials:
- Bag each Jennifer’s Mosaic™ Stained Glass Chips: Purple, Orange, Dark Green, Red, Yellow
- Jennifer’s Mosaics™ Outdoor Cement
- Petroleum Jelly
- Contact Paper
- Jennifer’s Mosaics™ Wheeled Glass Nippers
- 12” Hexagon Stepping Stone Mold
- Bucket or Mixing Bowl
- Pen
- Paper Towels
- Sponge
- Wooden Spoon
- Measuring Cup
- Scissors
Instructions:
Preparation:
- Trace an outline of mold onto contact paper. Trim to the size of the mold (contact paper available from stained glass, craft suppliers and grocery stores). Note the contact paper should be smooth and free of creases.
- Contact paper should fit closely inside mold. To achieve a good fit, place the trimmed contact paper inside the mold and run a pen along the sides of the mold. Trim away markings as needed and place contact paper to the side.
- Using a paper towel, apply a thin coat of petroleum jelly along the inner edges of the empty mold.
Place Glass:
- Place leaf pattern in the center of the mold, if necessary trim to fit. Peel the backing off the contact paper and place in the mold sticky side up, over the pattern.
- Nip red, orange, yellow, dark green and purple chips into random shapes and sizes to fill in the leaves.
- The desired side of the glass should be face DOWN against the contact paper. Nip dark green chips into thin rectangles. Place at the bottom of the leaves to create stems. Nip dark green and purple chips in half on the
diagonal to create triangles. Create a border by alternating colored triangles 1/8” apart and 1” from the edge of the mold. Nip tiles as needed to fit corners of the stone.
- Adjust pieces as necessary and press them firmly onto the contact paper.
Pour Cement:
- Mix Jennifer’s Mosaic™ Outdoor Cement following the directions on the box label. If you wish to color your stone, add colorant to the water before mixing with dry cement. Wear a dust mask while mixing.
- Pour cement slowly and evenly into mold, gently tap sides of mold to release any air bubbles in cement.
- Do not move mold while the cement is drying.
- Wait approximately thirty minutes to one hour (time may vary due to climate) for cement to harden.
- The cement will warm as it hardens. Once it has cooled and set, remove stone from mold.
- Remove the stone by turning mold over and lifting up the edges of the mold.
- Peel off the contact paper and clean off any excess cement covering the glass. You may clean away cement with a paper towel, sponge or craft knife.
- Fill in any remaining air holes by mixing a small amount of Outdoor Cement into a paste and rubbing cement into the holes in a circular motion. If your project gets any marks or you have contact lines on the cement, you may smooth the cement out with sandpaper.
- Allow stone to cure for 24 to 48 hours before placing outdoors.
For more great garden crafts, click here for our garden crafts eBook!
Read NextDiy Patriotic Mason Jar Herb Garden