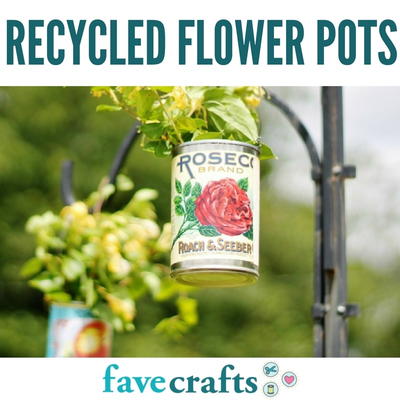
3-Tier DIY Indoor Fairy Garden

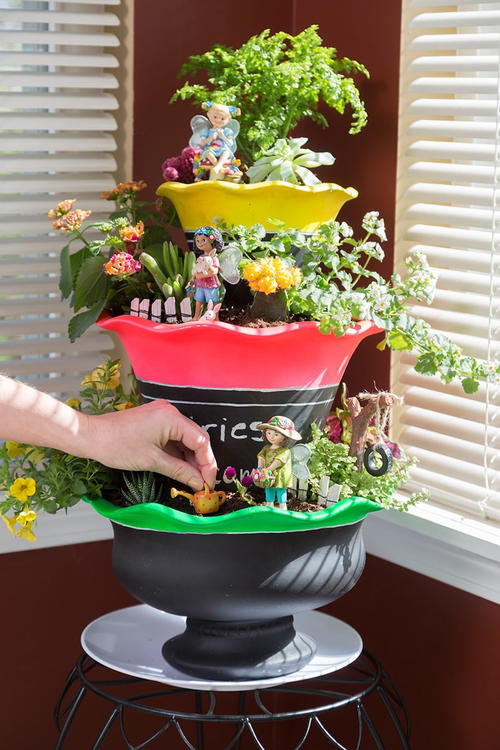
Make an indoor fairy garden that will be the envy of all your guests. This stunning tiered fairy garden will make a stunning decoration for your sun room. Learn how to make a tiered plant and paint your planters with vivid colors. Collect your favorite fairy figurines and choose your plants. Once you put it all together, it will stand tall and really be a conversation piece at parties! The fairy garden trend is one most of us can get on board with. Those mini figurines and furniture are just too cute!
Estimated Cost$11-$20
Time to CompleteIn an evening
Primary TechniquePainting

Project TypeMake a Project
Materials List
- Testors Fluorescent Sprays
- Testors Chalkboard Sprays
- Testors Enamel Markers
- Testors Universal Bonding Primer
- 3 Terra Cotta Pots Of Different Sizes
- Painter's tape
- Kraft Paper
- Lint-Free Cloth
- Chalk or Chalk Marker
- Gloves For Painting And Gardening
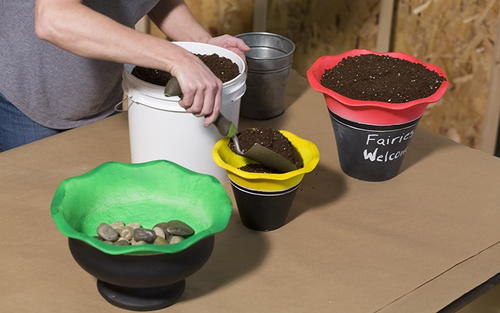
- Potting Soil
- Plants and Fairy Garden Pieces
- Trowel
- Stones
Instructions
-
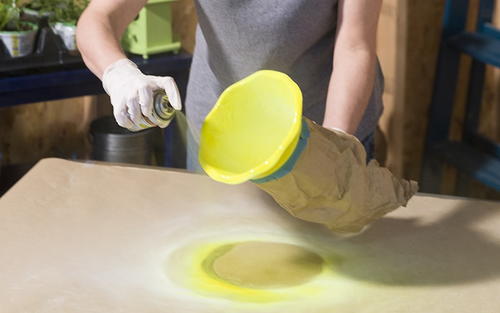
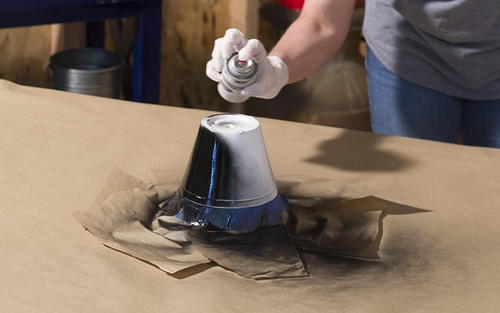
Always work in a well-ventilated area, such as outside or in an open garage. Prime pots using Rust-Oleum’s Universal Bonding Primer to all 3 pots inside & outside. Let dry.
-
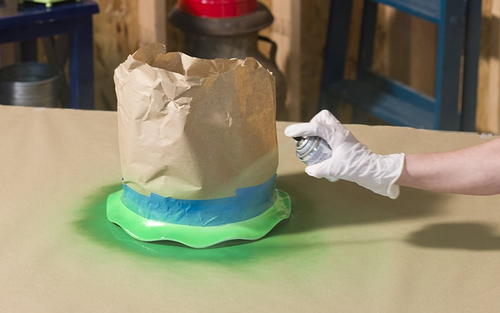
Add the painters tape and paper to prep all three pots for adding the fluorescent paints.
-
For the small pot, spray the Fluorescent Yellow Paint to the top area inside and outside of the pot. Let dry.
-
For the medium pot, spray the Fluorescent Pink Paint to the top area inside and outside of the pot. Let dry.
-
For the large pot, spray the Fluorescent Green Paint to the top area inside and outside of the pot. Let dry.
-
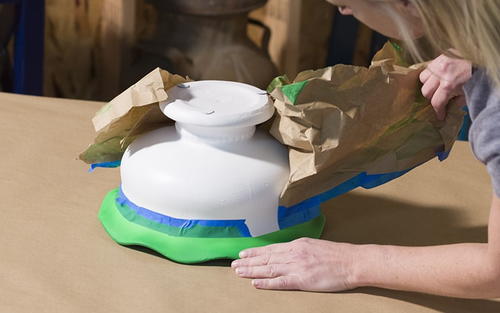
Take off the painters tape & paper from all three pots.
-
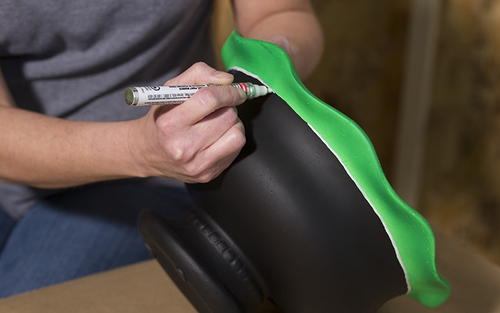
Add the painters tape and paper to prep all three pots for adding the chalkboard paint.
-
Add the Chalkboard paint to the lower area of all three pots. Let dry. Then remove the painter's tape and paper.
-
Using the White Enamel marker, paint a line where the fluorescent color and the chalkboard color meet on all three pots.
-
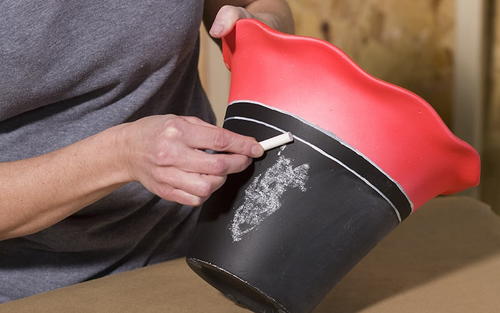
Prep the medium pot for chalk writing by using the side of a piece of chalk, rubbing it in the area where the wording will be written, and then rubbing the area with a lint free cloth.
-
Write "Fairies Welcome!" on the middle pot using a piece of chalk or a chalk marker.
-
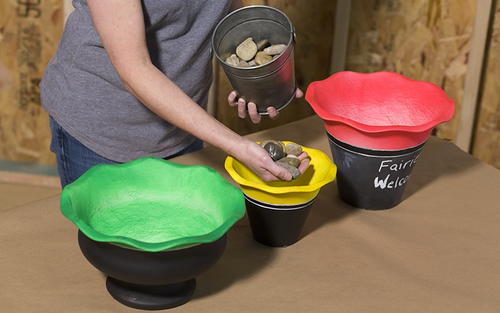
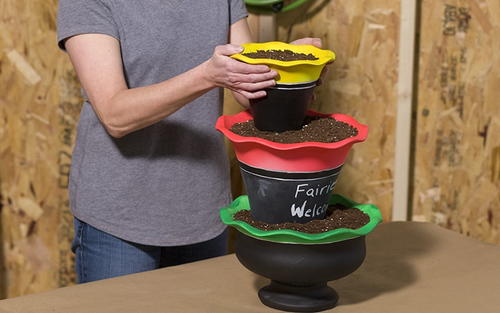
Add a small amount of large stones to each pot for drainage.
-
Add potting soil to all three pots.
-
Stack each pot carefully so it is positioned toward the back of each pot below it.
-
Add your plants and Fairy items to the display and find a sunny spot in your home to enjoy your creation!


Why You'll Love This Gardening Craft
Are you ready to dive into the magical world of indoor fairy gardens? Here are the top 3 reasons why you should make our 3-Tier DIY Indoor Fairy Garden:
1. One-of-a-kind Decor: Let's face it, everyone loves to show off their creative side when it comes to home decor. Making your own indoor fairy garden will not only add a touch of whimsy and charm to your space, but it will also be a unique and personalized decoration that will surely impress your guests.
2. Stress Relief: Creating a fairy garden is a fun and relaxing activity that can help you unwind and de-stress after a long day. Tending to your plants and arranging your fairy figurines can be a therapeutic experience that allows you to escape into a tranquil and enchanting world.
3. Conversation Starter: Once you complete your tiered fairy garden masterpiece, it will undoubtedly become a conversation piece at any gathering or party. Your guests will be in awe of your artistic talents and creativity, and they'll be eager to learn how you made such a stunning display. Get ready to bask in the compliments and admiration of all who see your indoor fairy garden!
So what are you waiting for? Gather your materials, unleash your inner artist, and embark on the enchanting journey of creating your very own 3-Tier DIY Indoor Fairy Garden. Let the magic begin!
Contest Rules:
- There is a maximum of one extra entry per person. The extra entry will be based upon a comment left on this post. Duplicate comments are not tallied.
- The winner will be selected at random from the comments on this page and the entries on the contest page.
- The winner will be contacted on the morning of March 19, 2018.
- Email Address provided in their account (please do NOT leave your email address in the comments--you already provided it when you created your account)
- You have until March 18 at 11:59pm EST to leave your comment on this post. Comments posted after that will not be counted.
- Contest open to anyone 18+ in US and/or Canada. Excludes Quebec and Puerto Rico.
What would you/do you put in your fairy garden?
Read NextMini Succulent Planters
Your Recently Viewed Projects
Thanks for your comment. Don't forget to share!
whodian 4849581
Feb 24, 2020
would be wonderful to add a toad house, or frog pond, or a butterfly watering hole, or even a humming bird feeder , might have make it bigger need more animals too.
kimlennie 9336847
Feb 26, 2019
I was planning on making a fairy garden this year and never thought to do it tiered. This is an awesome idea.
Weberme
Mar 11, 2018
What a perfect fairy garden this is. Just what I was looking for. I want to pet small flowers and herbs in mine with a few succlents and faries, a house, steps and a few accessories. I guess I will have to make mine extra large and a great big one for outside in cornor for patio. Thanks for the inspiration.
Mistress of All Ev il
Mar 09, 2018
This is too cute. I've never seen a fairy garden this big. Would look great in the empty corner space in my home. Thanks!
jojohnson57 381913 2
Mar 06, 2018
This will be a great project for the children to make for our church garden! Am so exited!
tp720200 6592794
Mar 03, 2018
Hope I can find the fancy pots, I like them. I want to make this for sure for my patio.
doriswood1955
Mar 01, 2018
I am going to make this in the summer, whether I win or not. I have a fairy succulent garden outside, so it might not have faries. I'm going to make it anyway.
prpldy 0351417
Feb 28, 2018
I've got to make one of these. Looks like such fun. And who doesn't believe in faries.
craftylin
Feb 27, 2018
My granddaughter loves fairy gardens. Would love to plan herbs in it so we could use it year around.
injundunebunny333
Feb 24, 2018
I am going to repurpose my grandchildren's happy meal toys and we are all going to plant seeds together this spring. Thanx for the idea.
kimlennie 9336847
Feb 23, 2018
I love fairy gardens have yet to make one. I think though I'm going to try this it looks awesome but I would use gnomes instead.
Beth McC
Feb 19, 2018
I would have to research, not sure what plants to use. I adore anything with faeries so would have lots of faerie items!
karawaldner 306086 2
Feb 19, 2018
Very cute, I have my fairy garden in a big wicker basket I turned into a pot in my craft room,
carolynhoxton 4606 948
Feb 19, 2018
This is really pretty, I have wanted to make something like this, with chalk paint for a while, just haven't done it, thanks , looks like a fun thing to do.
sgw09 061954
Feb 19, 2018
I like to use small succulents and verbena to have something to trail
Report Inappropriate Comment
Are you sure you would like to report this comment? It will be flagged for our moderators to take action.
Thank you for taking the time to improve the content on our site.