This project was submitted by one of our readers, just like you.
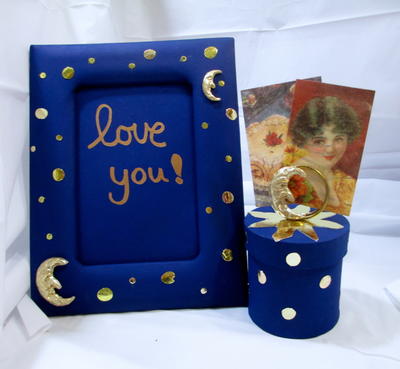
Moon DIY Frame & Trinket Box Set

Moon DIY Frame Trinket Box Set
In the Designer's Words: "A moonlit night inspired this Moon themed frame with matching trinket box. The flat blue ceramcoat paint is the perfect backdrop for the deco foil accents that represent stars and planets on this project. I added the wire on top of the canister as a fun accent that also serves a purpose. You can either choose to display a favorite photo or write a special message inside the inner frame with the Testors Marker or chalk. The Trinket box can be used to hold your favorite trinkets and it doubles as a note cardholder. I am going to use it to hold my movie tickets. This project can be personalized even more by using your favorite embellishments to add dimension to the frame and trinket box."
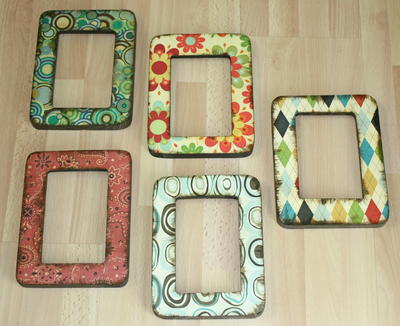
The Moon DIY Frame & Trinket Box Set would be a lovely addition to your nightstand. Many crafters and home decorators prefer to add sunshiney elements to their designs to bring forth a cheery and energetic environment. Oftentimes, the tranquil and trendy look of the moon and stars is forgotten. Luckily for you, you can learn how to make a frame and trinket box that is a soothing shade of midnight blue with twinkling stars.
Estimated CostUnder $10
Time to CompleteIn an evening

Project TypeMake a Project
Materials List
- Therm-o-web Deco Foil Transfer Sheets in Champagne
- Therm-o-web Deco Foil Foam Adhesive
- Therm-o-web Zots Singles Clear Adhesive dots
- Plaid Ceramcoat Chalk Acrylic Paint in Navy Marine
- Folk Art Multi Surface Acrylic Paint in Bright Gold
- Testors Enamel Paint Marker in Gold
- Mini Glue Dots (3/16” Diameter)
- Aluminum Armature Wire
- 3 Half Moon Charms from Kathy Davis
- A Large Holed Bead
Instructions
-
Prepare canister by removing price stickers. Prepare the frame for painting by removing the plastic insert and any price stickers that may be on it. Paint two coats of the creamcoat chalk paint onto the pieces. Be sure to paint the entire frame. Allow paint to dry between each coat. If you want a more opaque finish, then add a third coat of the paint to the pieces.
-
Take the Aluminum Armature Wire and Wrap it around the 1” diameter gold paint cylinder twice to form two loops. Remove the wire from the paint bottle. Take the plier and make a 180-degree bend on each end of the wire. Leaving a ½” of wire, cut off excess wire.
-
Using the Folk Art Multi Surface Acrylic Paint in Bright Gold, paint the wire gold with two coats of the gold and allow to dry between coats. If you want a more opaque finish, then add a few more coats.
-
Cut a piece of the Therm-o-web Deco Foil Foam Adhesive to fit the top of the canister lid. Then using a pen or pencil, draw a sun or star shape pattern onto a piece. Cut out the shape and then peel off the paper liner off one side of the shape. Adhere it to the lid.
-
Then peel off the remaining paper liner off the shape. Take the Therm-o-web Deco Foil Transfer Sheets and place the foil (color side facing up) onto the foam. To transfer the foil, rub the foil carefully with your finger to burnish the foil. Carefully peel the foil sheet away from the shape.
-
Find center of the canister lid and poke a hole big enough to fit the wire. Push wire through the hole. Carefully turn the lid over and then use a bead and E600 glue to adhere the wire to the lid from beneath. Place it aside and allow it the E600 glue to dry before proceeding to step 7.
-
Using the glue dots, attach to the frame and canister in a pleasing pattern. Take the Therm-o-web Deco Foil Transfer Sheets and place the foil (color side facing up) on top of the glue dots. To transfer the foil, rub the foil carefully with your finger to burnish the foil. Carefully peel the foil sheet away from the glue dot.
-
Take the moon charms and apply some foil glue onto the surface and allow to dry (different brands will have different curing times) until surface is sticky to the touch). Take the Therm-o-web Deco Foil Transfer Sheets and place the foil (color side facing up) on top of the glue-covered charm. To transfer the foil, rub the foil carefully with your finger to burnish the foil into all the areas of the charm. Carefully peel the foil sheet away from the charm.
-
Using the Therm-o-web Deco Foil Foam Adhesive cut a piece to fit the moon and use it to adhere the moons to the frame. Use the Therm-o-web glue dots to adhere one of the moons to the wire.
-
To finish the project, use the Testors Enamel Paint Marker in Gold to write a personal message or your favorite quote onto the inner frame.

Read NextFun Foilicious DIY Frame