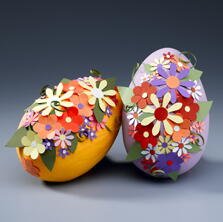
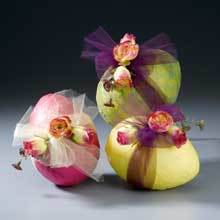
Silk Tie Easter Eggs
Learn how to dye Easter eggs using silk ties!

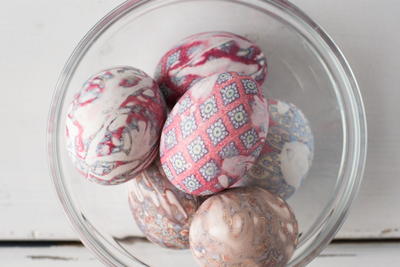
Up your Easter egg game this year with this super cool technique using silk ties. You will be amazed at how easy it is to create the most beautiful designs on your Easter eggs using just some scraps of fabric, water, and vinegar. In order for this to work, your fabric must be 100% silk. Note: the clothing dyes used for silk ties are not safe for consumption, so DO NOT eat any of the eggs after dying them with this method.
MaterialsFabric

HolidayEaster
Materials List
- Raw eggs (white)
- 100% silk ties
- Scissors
- White or light colored fabric
- Twisty ties or string
- Water
- White vinegar
Instructions
-
Collect an assortment of 100% silk ties. The uglier, the better!
-
Deconstruct the tie using your scissors; snip the seams and remove the lining so you are left with just the silk.
-
Cut a piece of the tie that’s big enough to wrap around an egg and wrap the egg with the piece of silk fabric. Note: your eggs should still be raw at this point. Make sure the printed side of the fabric is touching the egg. Try and wrap the fabric as tightly around the egg as possible without breaking it. The more direct contact the egg has with the tie, the cleaner your pattern will be. You will inevitably have folds in the fabric, which is fine; this will actually create a really pretty white swirl effect.
-
Once your egg is wrapped with the silk fabric, tie it with either a twisty tie or piece of string.
-
After they are wrapped in the silk, you’ll then wrap them once more with a light colored piece of fabric; wrap the egg just like you did with the tie and secure with a twisty tie. This is done to help hold the piece of tie next to the egg
-
Carefully place egg(s) in pot of water on the stove; fill the pot with enough water to cover eggs completely. Add three tablespoons of white vinegar to the water; this will create the chemical reaction needed for the dye to transfer onto the eggs.
-
Bring water to a boil. Once the water is boiling, reduce heat and let simmer for 15-20 minutes.
-
After 20 minutes, carefully remove the eggs from the water and let cool for about 10 minutes. Once cool, unwrap to reveal the design!
-
Optional: Rub the eggs with vegetable oil to make them shiny.
More Crafty Ideas For You
One fun and unique craft project we highly recommend for readers who enjoy making Silk Tie Easter Eggs is creating a set of Silk Tie Coasters. This project is perfect for those looking to repurpose old silk ties in a creative and functional way. By following a similar process to making the silk tie Easter eggs, but on a smaller scale, you can create beautiful coasters that will add a touch of elegance to any table setting.
Another craft project idea for those who enjoy making Silk Tie Easter Eggs is creating a Silk Tie Wall Hanging. This project allows you to showcase the vibrant and intricate patterns of silk ties in a larger format. By cutting the ties into strips or pieces and adhering them to a canvas or wooden frame, you can create a stunning piece of wall art that will add a pop of color to any room.
For readers looking to take their silk tie crafting to the next level, we suggest trying their hand at making a Silk Tie Quilt. By collecting a variety of silk ties in different colors and patterns and sewing them together in a patchwork design, you can create a one-of-a-kind quilt that is both visually striking and incredibly soft. This project is perfect for seasoned crafters looking for a more challenging and rewarding project to tackle.
Read NextRustic Cross Centerpiece
Your Recently Viewed Projects
Thanks for your comment. Don't forget to share!
mulberrygalprinces s
May 22, 2018
These are just gorgeous.i never would have thought of doing this. My mother in law came from Russia and use to make beautiful Easter eggs by using wax and dyes. She never cooked her eggs. She said when you use them and cook them that they are ok to eat.
Mistress of All Ev il
Apr 13, 2018
I never would have thought to dye eggs this way. That's cool. Though, it sucks you can't eat the eggs afterwards. That's literally the best part about dying eggs. I think I would only do like a couple using this message so not ALL of the eggs are going to waste.
Report Inappropriate Comment
Are you sure you would like to report this comment? It will be flagged for our moderators to take action.
Thank you for taking the time to improve the content on our site.