Easy Easter Card Set
Create seven different Easter cards with a kit from Ecstasy crafts. Cards feature lovely textured Easter eggs, bunnies and chicks. Say Happy Easter to everyone on your list with these pretty coordinating cards.
Kit includes:
- Dufex Easter 3-D and card element sheets
- 2 Ivory square fold over cards
- 2 Yellow rectangle cards
- 2 Lilac square cards
- 6 matching envelopes
- 1 sheet A4 lilac card stock
- 1 sheet A4 yellow card stock
- 1 box of purple paper flowers
- 2 gold sticker sheets:
- Happy Easter,
- Small Easter eggs (#898)
- 1 Transfer Sheet
- 3-D Foam Tabs
- 1 sheet of acetate
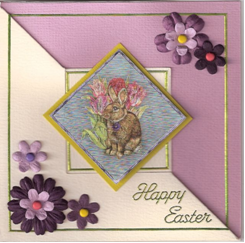
Small Easter Bunny Card
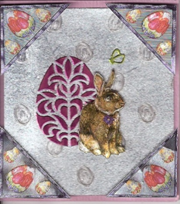
- Cut a piece of lilac card that measures 8.5 x 15 cm or 3 ¼” x 5 7/8”.
- Cut out the “egg” corners from the card elements sheet and a piece of background sheet measuring 7 x 7.7 cm or 3” x 2 3/4 “.
- Attach the silver background sheet to the lilac card with double-sided tape.
- Attach the corners using a few 3-D foam tabs.
- Colour the negative of one of the Easter eggs in purple and use the transfer sheet to transfer to the silver background.
- Press out the rabbit and attach to the card using a few 3-D foam tabs.
- Add a butterfly as desired.
- Add a “Happy Easter” sticker greeting to the inside of the card.
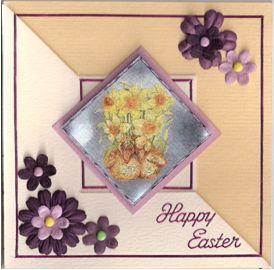
Happy Easter Bunny Card

- Fold over the front of the ivory square card and use double sided tape to secure.
- Cut a square from the lilac card stock sheet to fit the inside of the card and attach using double-sided tape.
- Colour 4 sticker lines using the Dufex green marker from package # 246017. I used lines from sticker sheet #1082.
- Make a frame using the green sticker lines around the inner square (I followed the embossed lines) and around the outer card so that it appears continuous with the inside of the card.
- Cut out the bunny design from the Dufex Card Elements sheet. I used a ruler and hobby knife.
- Cut out a small square slightly larger than the bunny design from a coordinating colour. I used a light green colour.
- Attach the coordinating square to the card so that it looks like a diamond shape with double-sided tape.
- Attach the bunny square to the green square with 3-D foam tabs.
- Colour a “Happy Easter” sticker using the same green coloured marker and attach to the card as desired.
- Decorate using the purple paper flowers as desired. I pierced a hole through both layers and attached the flowers using multi-coloured brads from Memory Makers.
Happy Easter Bunny Card
Follow the instructions for the bunny “Happy Easter” card above using yellow card stock for the background and colour the sticker lines with a Dufex purple marker.
3-D Yellow Ducks Easter Card
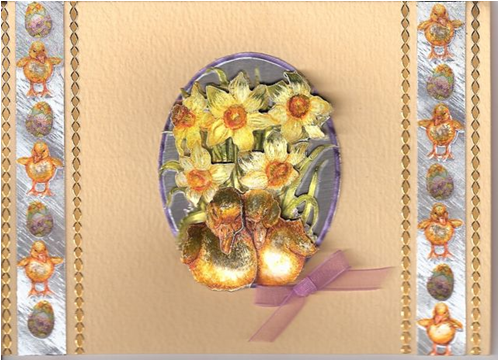
- Press out Layer #1 from the Dufex sheet.
- Attach layer #1 to a yellow rectangle card using double-sided tape.
- Place several 3-D foam tabs to the back of layer #2 and attach directly on top of layer #1.
- Repeat step #3 for layers 3 through 5.
- Cut and attach the duck border strips to either side of the rectangle card.
- Attach gold sticker to either side of duck borders.
- Add a purple box as desired.
Happy Easter Eggs Card
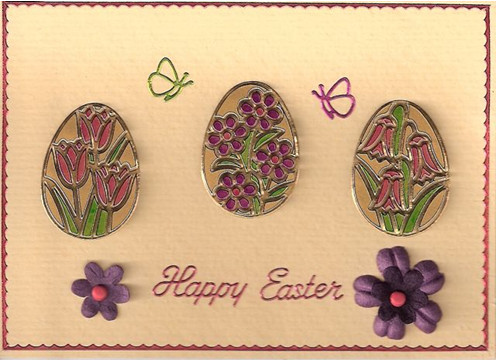
- Peel off 3 of the outline sticker eggs from sheet #.
- Place down on a rectangle yellow card spacing evenly.
- Colour the negative using green, pink and purple Dufex markers.
- Take a piece of the transfer sheet, follow the instructions on page #3 “Using the Sticker transfersheet." Transfer the negative to the sheet of acetate.
- Cut an oval around the acetate and sticker negatives.
- Place a few small pieces of 3-D foam tabs to the back of the acetate and sticker sheet.
- Attach directly over the outline sticker on the rectangle card. This will create a unique 3-D sticker effect.
- Decorate the card.
Mini Easter Egg Card
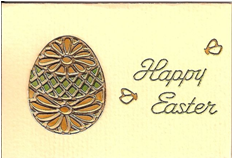
- Cut a piece of yellow card stock 12.5 x 8.5 cm or 4¾” x 3¾” and fold in half.
- Follow the instructions above to create a 3-D sticker egg using the outline sticker as the base and the negative on acetate as the second layer.
- Colour the negative before transferring using yellow and green Dufex markers.
- Colour a "Happy Easter" sticker with green Dufex marker.
- Colour a few butterflies.
3-D Easter Bunny Card
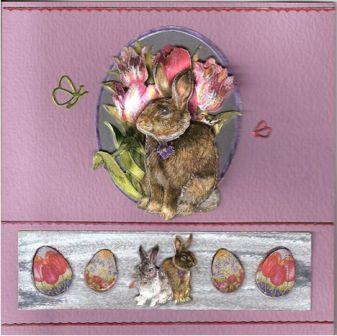
- Press out layer #1 from the 3-D sheet and attach to a square lilac card.
- Press out layer #2 and attach several foam tabs to the back this layer and attach directly on top of layer #1.
- Repeat step #2 for layers 3 through 5.
- You may wish to curl each layer with the back of scissors before attaching the foam tabs so that the layers look more realistic.
- Press out the strip with the rabbits and eggs and attach to the lilac card.
- Press out the rabbits and eggs that match the strip and attach to the strip using 3-D foam tabs.
- Decorate your cards with coloured sticker lines….I used pink lines coloued with a Dufex pink marker.
- Colour and add a few butterflies as desired around the design.
Find this Easter Card kit here for only $21.00. You can also purchase your favorites card-making materials seperately. Let these ideas inspire your own creativity with the materials.