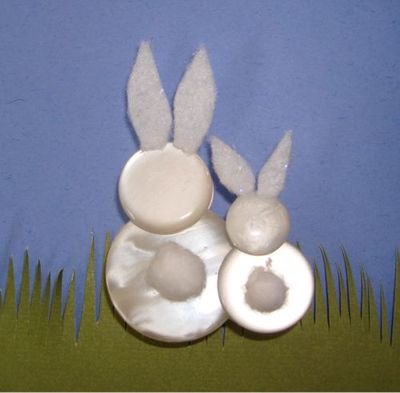
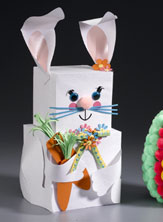
Paper Blossom Easter Bunny
Bearing blooms of spring and Easter cheer, this paper bunny is so charming! Plus this Easter craft is so quick and easy you can keep them for yourself for Easter decorating or pass along as a thoughtful Easter gift for a friend.
Materials:
- STYROFOAM™ Brand Foam:
- Block, 18" x 4" x 4"
- Cube, 5"
- White embossed scrapbooking paper, four 12" x 12" sheets
- Card stock or heavyweight paper, solids or subtle patterns: orange; green; pearl white; pearl pink; pink; blue; black; assorted pastels
- Pink pom pom, 1"
- Blue wiggle eyes, 1/2", two
- Ribbon, 3/8" x 8" length
- Craft punches: 1/4"and 1/2" circles; various flowers
- Pencil
- Paraffin or candle stub
- Serrated knife
- Ruler
- Extra-large rubber bands (optional)
- Scissors
- Yellow-head straight pins
- Glue sticks and low temperature glue gun
- White, thick craft glue
Download Pattern (pdf)
Steps:
- Wax serrated knife with candle stub or paraffin; cut 4" cube from foam block. Set aside remainder of foam block for future project.
- Cut the following strips from white embossed paper to cover foam cubes: one 4 1/2" x 12"; one 4 1/2" x 6"; two 5 1/2" x 12". In addition, cut one 4" square and one 5" square from white embossed paper; set aside.
- Overlap two short ends of 4 1/2"-wide strips 1/2" to create one 4 1/2" x 17 1/2" strip; glue overlapped ends to secure. Repeat with 5 1/2" wide strips, creating one 5 1/2" x 23 1/2" strip; glue ends to secure.
- Wrap appropriate paper strip around four sides of each foam cube, allowing paper to extend 1/2" above top edge of cube; do not glue yet. Use fingers to crimp paper at cube corners; remove paper and crisply fold at crimp marks. Score and fold a line 1/2" from top edge of strip, as well.
- Glue paper strip around cube sides, overlapping ends. Hold paper in place with hands or large rubber bands until glue dries. Clip paper corners above foam and fold excess down to top of each cube; glue to secure. Glue paper squares to tops of cubes. Use glue gun to glue cubes together as shown.
- Cut patterns from papers as indicated.
- Cut slit along bottom edge of each rabbit leg as indicated on pattern. Gently pull two sides of slit together so paper overlaps, making paper cup slightly; glue to secure. Glue legs to sides of body.
- To curl arms slightly, gently pull paper over side of pencil. Glue arms to sides of body as shown.
- Glue ear linings to ears; glue bottom corners of ears together to make them cup. Make gentle fold across horizontal center of each ear and curl over pencil so ears have shape. Glue ears to sides of head.
- For tail, cut 1 1/4" x 6" strip from white pearl paper; cut fringe every 1/8". Roll paper strip tightly and glue end to secure. Flare fringe out and down to create "cotton tail." Glue tail to back of rabbit.
- Refer to photo to glue wiggle eyes and pom pom nose to face. For cheeks, punch two 1/2" circles from pink paper; glue to face.
- Cut six 1/8" x 2 1/2" strips from blue paper for whiskers; glue to face as shown. Cut small smile from black paper and glue to face; cut narrow strip from black paper to connect mouth and nose. Cut eyelash fringe from black paper, if desired; glue just above eyes.
- Tie ribbon into bow with tails and glue to bunny's neck.
- Punch flowers of various sizes from assorted pastel papers. Punch 1/4" holes from contrasting papers for flower centers. Glue centers to flowers. Use yellow-head pins dipped in glue to attach flowers to neck and base of one ear as shown.
- For carrot leaves, cut 2" x 5" strip from green paper; cut fringe every 1/8". Glue bit of green fringe to top back of each carrot. Separate and crimp some fringe to add dimension. Glue carrots under arm as shown.
®™ Trademark of The Dow Chemical Company ("Dow") or an affiliated company of Dow.
For more project ideas, please see styrofoamstyle.com.
Read NextDollar Store Easter Bunny