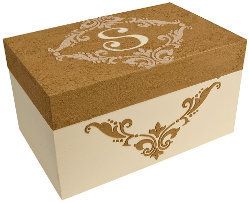
Nested Texture Box
Using textured stencils, acrylics and spray sealers you can create this decorative nexted texture box. It's made in eight steps and once you're finished you can fill it with anything you wish.

Materials:
- DecoArt Products Required
- Texture Stencils
- TS07-B - Royal Tile
- Texture Fierro
- TXF09 - Gold
- Texture Crackle
- TXC07 - Sandstone
- Americana Acrylics
- DAO3 - Buttermilk
- Americana Spray Sealers
- DAS13 - Americana Matte Spray
- Fan Brush
- DT01 - Fan Brush
- Palette Knife
- DT02 - Palette Knife
- Sponge brush
- Water container
- Palette or plastic plate
- Paper towels
- Painter's tape
- Nesting box
Steps:
Note: Allow to dry between steps.
- Use fan brush to apply thin coat of Texture Fierro Gold on box lid. Vary brush direction for brushed gold appearance on top.
- Use sponge brush and Buttermilk to paint box.
- Position stencil on box lid and secure with two small pieces of tape.
- Use palette knife to apply Texture Crackle Sandstone over open stencil areas. To remove stencil, press finger on one corner then carefully lift from opposite corner. Rinse stencil and pat dry with paper towel.
- Position stencil on box front and secure with tape.
- Use palette knife to apply Texture Fierro Gold over open stencil areas. Lift stencil.
- When dry paint or transfer monogram of your choice.
- Seal with Americana Matte Spray Sealer.
Helpful Tip
If you prefer, use DuraClear Brush-On Varnish to seal.
Read NextYarn Storage Box