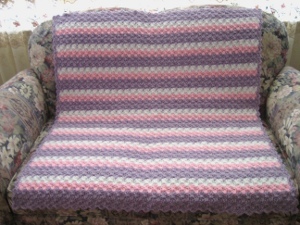
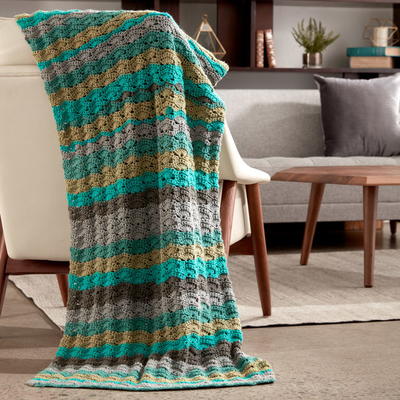
Painted Desert Sunset Afghan
Made up of a variety of stunning granny squares, this Painted Desert Sunset Afghan is an amazing crocheted afghan that would look great in anyone's home. Use the provided yarn suggestions or gather up your own yarn stash and power through it in no time with this beautiful stash-busting afghan. The different-sized granny squares in this pattern will keep any crochet fan on their toes, and the bright and fun yarn colors will help you instantly take any room in your home from drab to fab.

Materials:
- 1 skein Red Heart® With Love® yarn in Eggshell (A)
- 1 skein Red Heart® With Love® yarn in Holly Berry (B)
- 1 skein Red Heart® With Love® yarn in Mango (C)
- 1 skein Red Heart® With Love® yarn in Daffodil (D)
- 1 skein Red Heart® With Love® yarn in Lettuce (E)
- 1 skein Red Heart® With Love® yarn in Evergreen (F)
- 1 skein Red Heart® With Love® yarn in Bluebell (G)
- 1 skein Red Heart® With Love® yarn in Blue Hawaii (H)
- 1 skein Red Heart® With Love® yarn in Lilac (I)
- 1 skein Red Heart® With Love® yarn in Merlot (J)
- 1 skein Red Heart® With Love® yarn in Boysenberry (K)
- 6.0 mm [US J-10] Susan Bates® Crochet Hook
- Yarn Needle
- Painted Desert Sunset Afghan Assembly Diagram
Gauge: 12 sts and 7 rows dc =4” (10 cm). CHECK YOUR GAUGE. Use any size hook to obtain the gauge given.
Notes:
- When sewing the motifs together, be careful not to pull the yarn too tightly or puckering may occur.
- When assembling the throw, be sure to work from the back, the assembly diagram shows the back side of the throw.
- When working border rounds, there are 8 corners due to the angled corners of the throw.
Special Abbreviations:
- 2-dc cluster (Cl): [Yarn over, insert hook in next st, yarn over, draw yarn through st, yarn over, draw yarn through 2 loops on hook] twice in same st or space, yarn over, draw through all 3 loops on hook.
- A, B, C, D, E, F, G, H, I, J, K = color A, B, C, D, E, F, G, H, I, J, K
- ch = chain
- dc = double crochet
- sc = single crochet
- st(s) = stitch(es)
- ( ) = work directions in parentheses into same st
- [ ] = work directions in brackets the number of times specified
- * or ** = repeat whatever follows the * or ** as indicated

Instructions:
Octagon Motif
(make 14; 2 in each of the following color sequences):
- Color Sequence O1: I, C, B, F, A, H
- Color Sequence O2: D, E, K, H, A, I
- Color Sequence O3: F, H, D, G, A, E
- Color Sequence O4: K, D, G, J, A, B
- Color Sequence O5: E, G, J, D, A, F
- Color Sequence O6: J, I, E, C, A, G
- Color Sequence O7: H, B, F, K, A, C
- With first color, ch 4; join with a slip st to form a ring. Round 1 (right side): Ch 3 (counts as dc, here and throughout), dc in ring (counts as first Cl), ch 1, (Cl, ch 1) 7 times in ring; join with a slip st in top of beginning ch-3—8 Cl; 8 ch-1 spaces. Fasten off.
- Round 2: With right side facing, join next color in any ch-1 space, ch 3, (dc, ch 1, Cl) in same ch-1 space, (Cl, ch 1, Cl) in each ch-1 space around; join with a slip st in top of beginning ch-3—16 Cl; 8 ch-1 spaces. Fasten off.
- Round 3: With right side facing, join next color in any ch-1 space, ch 3, 4 dc in same ch-1 space, *sc between next 2 Cl**, 5 dc in next ch-1 space; repeat from * around, ending last repeat at **; join with a slip st in top of beginning ch-3—8 shells. Fasten off.
- Round 4: Working in back loops only, with right side facing, join next color in 3rd dc of any 5 dc group, ch 1, sc in same st, *hdc in next dc, dc in next dc, 2 tr in next sc, dc in next dc, hdc in next dc**, sc in next dc; repeat from * around, ending last repeat at **; join with a slip st in top of first sc—56 sts. Fasten off.
- Round 5: With right side facing, join next color with a slip st between 2 tr of any 2-tr pair, *ch 3, skip next 3 sts, working over next sc in Round 4, dc in corresponding dc, 1 round below, ch 3, skip next 3 sts**, slip st between 2 tr of next 2-tr pair; repeat from * around, ending last repeat at **; join with a slip st in first slip st—16 ch-3 spaces. Do not fasten off.
- Round 6: Slip st in next ch-3 space, ch 3, 3 dc in same ch-3 space, *ch 2, 4 dc in next ch-3 space, ch 1**, 4 dc in next ch-3 space; repeat from * around, ending last repeat at **; join with a slip st in top of beginning ch-3—8 ch-2 corner spaces; 8 ch-1 side spaces. Fasten off.
- Round 7: With right side facing, join next color in any ch-2 space, ch 3, *dc in each of next 2 dc, ch 1, skip 1, dc in next dc, dc in next ch-1 space, dc in next dc, ch 1, skip one, dc in each of next 2 dc**, (dc, ch 2, dc) in ch-2 space; repeat from * around, ending last repeat at **, dc in first ch-2 space, ch 2; join with a slip st in top of beginning ch-3—8 ch-2 corner spaces; 2 ch-1 spaces across each side. Fasten off, leaving a long sewing length.
Triangle Motif
(make 20; 2 in each of the following color sequences):
- Color Sequence T1: K, F, J
- Color Sequence T2: B, I, G
- Color Sequence T3: J, D, H
- Color Sequence T4: E, J, D
- Color Sequence T5: G, K, C
- Color Sequence T6: H, B, E
- Color Sequence T7: F, H, I
- Color Sequence T8: C, G, F
- Color Sequence T9: I, E, K
- Color Sequence T10: D, C, B
- With first color, ch 4; join with a slip st to form a ring. Row 1 (right side): Ch 3, 2 dc in ring, ch 2, 3 dc in ring, turn—6 dc; 1 ch-2 space. Fasten off.
- Row 2: With right side facing, join next color in top of beginning ch-3, ch 3, dc in first st, dc in next st, ch 1, (3 dc, ch 2, 3 dc) in next ch-2 space, ch 1, skip next st, dc in next st, 2 dc in last st, turn—12 dc; 2 ch-1 spaces; 1 ch-2 space. Fasten off.
- Row 3: With right side facing, join next color in top of beginning ch-3, ch 3, dc in same st, dc in next st, ch 1, 3 dc in next ch-1 space, ch 1, (3 dc, ch 2, 3 dc) in next ch-2 space, ch 1, 3 dc in next ch-1 space, ch 1, skip next st, dc in next st, 2 dc in last st—18 dc; 4 ch-1 spaces; 1 ch-2 space. Fasten off, leaving a long sewing length.
Corner Motif
(make 4; 1 in each of the following color sequences):
- Color Sequence C1: G, J, E
- Color Sequence C2: F, G, I
- Color Sequence C3: B, E, D
- Color Sequence C4: H, K, C
- With first color, ch 4; join with a slip st to form a ring. Row 1 (right side): Ch 3, 2 dc in ring, [ch 2, 3 dc] twice in ring, turn—9 dc; 2 ch-2 spaces. Fasten off.
- Row 2: With right side facing, join next color in top of beginning ch-3, ch 3, dc in first st, dc in next st, ch 1, (3 dc, ch 2, 3 dc) in next ch-2 space, ch 1, (3 dc, ch 2, 3 dc) in next ch-2 space, ch 1, skip next st, dc in next st, 2 dc in last st, turn—18 dc; 3 ch-1 spaces; 2 ch-2 spaces. Fasten off.
- Row 3: With right side facing, join next color in top of beginning ch-3, ch 3, dc in first st, dc in next st, ch 1, *3 dc in next ch-1 space, ch 1, (3 dc, ch 2, 3 dc) in next ch-2 space, ch 1; repeat from * once, 3 dc in next ch-1 space, ch 1, skip next st, dc in next st, 2 dc in last st—27 dc; 6 ch-1 spaces; 2 ch-2 spaces. Fasten off, leaving a long sewing length.
Square Motif
(make 6; 1 in each of the following color sequences):
- Color Sequence S1: I, K, F, A, D, J, H
- Color Sequence S2: B, G, C, A, E, D, K
- Color Sequence S3: E, F, I, A, H, K, D
- Color Sequence S4: G, B, E, A, J, F, I
- Color Sequence S5: D, H, K, A, B, C, J
- Color Sequence S6: C, J, H, A, I, G, F
- Work same a Octagon through Round 3.
- Round 4: Working in back loops only, with right side facing, join next color in 3rd dc of any 5 dc group, ch 1, sc in same st, sc in each of next 2 dc, *hdc in next sc, sc in each of next 3 dc, hdc in next dc, dc in next dc, (tr, ch 2, tr) in next sc, dc in next dc, hdc in next dc**, sc in each of next 3 dc, rep from * around, ending last repeat at **; join with a slip st in first sc—4 ch-2 spaces; 13 sts across each side. Fasten off.
- Round 5: With right side facing, join next color with a slip st in any ch-2 space, ch 3, 2 dc in same space, *[ch 1, skip next st, dc in each of next 3 sts] 3 times, ch 1, skip next st**, (3 dc, ch 2, 3 dc) in next ch-2 space; repeat from * around, ending last repeat at **, 3 dc in first ch-2 space, ch 2; join with a slip st in top of beginning ch-3 space—4 ch-2 corner spaces; 4 ch-1 spaces across each side. Fasten off.
- Round 6: With right side facing, slip st next color in any ch-2 space, ch 3, 2 dc in same space, *(ch 1, 3 dc) in each of next 4 ch-1 spaces, ch 1**, (3 dc, ch 2, 3 dc) in next ch-2 space, ch 1; repeat from * around, ending last repeat at **, 3 dc in first ch-2 space, ch 2; join with a slip st in top of beginning ch-3—4 ch-2 corner spaces; 5 ch-1 spaces across each side. Fasten off.
- Round 7: With right side facing, join next color with a slip st in any ch-2 space, ch 3, 2 dc in same space, *(ch 1, 3 dc) in each of next 5 ch-1 spaces, ch 1**, (3 dc, ch 2, 3 dc) in next ch-2 space, ch 1, repeat from * around ending last repeat at **, 3 dc in first ch-2 space, ch 2; join with a slip st in top of beginning ch-3—4 ch-2 corner spaces; 6 ch-1 spaces across each side. Fasten off, leaving a long sewing length.
Assembly
- With wrong sides facing, arrange all motifs following assembly diagram. With yarn needle and sewing lengths, working through back loops of sts, whip stitch motifs together.
Border
- Round 1 (right side): With right side of afghan facing, join A with a slip st in any ch-2 corner space, ch 1, *(sc, ch 2, sc) in ch-2 corner space, sc evenly around entire afghan, working 1 sc in each dc and each ch-1 space, (sc, ch 2, sc) in each of the 7 remaining ch-2 corners, and 15 sc evenly spaced across each triangle edge (do not work in ch-spaces before and after each triangle); join with a slip st in first sc—8 ch-2 corner spaces. Fasten off.
- Round 2: With right side facing, join G with a slip st in first sc after any ch-2 corner space, ch 1, *sc in each sc to next ch-2 space, ch 2, skip ch-2 space, repeat from * around; join with a slip st in first sc. Fasten off.
- Round 3: With right side facing, join H to any ch-2 corner space, ch 3, (dc, ch 2, 2 dc) in same space, ch 1, skip next sc, *(dc in each of next 3 sc, ch 1, skip next sc) across to next ch-2 corner space**, (2 dc, ch 2, 2 dc) in next ch-2 corner space; repeat from * around, ending last repeat at **, join with a slip st in top of beginning ch-3. Fasten off.
- Round 4: With right side facing, join H with a slip st in any ch-2 corner space, ch 5 (counts as first dc, ch 2), dc in same ch-2 corner space, ch 1, *(3 dc in next ch-1 space, ch 1) across to next ch-2 corner space**, (dc, ch 2, dc) in next ch-2 corner space; repeat from * around, ending last repeat **; join with a slip st to 3rd ch of beginning ch-5. Fasten off.
- Round 5: With right side facing, join D with a slip st in any ch-2 corner space, ch 5, dc in same ch-2 corner space, 2 dc in next ch-1 space, ch 1, *(3 dc in next ch-1 space, ch 1) across to next ch-1 space before next ch-2 corner space, 2 dc in next ch-1 space**, (dc, ch 2, dc) in next ch-2 corner space, 2 dc in ch-1 space, ch 1; repeat from * around, ending last repeat at **; join with a slip st to 3rd ch of beginning ch-5. Fasten off.
- Round 6: With right side facing, join E to any ch-2 corner space, ch 3, (dc, ch 2, 2 dc) in same ch-2 space, ch 1, *(3 dc in next ch-1 space, ch 1) across to next ch-2 corner space**, (2 dc, ch 2, 2 dc) in next ch-2 corner space; repeat from * around, ending last repeat at **; join with a slip st top of beginning ch-3. Fasten off.
- Round 7: With right side facing, join I with a slip st in any ch-2 corner space, ch 1, *(sc, ch 2, sc) in ch-2 corner space, sc in each dc and ch-1 space across to next ch-2 corner space; repeat from * around, ending last repeat at **; join with a slip st in first sc. Fasten off.
- Round 8: With right side facing, join F with a slip st in first sc after any ch-2 corner space, ch 1, *sc in each sc to next ch-2 space, ch 2, skip next ch-2 space; repeat from * around; join with a slip st in beginning sc. Fasten off.
- Round 9: With right side facing, join K with a slip st in sc before any ch-2 corner space, *5 hdc in next ch-2 corner space, slip st in next sc, (skip next st, 3 hdc in next sc, skip next st, slip st in next sc) across to first sc before next ch-2 corner space; repeat from * around; join with a slip st in first hdc. Fasten off.
Your Recently Viewed Projects

Thanks for your comment. Don't forget to share!
Drakes Nest
Apr 01, 2017
Love the pattern, however, when I download, parts of the pattern are cut off with the "dismiss/allow notifications" stuff on the pattern. This happens everytime I download one of your patterns and I end up hand-writing the missing/cut off instructions. Wish you would fix that.
Editor Dana
Apr 03, 2017
Hi there! I'm so sorry to hear about the printing trouble! Have you tried dismissing the notifications, or accepting them? I've enabled the desktop notifications and I'm not seeing the print issue on my end. Regardless, I'll have our tech people look into it! Thank you for bringing this to our attention. -Dana from FaveCrafts
princess6860504
Mar 24, 2017
The "Painted Desert Sunset Afghan" is so amazingly beautiful. I think it is deceiving because you look at it and it looks so detailed and therefore it must be so difficult to make! However, I think the constant color changes are what give it the intricate look. It will most likely take a LOT of your time to crochet this, but if you're patient then you'll have no problem. I would love to work this up and see how it all comes together.
Zeemer
Apr 13, 2016
We're lucky, crocheters because the pattern is found just right on the same page. But the assembly diagram has been provided as a link http//www.favecrafts.com/masterimages/Crochet/Pain == ted-Desert-Sunset-Afghan-diagram.jpg. I'm currently making a granny square design afghan then after this, I'm gonna start a non-granny square afghan probably start this one. This is definitely in my bucket list.
ninaf
Mar 20, 2014
I think there may be a misprint in the directions for the border of this afghan. The first color joined is A (Eggshell), the second is G (Bluebell), the third is H (Blue Hawaii) but then after you fasten off H, it says to join H AGAIN. I looked at the photographs, and it looks to me as if a reddish color is joined after the H row. Am I correct? Please advise ASAP. I really like this afghan, and I'll probably just go ahead and join a red color anyway, even if I don't receive a response about the misprint.
JANIE OH
Mar 15, 2014
Hi...I am looking for the assembly diagram as well. I have quite a few squares done...I love it so far.
overbrookshaw
Mar 07, 2014
Oh I forgot to ask, how are you joining all those ends? Yours is so beautiful. Thanks again, Yvonne.
overbrookshaw
Mar 07, 2014
Hi, my name is Yvonne, I have started the afghan above. I have the big round ones done. I am trying to do the small triangles. I am really having trouble understanding what the directions mean. They are not real clear. Can you help me? Can you Get me started? I hate to give up on it now. Thanks so much.
Report Inappropriate Comment
Are you sure you would like to report this comment? It will be flagged for our moderators to take action.
Thank you for taking the time to improve the content on our site.