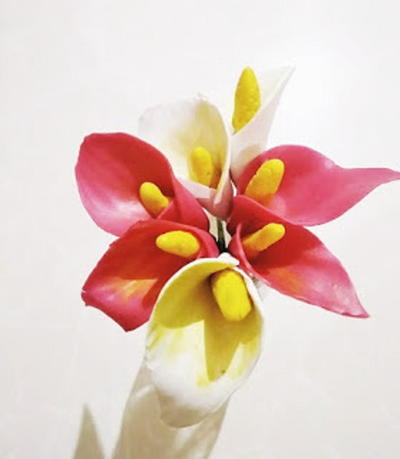
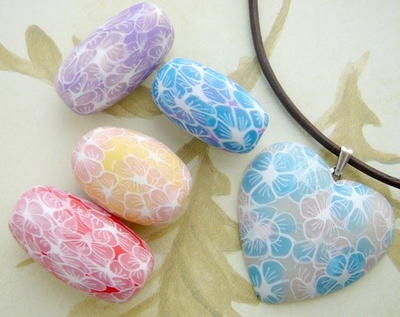
Opaque Flower Clay
Follow the detailed step-by-step photos in this Opaque Flower Clay tutorial to learn how to make clay beads with tiny blossoms in them. This beautiful clay technique does not require painting and it's even easy for beginners! By making easy clay canes, you can create this look of painted jewelry just by combining a few colorful clay pieces together. This is a well-loved and simple technique that anyone can master, and once you learn how to create clay canes, you can make stunning jewelry, decorations, and more with ease.

You can find this project, as well as many other Polymer clay tutorials, in our free eBook, 24 Polymer Clay Tutorials: Polymer Clay Jewelry, Decor and More!

Materials:
- 1/2 block of porcelain white or translucent Cernit
- 1 small pea size piece of colored Cernit
- 1 block of opaque white Cernit
- Scrap clay or other colors to make the beads
- Clay blade
- Pasta machine
Instructions:
-
Condition a half of block of Cernit porcelain white or translucent until soft and pliable.
-
Add a small pea size ball of color to the conditioned half block of clay. Mix until it is one color.
-
Roll the colored clay in to a plug that is about 1" in diameter.

-
Condition and roll out the Opaque white clay on the 5th thickest setting in the pasta machine. Trim one edge of this sheet to get a straight edge.
-
Lay the colored clay plug on the straight edge and cut a strip the width of the plug and long enough to wrap around the plug.

-
Roll up the plug in the sheet.
-
Roll the plug over the sheet in front of the plug gently and roll the plug back. Cut inside the line you will see on the sheet with the blade.
-
Remove the excess sheet, set aside, and then roll the plug and sheet up. The ends will match or very close. Press the edges together and smooth the seam away.
-
Cut the plug on the side with your clay blade about half way through the plug. Do not cut where the seam was.

-
Gently move the cut open and take the excess sheet and place in to the opened cut. Close up the cut in the clay with the excess piece inside the plug.
-
Trim the excess sheet off at the edge of the opening on the plug.
-
Make another cut in to the plug on one side of the center cut and place the excess sheet piece in to this cut and trim away the excess level with the plug side.

-
Do this again on the other side of the center cut.
-
Close all the cuts with sheets and gently press everything together.
-
Compact the whole plug together.Squeeze it in the center from all sides to form a little waist. As you rotate and press the cane move up to one end of the cane. Then turn the cane over and start at the center waist and rotate and press and you move up to the other end. I keep doing this until the cane or plug is longer and half of the size around that it was. Do not worry about lumps and bumps. The rolling will take the lumps out. By compacting the plug this way, it will keep the cane from shifting as much inside. Then place on your work surface and roll the whole log down to about 3/8" in diameter. You will need 5 pieces about the same length for the petals.

-
Make a little pinch on one side of each of the petal logs where lines come to the outside of the log. Turn over the logs to the other end and pinch each one of those ends.
-
Line up the pinches on a log by holding the pinches and rocking them in to alignment. Then pinch down the length of the cane from pinch to pinch. Do this to all 5 pieces. Make the point on the log down the side pretty sharp.
-
Place three of the logs together with the points in the middle. There will be a little canal or channel down the center of the three logs.

-
Roll a small coil 1/8" or a little larger depending on the size of the channel to go in the center.
-
Now place in the other two petals lining them up from one end to the other. Gently press from one end to the other on each petal to press it together.

-
You can pack the outside with color or you can coax the cane down by gently sliding your finger and your thumb down the dips on opposite sides. Then turning the cane around and sliding down the length of the cane again. You keep turning and sliding and the cane will lengthen. Then I turn the cane over from end to end and do it the same process again. It will not be all perfect and you will have a knobby end, I take advantage of the smaller and larger flowers when I use them. This is a very gentle process. If the dips fill in you can run a tool down the length of the cane.

-
This is the cane pulled out. You slice these off as thin as possible and place on to a core of clay in the color of your choice. It is not imperative for the beads I do to have the complete cane slice and when I roll these in to the core it will give the illusion of many layers. It is important to watch color that you apply the slices to, it will change the color of the petals.

Read NextShell Paint Palette
Your Recently Viewed Projects

Thanks for your comment. Don't forget to share!
mulberrygalprinces s
Aug 08, 2016
This is great. I just bought a pasta maker and clay and just was waiting for the right pattern to try it out. This is just right. The possibilities are endless with his as a starting place. The instructions are simple and shown very Clearly. Thank you for offering this for free.
pepperanne14 05270 81
Sep 17, 2012
a good tut :) Lots of clear photos and directions. Well done.
agypsyangel
Feb 10, 2011
This is a wonderful tutorial. I have always wanted to learn this process.
curley21
Jun 05, 2010
I found a pasta machine at a yard sale for $5. I am going to attempt this project. Hope it turns out like the pictures!
Pratchettsmom
Apr 04, 2010
To Silkie, the pasta machine is used in step 4, where you condition and roll out the sheet of white clay. This gives it a uniform thickness so that you can wrap it around the colored clay plug.
Silkie
Feb 22, 2010
I love those clay beads! I must be stupid or can't read though, cause I can not find when you put them through the pasta machine. What am I missing? Thanks, Deb
KrazeeBrod
Feb 19, 2010
I also am new to clay and I think this will be just the project to help me learn better how to shape and create beads. Gorgeous!
BeeJay
Jan 07, 2010
I am new to Clay, this looks easy and managable, can't wait to try it in several color combinations!
Report Inappropriate Comment
Are you sure you would like to report this comment? It will be flagged for our moderators to take action.
Thank you for taking the time to improve the content on our site.