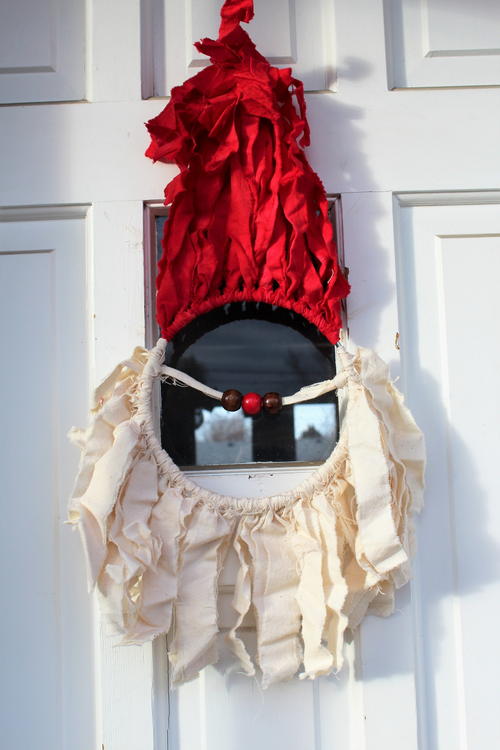
Santa Claus Macrame Door Decor

Instead of a traditional wreath, make this Santa Claus door decor! This basic macrame project features simple knots and torn fabric for a rustic look.
From the Designer: "This easy DIY Santa Claus Door Decor is just that – easy. I could call it a macrame project but really you just use one of the easiest knots – the larks head knot – over and over again. It’s a perfect project for older kids to make too. As long as they can master that one simple knot, they can easily create this project. You can make a large one, like I did, to hang on your door or in a window or make them ornament sized. You decide!"
Time to CompleteIn an evening
Main MaterialFabric

HolidayChristmas
Project TypeMake a Project
Materials List
- A metal or wooden ring: For ornaments, I have used rings as small as 1 1/2-2 inches and for door decor, as large as 14 inches in diameter.
- Red and white macrame cord or yarn or embroidery floss (if making really small ones). Ribbon would be really pretty too! For this one, I used muslin fabric. I tore it into strips to give it that rustic look. For the red part, I used fabric dye to colour the plain muslin.
- 3 beads: 2 for Santa’s eyes (whatever colour you would like them to be) and a red one for his nose. The size is dependent on the size of the ring (his face) that you use. You just want it to look proportional.
- A pair of scissors.
- Any embellishments you might wish to add. I have tied pieces of holly onto some of the bigger ones sometimes and used jingle bells on the smaller ones.
Instructions
-
You’ll want to begin by cutting your yarn/fabric strips/macrame cord etc into the lengths you will need. My ring is 15 inches in diameter and I cut my fabric strips into 36 inch lengths. If in doubt, it’s always better to go longer than shorter because you can always trim it after it’s complete.
-
You will need enough strips to go about a third of the way around the ring with white and then about a third of the way around the ring with red. You will also need an extra strip of red to tie off the hat and an extra strip of white to make the face.
-
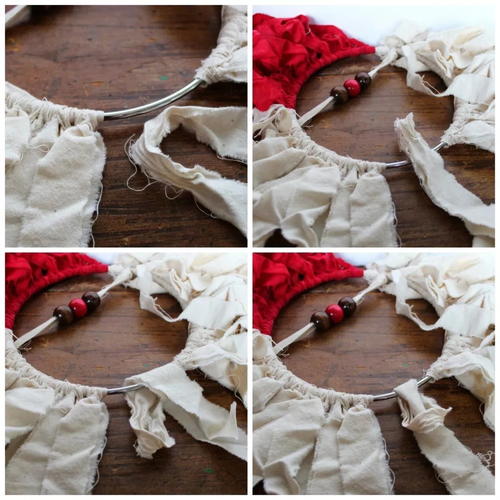
To make the larks head knots, you want to fold a strip of fabric in half. Place the loop (where the fold is) on the ring as shown in the photos. Fold it over the ring towards the back and then pull the ends of the fabric strip through the loop.
Note: click image for larger version. -
As you are making the knots, just give them a double check and straighten them out if they get twisted. You want them all to lie properly on the ring. Once you are satisfied that they are straight, pull to tighten. Repeat until you have completed all of the strips.
-
The beard just hangs as is but once you have completed all of the knots for the hat, you need to gather them up and use another piece of red to tie them together. This will form the hat shape. Note: I use the excess part of this red tie to create a hanger for the Santa.
-
Now to make the face. String the beads (with the red one in the middle) onto a white strip. Tie it at each end to secure it onto the ring.
-
Trim any stray pieces as needed and hang up your Santa face!
Read NextFolded Book Christmas Tree