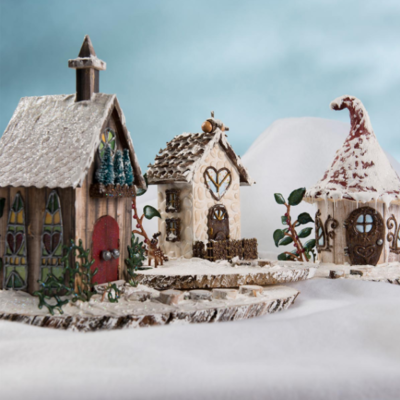
Fairy Garden DIY Snow Village

Want to add a little more magic around your home this holiday season? By creating this Fairy Garden DIY Snow Village, your winter decor will be complete. Believe it or not, this enchanting snow village can be made entirely by you using some handy dandy Mod Podge materials. You may have seen a similar decor set at your local craft or home store, but you can recreate this beautiful snowy village for a cheaper price. Once the project is done, place this piece in the center of your kitchen table where everyone can enjoy the view.
Estimated Cost$31+
Time to CompleteWeekend project
MaterialsClay, Paint
Primary TechniqueHome Decor

SeasonWinter
HolidayChristmas
Project TypeMake a Project
Materials List
- Mod Podge ® Silicone Craft Mat
- FolkArt ® Acrylic Colors - Real Brown, 2 oz.
- Mod Podge ® Mod Melts - White Milk Glass
- Mod Podge ® Mod Melter
- Mod Podge ® Mod Molds - Ornaments
- Mod Podge ® Mod Melts - MetallicsNumber Needed: 1$10.99
- Mod Podge ® Collage Clay - Vanilla White
- FolkArt ® Multi-Surface Satin Acrylic Paints - Burnt...
- FolkArt ® Acrylic Colors - Hunter Green, 2 oz.
- FolkArt ® Acrylic Colors - Cardinal Red, 2 oz.
- FolkArt ® Acrylic Colors - Linen, 2 oz.
- FolkArt ® Acrylic Colors - Titanium White, 2 oz.
- FolkArt ® Acrylic Colors - Vintage White, 2 oz.
- FolkArt ® Acrylic Colors - Clover, 2 oz.
- Mod Podge ® Glitter - Extreme Glitter, 8 oz.
- Mod Podge ® Ultra Matte Chalk Finish, 8 oz.
- Fairy Garden DIY Snow Village Template
Instructions
Here is the step-by-step guide to create your very own Christmas Village:
-
Select a wood finish for the Church and the Cone Shape houses. Cut the paper to fit and Mod Podge onto the houses with Ultra Matte Chalk.
-
For the Tall house, paint the base of the house in Vintage white. Let dry. Using the Mod Melter, create “stone” mounds directly on the sides of the house. Let dry completely on a side before moving on to another side. Let dry and then paint the stones with Linen.
-
Paint the Church doors Cardinal Red. Let dry.
Roof
-
Church roof is made of embossed scrapbook paper cut to fit. Mod Podge in place. And then add collage clay “snow” and sprinkle with glitter before it dries.
-
Tall house roof is made of coating the roof in collage clay and inserting pine cone buds into the clay. Sprinkle with glitter before it dries.
-
For the Cone Shape house roof. Cover the roof in aluminum foil and mold into a mushroom top shape. Cover the shape in masking tape. Coat with collage clay and smooth out using a damp brush. Let dry. Paint the mushroom top in Cardinal Red with Vintage White dots. Let dry. Lastly, add collage clay “snow” and sprinkle with glitter before it dries.
Embellishments
-
Print the downloadable Winter Fairy House template at 100%. Lay the template underneath the silicone craft mat. Trace the outlines of the church windows in Silver. Let cool and remove from mat. Repeat until you get the amount of windows you need. Using the template as a guide, color in the stain glass design on a piece of paper. Cut it out and glue to the back of the Mod Melt windows.
-
Outline and fill in the doors with the Mod Melter in Gold. Let cool. Paint Real Brown and dry brush wood grain in Burnt Umber. Let dry. Glue a yellow piece of paper behind the window openings.
-
Outline the arch windows with decorative trim in Gold. Let cool. Repeat. Paint Real Brown and dry brush wood grain in Burnt Umber. Let dry. Glue a yellow piece of paper behind the window openings.
-
Outline and fill in the foliage stems using White Mod Melts. Let cool then add the berries to the stems. Repeat to achieve the desired amount of foliage embellishments. Paint the stems in Real Brown, the leaves in Hunter Green and Clover and the berries Cardinal Red. Let dry completely. Add a final coat of Extreme Glitter for an added sparkle.
-
Using the Mod Mold, create four rectangle frames for the Tall house windows. Mod Mold six of the floral square design. Mod Mold two rows of the trim. Paint all of the cooled molds in Real Brown.
-
Apply the embellishments to the houses with the Mod Melter. Touch up with paint as needed. See project photo as guide.
Finishing Touches
-
Glue the each house to a large wood round. Glue small wood rounds to create a pathway between houses.
-
Apply the collage clay “snow” on the ground and insert the foliage and deer. Finally, sprinkle glitter before it dries.
Read NextFolded Book Christmas Tree


Thanks for your comment. Don't forget to share!
Marilyn B
Nov 03, 2017
This is a wonderful and professional looking project and I could see where this is one of those treasures that would become family heirlooms and a tradition to bring out each year and passed on to children for the next generation! With those small battery pack light sets, or even battery flicker tea lights, you could easily insert those inside, or even leave areas in the bottom to poke some regular string lights inside, make your windows colorful but somewhat translucent to get that light glowing even more. Super beautiful project idea!
Weberme
Jul 23, 2017
Oh Wow. Let me see. I love fairy houses and gardens as much as my grand daughter and tis snow village is cute and so easy to make.I would add a lot of fairies walking around town some with little gifts in hands, some glitter sprinkled around for fairy dust, a Christmas tree decorated and a frozen pond with fairies skating. I would put lights in houses and some hanging through the town on homemade poles. This is such a fun project to have the whole family do. I may even hit my stash pile to see what I can add to the houses.Thanks.
neeterg
Jul 20, 2017
I'm not sure how I would finish this but I think it would have to be a Christmas theme.
Deb E
Jul 19, 2017
I'd add mini lights plus spread some fiber-glass around for snow. Such a pretty village.
mommajoe824 283183 9
Jul 18, 2017
I would add lighting to the buildings. Lots off snow, also make some little fairies hanging around, with an Angel watching over.
EnchantedNM
Jul 17, 2017
This kit is so adorable!! I have been carried away by the miniature houses fad and would like to learn about making smaller structures from this kit. Thank you for the chance!
connie120 9579351
Jul 17, 2017
I love Fairies, and the Snow Village is just adorable. I think that I would put it on a board base and drill holes so that I could put lights inside the houses and then cut out the windows so that the light would shine thru. I would also make a skating ring out front with some little fairies on it out of a mirror with some snowmen make out of clay. I am trying to think of how I could put a music box somewhere in there, I will figure it out yet.
Deb E
Jul 17, 2017
I'd customize the village by using shades of blue and white paint and glitter on the houses and add tiny lights.
macaskillbarbara 2 542091
Jul 17, 2017
Totally adorable! I love all things faerie and this is a sweet creation! TFS!
lcarr
Jul 13, 2017
This is really pretty. I think if I was to make it I would use an exacto knife and cut our the windows of the church. I would secure a coloured cellophane over them on the inside. Then I would used led lights inside of the church, so that when the lights are turned on the windows glow. I might also add tiny led lights to a Christmas tree, or along the edges of the rooves of the houses.
Weberme
Jul 16, 2017
You got that spot on. I was thinking the same thing. I would like to also find a way for some smoke to come out the chimney not real smoke and some sleighs and winter things outside. You could also use some hot glue to make it look like icicles hanging from roof and a snow fairy outside. I love fairy gardens and this can be added to it. Have you made this yet?
lcarr
Jul 17, 2017
No, I haven't made this yet. This is the sort of craft my mother really enjoys, so I am hoping to do it with her when she visits in December. For your smoke idea, I wonder how it would turn out if you put a small, covered incense burner in the chimney section. Make a cone or tube to cover the burner so that the smoke can only go up the chimney.
kimlennie 9336847
Jul 13, 2017
This is so pretty. I would use it just like it says on my dining room table. Just hope my crafting skills are up to par to make this.
Kim K 12345
Jul 10, 2017
Thank you for this great tutorial! I'm not sure if I will be able to make my own snow village for this holiday season, but this post is very inspiring!
Report Inappropriate Comment
Are you sure you would like to report this comment? It will be flagged for our moderators to take action.
Thank you for taking the time to improve the content on our site.