O Tannenbaum Die Cut Christmas Card
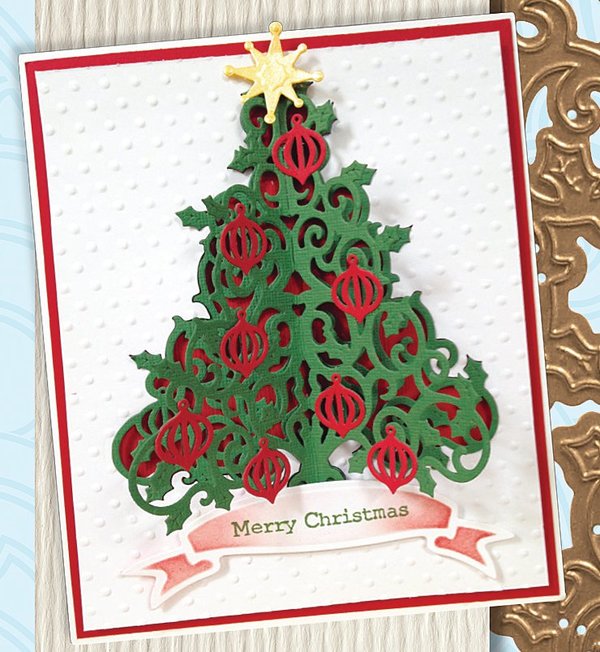
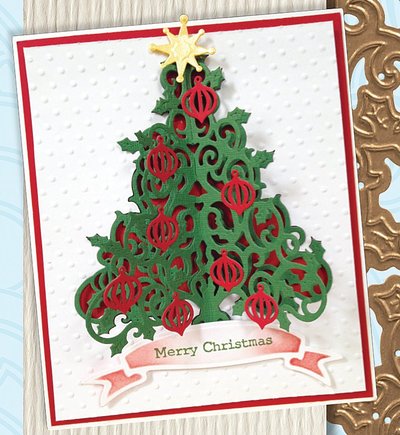
Send your loved ones a Christmas greeting they're sure to remember for years to come with this O Tannenbaum Die-Cut Christmas Card. Custom Christmas cards like this one are great for sending a message to a loved one this holiday season...and you're sure to impress family and friends when you tell them that you made this card yourself! Embellished with a tree that literally pops off the page, this handmade Christmas card is sure to stand out among the rest.
Primary TechniquePaper Crafts

SeasonWinter
Materials:
- Spellbinders® 3D Christmas Tree- S6-014
- Spellbinders® Dainty Dots- EG- 002
- Spellbinders® Banners- S4-324
- Cardstock: Cream, Forest Green, Cranberry, Pale Yellow
- Rhinestones: Want2Scrap 72 count Silver Rhinestone Bling
- Ink: Forest Green, Cranberry
Instructions:
- Create card base by trimming cardstock 7 ¾” X 10 ¾; fold in half.
- Trim Forest Green 4 7/8 X 6 ¾; adhere to card front.
- Trim Cranberry 4 ½ X 6 3/8”; adhere to card front.
- Trim Cream 4 3/8 X 6 ¼”; Center the 3D Christmas Tree die on this panel, die cut and remove excess paper.
- Emboss the cream panel with Dainty Dots M-Bossabilities, adhere to card with foam adhesive.
- Die cut 3D Christmas Tree from Forest Green; Die cut (16) ornaments from Cranberry cardstock, adhere ornaments to tree (see photo for placement); embellish tree branches with Rhinestones.
- Adhere two pieces of 3D Christmas Tree by applying adhesive only down the center of the tree.
- Place finished tree into embossed cream panel using foam adhesive.
- Die cut star from Pale Yellow cardstock, adhere to top of tree with foam adhesive.
- Die cut banner using Banners Die from Cream cardstock; leave banner in die and stencil inside edges of banner with Cranberry ink.
- Stamp sentiment on banner with Forest Green Ink, adhere to card front with foam adhesive.
 You can find this project-and many more-in our new free eBook, 11 DIY Christmas Decorations and Ideas.
Read NextChristmas Door DIY Greeting Card

