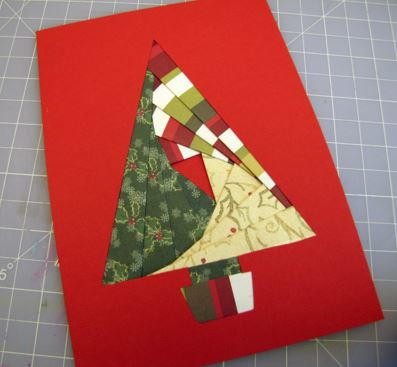
Christmas Door DIY Greeting Card
Learn how to make Christmas cards at home with this easy and lovely tutorial.

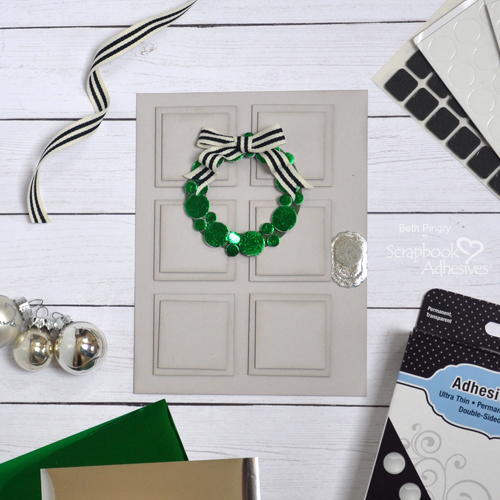
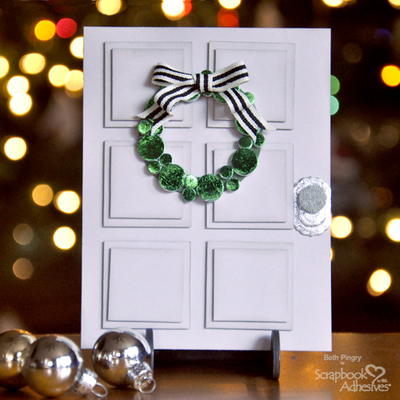
Make a DIY Christmas card that is effortlessly elegant and lovely when you follow this tutorial. There is no better greeting than a festive door! Learn how to create a lovely holiday wreath card that is simple and sweet. By using foam shapes and shiny foils, you can create a little wreath in the center of a welcoming door. There is nothing more inviting! You'll love how easy this project is to make, and your loved ones will adore receiving a handmade card this holiday.
Time to CompleteUnder an hour
Primary TechniquePaper Crafts
Project or Page SizeCard
Type of Paper UsedCardstock

SeasonWinter
HolidayChristmas
Project TypeMake a Project
Materials List
- Scrapbook Adhesives by 3L:
- 3D Foam Circles White
- Thin 3D Foam Squares Black
- Adhesive Dots Medium Ultra Thin
- 3D Foam Creative Embellishment Kit with Foil
- Cardstock: grey, green
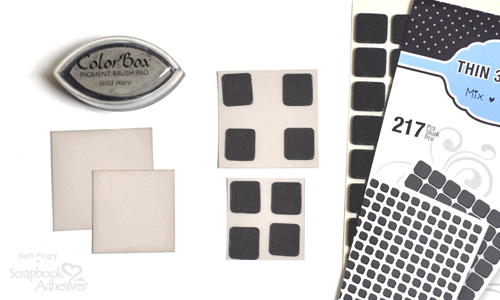
- Ink: Clearsnap Colorbox Wild Hare pigment ink
- Microbeads: Silver
- Dies: Spellbinders Labels Four and Labels Four Small, Standard Circles LG and Standard Circles Sm
- Ribbon: Black and White striped ¼ inch wide
Instructions
-
Using light grey paper, cut a card base to 5 ½ x 4 ¼ inches.
-
Cut six squares to 1 ½ inches, and six squares to 1 ¼ inches.
-
Ink the edges of all the squares with a grey ink that’s close to the color of the cardstock.
-
Add Thin 3D Foam Squares Black to the back sides of all the squares.
-
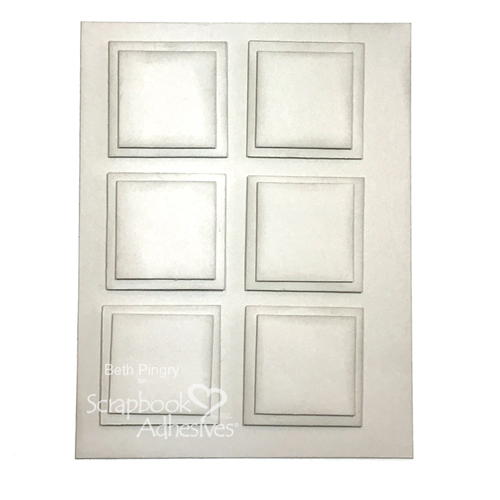
Remove the liners from the adhesive on the smaller cardstock squares and center them onto the larger cardstock squares.
-
Remove the liners from the adhesive on the larger squares and arrange onto the card base slightly offset to the left side. This leaves room for the door knob.
-
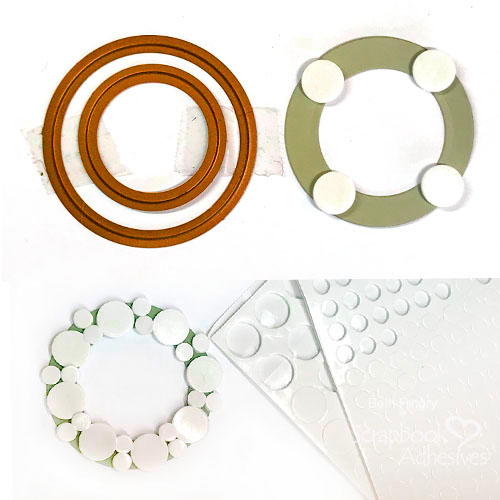
Die cut a wreath shape from green cardstock using two round dies nested together. I like to tape them together, so they don’t move. This one measures 2 ⅛ inches on the outside, 1 ½ inches on the inside circle.
-
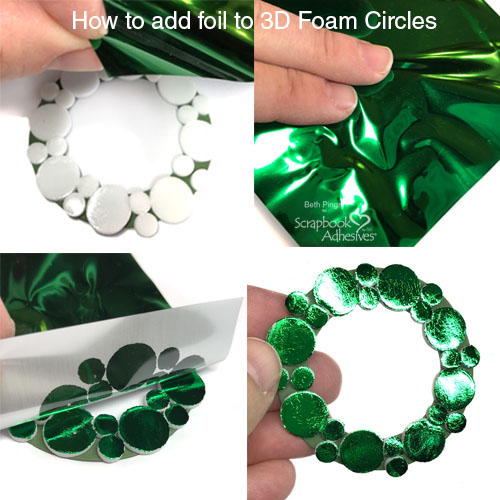
Add 3D Foam Circles White Regular to the wreath shape, starting with four equally spaced. Then add 4 more between them. Fill in the spaces with 3D Foam Circles White Small (you get both sizes in the package).
-
Remove the liners from Circles on the wreath. Apply Green Foil from the 3D Foam Creative Embellishment Kit, position the foil with the green side facing up. Touch the bottom side of the foil to the adhesive and gently rub to transfer the color. Peel away the foil sheet.
-
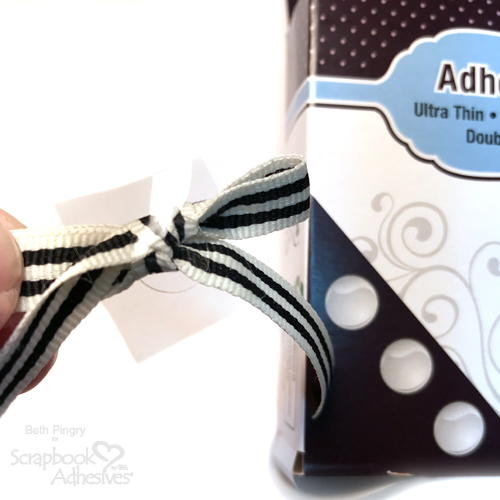
Tie a bow with ribbon, I used a ¼ inch wide ribbon. Add Adhesive Dots Medium Ultra Thin to the back side of the bow and adhere it to the wreath.
-
Trim the tails of the ribbon and add an Adhesive Dot near the end of each tail and adhere it so the tails are positioned as desired.
-
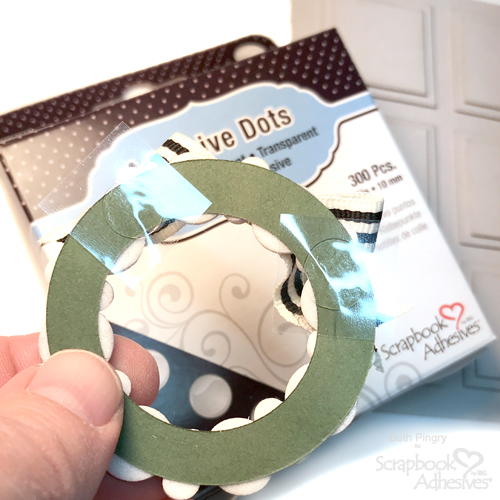
Add two Adhesive Dots to the back of the wreath, remove the liners, position at the top four panels of the door card.
-
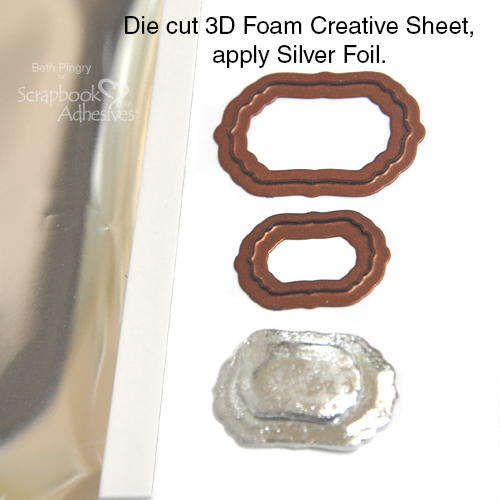
To make the door handle, die cut or punch a small shape from a 3D Foam Creative Embellishment Kit sheet. I used two small shapes. Remove the top liner from the foam shapes and add Silver Foil as directed in Step 9. Remove the back liner from the smaller shape and adhere on top of the larger shape. Remove the bottom liner from the larger shape and adhere to the door card slightly below the center on the right side, as shown.
-
Remove one 3D Foam Circle White Regular from the sheet. Pour silver micro beads into a small container (I use a cupcake liner) and press the beads into the adhesive until it’s covered. Remove the liner from the back side and position on top of the silver piece as a door knob.

Contest Rules:
- There is a maximum of one extra entry per person. The extra entry will be based upon a comment left on this post. Duplicate comments are not tallied.
- The winner will be selected at random from the comments on this page and the entries on the contest page.
- The winner will be contacted on the morning of December 24th, 2018.
- Email Address provided in your account (please do NOT leave your email address in the comments--you already provided it when you created your account)
- You have until December 23rd, 2018 at 11:59pm EST to leave your comment on this post. Comments posted after that will not be counted.
- Contest open to anyone 18+ in US and/or Canada. Excludes Quebec and Puerto Rico.
Describe the last homemade card you made!
Your Recently Viewed Projects
Thanks for your comment. Don't forget to share!
ratgirl
Dec 15, 2018
The last card I finished was a halloween card I made this year with a stamped image of an orange cat and a giant pumpkin. ) I'm still working on my Xmas ones...some have cats on them, some have chipmunks. )
bobnalyse 9218789
Dec 15, 2018
the last card I made was yesterday, Christmas cards I used a 1 sheet wonder idea and popped up the focal point and used glittered embossing powder for my sentiment. I like your card and planning to try it for a house warming card .
laurieblack 224908 2
Dec 14, 2018
Cute card, I might use this next year. Just mailed Christmas cards yesterday, have to make three birthday cards next week.
gaudet5 7966376
Dec 14, 2018
I have been making Christmas cards like crazy. Hoping they all make it their destinations on time. Going to try this door card for sure!!! Beautiful!
catisi 7678579
Dec 14, 2018
The last card I made was a birthday card. I stamped little flowers all over the front, then inked my acrylic block with pinks and greens and used a brush to color in the flowers. When that dried, I inked the acrylic block with blue and brushed the rest of the background with blue. I stamped and die cut Happy Birthday and glued it to the front.
Mommahobbit
Dec 14, 2018
So cool. The last card i made was a box pop up card with snowmen on it.
jean marmo
Dec 14, 2018
I made and sent a thank you card yesterday. Love making cards every week.
toribe 6394080
Dec 14, 2018
the last homemade cards I made were my Christmas cards. Shaker cards!!
raypra2
Dec 14, 2018
The last home made card I did was to my mother when I was in school. It has been a while. Then it was just a folded construction paper with string art inside for Valentine's day.
dskene2 1252205
Dec 13, 2018
The last card I made was a Christmas card that had a stamped wreath on it!
cheryl 1176072
Dec 12, 2018
I made a birthday card recently. It was made with paper and stamps.
Knittingdancer on Ravelry
Dec 08, 2018
The last handmade card I made was a Valentines Day card for a card swap. I use red construction paper and stickers, and a paper doily.
kellyk85 7013308
Dec 07, 2018
This is adorable! The last card I made was in October and it was for my dads birthday!
aketch
Dec 04, 2018
I like simplicity and nature. I use seeds, dried branches, needles and glitter. Sometimes I add a splash of paint for color.
ridiculosity 67303 43
Dec 03, 2018
I don't remember, it was before yesterday. It was pretty simple, I think. I love to do layers and a few embellishments.
Report Inappropriate Comment
Are you sure you would like to report this comment? It will be flagged for our moderators to take action.
Thank you for taking the time to improve the content on our site.