Christmas Snow Globe Shaker Card Tutorial
Learn how to make shaker cards for the holidays.

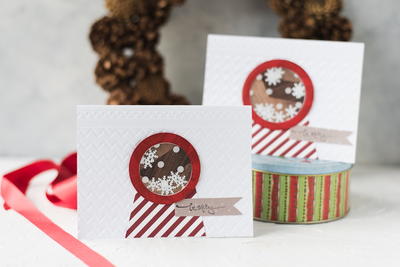
Make a super pretty card for your loved one this holiday with the Christmas Snow Globe Shaker Card Tutorial. This DIY Christmas card is excellent for those who love paper crafting! Follow the video tutorial to learn how to make shaker cards, and make one that resembles a lovely snow globe. Beginners to paper crafting can follow along with this tutorial, although you'll notice to get that perfect circle, a die cutting machine is your best friend. Impress friends and family with your Christmas cards this year by making these lovelies.
Estimated CostUnder $10
Time to CompleteUnder an hour
MaterialsPaper
Primary TechniquePaper Crafts
Project or Page SizeCard

SeasonWinter
HolidayChristmas
Project TypeMake a Project
Materials List
- Coordinating papers
- Clear acetate paper
- Die cut machine – Tonic Tangerine
- Tonic essentials nesting circle dies
- Paper trimmer
- Scissors
- Adhesive
- Embossing folder
- Card base
- Confetti
- Stamp and ink
Instructions
-
Emboss front of the card.
-
Cut out small rectangle and then cut top middle out with circle die, creating a half moon divet in the top.
-
Use that same size circle die to cut out the back of the snow globe.
-
Take one size smaller of the circle, layering the main size you chose and the one smaller to create a frame. Cut four frames out.
-
Use the main size die to cut out the acetate and put it to the side.
Note: You might need to use an extra piece of cardstock to create a shim depending on your dies and your machine. -
Take the one size smaller and then one size larger circle dies to create a nice frame for the snow globe.
-
Adhere the snow globe base and background to the card.
-
Glue the four stackable frames together and then around the background piece on the card.
-
Add the confetti.
-
Adhere the acetate piece over the confetti, gluing it to the frame.
-
Glue the decorative, larger frame over the entire thing.
-
Stamp your sentiment and cut it out to create a flag.
-
Adhere to the front of the card.
Your Recently Viewed Projects
Thanks for your comment. Don't forget to share!
mulberrygalprinces s
Jul 21, 2018
This is a wonderful idea. It would be a one of a kind card that would get noticed that's for sure. I read the directions and it's a little involved but I don't think it's something I couldn't handle. It's worth a try. And better now then at the very last minute.
Report Inappropriate Comment
Are you sure you would like to report this comment? It will be flagged for our moderators to take action.
Thank you for taking the time to improve the content on our site.