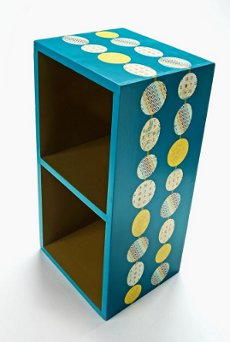
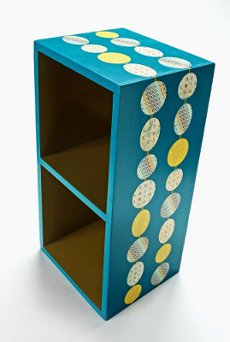
String of Circles Bookshelf
If you like simple pieces with simple geometric shapes and are always looking for more storage space, this bookcase will be a stylish and functional fit.
Materials:
- Wooden bookshelf
- Mod Podge Hard Coat
- FolkArt Acrylic Paint – Teal (3 bottles) and Spanish Olive (2 bottles)
- Scrapbook paper, 8 sheets – I used several coordinating patterns from the My Mind’s Eye So Sophie Collection
- Circle and oval templates or die cutter with circle and oval dies
- Painter’s tape
Instructions:
- Prepare surface.
- Paint the outside of the bookshelf Teal and the insides of the shelves Spanish Olive. It’s going to take a few bottles of paint and several coats on unfinished wood, so be patient. Allow to dry between coats.
- While waiting for the bookshelf to dry, prepare your circle and oval pieces. I did this with a die cutter, but you can also do this with a circle and oval template. You will need about 36 shapes total. If you are hand cutting the shapes, simply trace the circles and ovals on the BACKS of the papers before cutting them out.
- When the shelf is dry, use the painter’s tape to tape two thin stripes running up one side, across the top and down the other side as shown in the photo. You can use a ruler to measure, but I just eyeballed it. Make sure the tape is completely secured and then paint Spanish Olive in between the tape lines. You will need about three coats for complete coverage. Remove the tape immediately after painting and then allow to dry.
- You will Mod Podge next, but I recommend doing a layout of your shapes and then taking a picture before you Mod Podge. The picture will allow you to refer to your layout for placement. When you Mod Podge the shapes in place, do one at a time. Paint Mod Podge down, smooth and then wipe the excess Mod Podge away with your brush. Repeat until all of the shapes are applied. Allow to dry for 15 – 20 minutes.
- Completely coat the entire bookshelf with Mod Podge, including the insides of the shelves. Allow to dry and then apply another coat. Allow to dry for 24 hours before using.
Find this and 11 other great decoupage crafts in our FREE "Quick and Easy Decoupage" eBook.
Read NextElegant Refurbished Entryway Cabinet
mulberrygalprinces s
Jul 13, 2016
This is a fun, cute, easy idea. I want to do it for my grand daughters room. She will love it. I need to do it in white to match her other furniture. Plus instead of all circles I want to also add squares, triangles, rectangles, etc. she is at the age of learning shapes so this will really come in handy.
Report Inappropriate Comment
Are you sure you would like to report this comment? It will be flagged for our moderators to take action.
Thank you for taking the time to improve the content on our site.

