Contemporary Pin
The heating and flattening technique used in this project produces a fluid, unpredictable design that is the key to free form shapes. Wear your Contemporary Pin and show others just how much you love DIY jewelry making designs. This is a great project for more advanced crafters or anyone looking to try something new. Test your skills and learn just how fun it is to develop and execute your own homemade jewelry ideas. Attach your brooch to a scarf or jacket for a truly fashionable look. You won't be able to resist the refined and delicate design on this brooch. You can also create one and give it to a friend - the one-of-a-kind look is sure to make an impression.
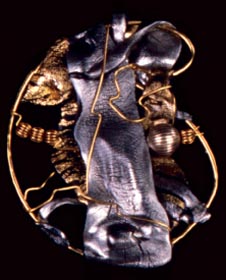
Materials:
- Friendly Plastic — 1-1/2" X 7" Two Harmonizing Colors of Choice
- Beads — One Large, Metal Bead for Focal Point and Odd Number of Smaller Beads in Contrasting Metal
- One or Two Bangle Bracelets or Thick Gauge Wire in Brass or Silver Tone
- Wire — Jeweler’s 20 or 24 Gauge Wire in Gold or Silver Tone
- E-6000 Glue
- Large Pin Back
- Electric Skillet for Warm Water
- Candy Thermometer
- Wire Clips
- Bent-Nose Jeweler’s Pliers
Instructions:
- Cut Friendly Plastic into three pieces: one larger piece approximately 1" x 2" in dominant color; one long triangle in contrasting color; one very long strip in contrasting color (as narrow as possible).
- Hold the larger rectangle shape of Friendly Plastic by one corner and submerge the rest of it into the hot water up to your fingers. Wave back and forth until it trails in the water. Remove fron water and quickly shift fingers to one of the softened corners to soften the corner you were holding. When totally softened, turn upside-down on working surface. A textured work surface will add design to your piece. Push shape out as if pressing out dough for a pie crust. The plastic will pick up the texture, if any, of the working surface. Cup piece in hand to cool. Repeat process with other two pieces, one at a time, only press the two from behind on your work surface creating a shadow effect.
- Bend bangle bracelet with one sharp turn of the bent-nosed pliers or heavy wire into an oval shape. Soften one end of largest plastic piece from step 2 in warm water and wrap around metal bracelet or wire frame. Warm and anchor the other end. Heat piece until you get the shape and draping effect that you like. Heat ends of other pieces in similar manner and anchor to frame, leaving space between the two pieces. If you have a long end, reheat in warm water and curl it around another piece to keep loose ends from sticking out.
- Bend one end of smaller wire and load beads onto it. Wrap one end of wire around large oval shape several times, tucking in sharp end. Weave beaded wire through the piece loosely, letting largest bead nest between two main pieces or in a recess. Anchor loose end of wire. With pliers bend the wire randomly until it conforms with piece.
- Glue on pin back or suspend from a chain or cord.
Note:
- The heating and flattening technique used in this project produces a fluid, unpredictable design that is the key to free form shapes. You can’t make a mistake! Just reheat and reshape or cut out parts you don’t like. Pieces made with this method often resemble metal, leather, paper or even wood.
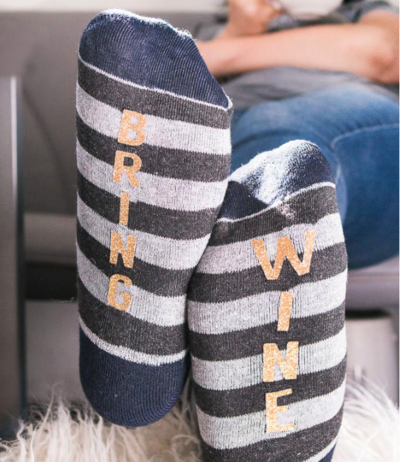
Read NextBring Wine Warm Winter Socks DIY