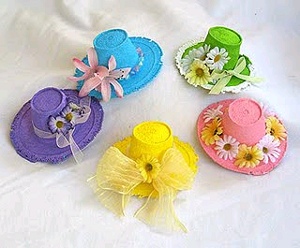
Mini Spring Bonnets
If you're looking for a quick Spring craft, try these mini Spring bonnets from Amanda Formaro! They're a cute Easter tablescape idea and they're made out of recycled Styrofoam coffee cups. Genius!
Materials:
- Styrofoam cups
- acrylic paint in pastel colors
- small silk flowers
- small beads
- pastel or sheer ribbons
- hot glue gun
- magnets (optional)
Videos:
Instructions:
- Preheat oven to 250 degrees F.
- Note: The temperature and instructions in this craft are based off of a dark coated cookie sheet at 250 degrees F in an electric oven. You may want to experiment with different temps until you receive satisfactory results. I recommend baking one or two cups at the recommended temperature and time first. If they seem to melt too quickly or the ends curl up and under, try reducing the temperature and trying again.
- Place Styrofoam cups upside down (open end of cup down) on a dark coated cookie sheet, placing them about 1-2" apart. Note: we experimented with both dark coated and silver cookie sheets, the cups did not melt properly on the silver sheets.
- Bake in the oven for approximately 3 minutes, don't walk away! It will take about one minute before you see any changes to the cups, then the heat will begin to melt and shrink them rather rapidly after that. It's lots of fun for the kids to watch, so be sure to turn the oven light on.
- Remove the cookie sheet from the oven and set aside to cool completely. DO NOT try to remove the cups from the cookie sheet until they are completely cooled. As they cool, the Styrofoam that is stuck to the sheet will relax and release its grip from the sheet, allowing you to remove them easily. Most cups will melt rather well, thought you may end up with one or two that look rather distorted or disfigured.
- Paint the "hats" with pastel colors, one coat is usually enough, and allow them to dry completely. Once they are dry you can embellish them with small silk flowers, pretty beads, and ribbons using a hot glue gun.
- If you like, you can hot glue a small round magnet to the bottom of the hat at the brim and hang on the refrigerator.
Read NextDaisy Duck Spring Centerpiece

Thanks for your comment. Don't forget to share!
Weberme
Apr 05, 2017
These mini spring bonnets are so adorable and would look good on a bunny or chick for a Easter display or even a doll. I like the way you can decorate them with the mimi flowers or ribbons. i have never seen the styrofoam cups melted in the oven before so this video is a great add on to show how to do it. Has anyone tried it since the video came out? Did it help?
BeckySue
Mar 11, 2016
I'm going to make the hats first on my own with the windows open then I'll let my preschool kids decorate them for Mother's Day gifts! Kids love to glue stuff on stuff, so I"ll give them feathers, plastic jewels, and sequin shapes. The glue dots work well, too. If needed, you can stick the glue dots all over the Styrofoam hat and the kids just stick their embellishments on them. I'm going to the kitchen now to melt those cups!
Member 9541787
Aug 18, 2014
This is a cute project. A worth-trying one. I love making home decors and ornaments. They are not only easy to make but look good too. I have found many new projects in this book, have a look! Its amazing!
glendagaye 7668626
Mar 24, 2014
Yep, I too tried this one and came away very disappointed. I looked at the style of cup and it was not the same as in the video, so my next stop is to buy one similar. The temp seemed to be fine for one cup, but then another took the entire 5 minutes and then the other didn't shrink at all. Thanks for the video as you had explained what outcomes to expect, and I got them all. Will keep trying as they are just sooooo cute
BeckySue
Mar 11, 2016
I was disappointed, too. I must be doing something wrong. I used a dark baking sheet and even after 20 minutes at 250, I still didn't get the melted brim. I only got a smaller cup. This photo shows before and after! LOL I never smelled a bad smell, though.
Semilove 4889839
Nov 12, 2012
Just to let you know.... my sister and I did this craft and after about 1/2 hour of trial and error found the perfect temp and time - we immediately set off the carbon monoxide sensor! Do this craft with caution and in a WELL ventilated area!
kimklunsford 74709 97
Mar 27, 2012
I also tried and tried these bonnets just like the instructions said and none worked. So then I looked closely at the picture of these bonnets and I seen the bonnets looked like there were slits cut into the rim. So I then tried cutting slits into a cup at the rim and I baked them @ 225 degrees F for about 10 min. This seem to work better. Also The bright green hat in the picture looks like a strip of lace trim was glued to the brim to cover up the slits.
Crafts by Amanda
Apr 30, 2012
Hi everyone this is Amanda I apologize I did not know there were so many comments sitting here However it's very important that you know that I did NOT cut slits in my cups before baking them as is suggested in this comment The directions that are written are exactly how I made them I didn't invent this particular craft I just followed someone else's directions and then embellished mine in my own way I know that it's frustrating When I make these I go through many more cups than I would care to but I save the mishaps for other projects instead I'm guessing the slits that you see may have been created during baking as I did not intentionally cut them to create the brims It's just a matter of getting the timing and the temperature just right I suppose there could be a possibility that the brand of…Read More foam cup being used could be the culprit as well I will put this on my to do list and see if I can't get a video tutorial together to demonstrate that not all of these will come out perfectly
kimklunsford 74709 97
Mar 27, 2012
I too tried this project many times with different size styrofoam cups, different oven temps and still did not work out right. Did you leave out a part? I don't know what else to try. Please help!!!
Crafts by Amanda
Apr 30, 2012
I'm sorry, it's just a matter of getting the temperature and timing right. Make sure you are using the white foam cups, I always used a generic brand. It's quite possible that companies have changed the properties in their cups and that may be affecting it. I originally made this project and took the photos over TEN years ago.
Crafter 15195
Mar 26, 2012
dumb question....how do you make the brims? I have never tried this before, but would like to. they look so cute.
Crafts by Amanda
Apr 30, 2012
The brims just form automatically when they bake. Sometimes they will curl up, other times they lay flat. It's very possible to go through 12-15 cups to get 4 or 5 perfect ones.
sewbeeit
Mar 25, 2012
Aren't the fumes from the melting Styrofoam cups toxic to breathe?
Crafts by Amanda
Apr 30, 2012
I did research this and spoke with several experts who told me that it was not harmful. However, it is suggested that your kitchen be vented properly, that you run your range vent if you have one, and you can even have a window open during baking for further piece of mind :)
KMP50
Mar 25, 2012
If you're going to be using hot glue and all that, why not just use a small bathroom papercup and glue it to a doilyor a paper circle. Seems like a lot of energy wasted , to say nothing of the possible carcinogens, as noted by someone else, released, to go through putting styrofoam in the oven. Sorry - not my "cup of tea"...
Crafts by Amanda
Apr 30, 2012
You could certainly do that. This project is about the fun of shrinking the cups, that's the novelty.
TiaKeas
Mar 25, 2012
I have been making these for years and really enjoy doing them. Try setting the cups the right way up too because they melt differently. Always have a well ventilated kitchen. The fun part is seeing what kind of hat they look like after they melt.
ibis
May 01, 2011
This is wrong and irresponsible on so many levels, especially the part about letting the kids anywhere NEAR this while the styrofoam is heated. Folks, the chemical composition of styrofoam includes benzene, styrene, and ethylene molecules, as well as HCFC as a blowing agent. When heated, styrofoam releases these chemicals as highly toxic, cancer-causing gases. It only takes nano-quantities of these chemicals to trigger permanent changes at the cellular level, leading to cancer and auto-immune illnesses.
Crafts by Amanda
Apr 30, 2012
I have been making crafts from shrunken foam cups for ten years. In that time I have spoken with a few different experts on the matter of what is emitted from the foam cups when heated. Ive been told the levels are low enough that it shouldnt be cause for concern, but that running your kitchen vent or if weather permits, keeping a window open during the baking process is an acceptable solution.
cac426
Mar 31, 2011
I have been looking for the instructions on how to make these, and now I have found them. Thank you!
Crafts by Amanda
Mar 26, 2011
Sorry some of you had trouble. It's really an experimentation as everyone's results are going to be different depending on your elevation, humidity, electric vs. gas oven, etc, etc. I suggest trying one at a time and watching very closely. Sometimes the brims will curl up first and then relax a bit and finally flatten out. Trial and error is really the key here.
emtcarrie
Mar 22, 2011
I tried over 50 times to make cups shrink...NEVER worked!!
Crafts by Amanda
Apr 30, 2012
So sorry about that. It really just depends on the temperature and the timing. I'm also beginning to wonder if manufacturers have changed the material make up of their cups in recent years. I will try to do an experiment and address this soon. Sorry for your frustration!
marjeanann 4694562
Mar 21, 2011
I agree something must have been left out. I also tried everything from different size and make cups, higher & lower temps, different types of cookie sheets, door open door closed, I even tried an electric cooker. Nothing. They are really cute in the picture but not out of my oven.
Crafts by Amanda
Apr 30, 2012
So sorry about that marj. I'm afraid it's totally hit or miss. I really had no idea when i made these ten years ago that it would vary so much from oven to oven and person to person.
emtcarrie
Mar 21, 2011
UGH!!! Bummed!!!! I have just gone through over 50 styrofoam cups..some were 8 oz with rims down the dide..Somer were 16 oz smooth sides...NONE of them worked!!!! I had somne look like top hats, pilgrim hats, upside down clay pot, mush, everything but Easter Bonnet.....Something is missing from the directions...I tried bake longer, bake at higher temp, bake at lower temp and bake shorter....I tried EVERYTHING I could think of and absolutely NOTHING worked.....I worked on these non-stop from 10:30am to 3:15pm...NOTHING!!!! VERY discouraged
Crafts by Amanda
Apr 30, 2012
So sorry, I wish I knew why it works for some and not for others. :( I feel your frustration and wish I could help further. Varying temperatures and times is the only thing I can think of, unless manufacturers have changed the material compounds in their cups as I made this project ten years ago. Things could be different now.
nycgrl
Mar 19, 2011
I TRIED THIS CRAFT AND DID EXACTLY WHAT THE INSTRUCTIONS SAID AND IT DID NOT WORK .. I DID IT 10 TIMES WITH THE CUPS AND THE RIM NEVER HAPPENED.?????
Crafts by Amanda
Apr 30, 2012
I'm sorry it didn't work for you. The instructions are complete, nothing has been left out. But they seem to work for some and not for others. I wish I knew what the magical answer was :(
feather77 1948922
Mar 19, 2011
I have been making these darling hats into bouquets for years by taking silk flowers off the stem, leaving the leaves and adding hot glue into the hat and holding the stem in place until the glue cools. Poke stems into floral foam and put into a small vase and top with dried floral moss. Use espresso cups for small hats and 8 oz for larger hats.
Crafts by Amanda
Apr 30, 2012
I'm so glad they work for you! I wish I understood why they work for some people and not for others.
Crafter 8556640
Mar 18, 2011
These look so beautiful, I'd make them just for the heck of it.Thanks so much.
grannymim
Mar 18, 2011
Very cute! They will make wonderful center pieces for our Easter Dinner tables at our family get together. Can't wait to make them.
grannymim
Mar 18, 2011
Very cute! They will make wonderful center pieces for our Easter Dinner tables at our family get together. Can't wait to make them.
grannymim
Mar 18, 2011
Very cute! They will make wonderful center pieces for our Easter Dinner tables at our family get together. Can't wait to make them.
grannymim
Mar 18, 2011
Very cute! They will make wonderful center pieces for our Easter Dinner tables at our family get together. Can't wait to make them.
marjeanann 4694562
Mar 17, 2011
I need help. I have tired this project. I tried different styrofoam cups, I tried with oven open and closed, I have tired different shelfs in oven. I have the none stick cookie sheets they are the teflon. What else should I do? Thanks
Sewing with Sher
Mar 17, 2011
Abosolutely Pricious. What a wonderful idea. I am making them for all my friends and clients. I am a real estate broker and these ideas are so helpful to me and this one is extra special. Thank you sherrypell
mammyboney
Mar 17, 2011
MEMORIES! My parents (yes my Daddy helped) use to make these every year. I never "learned" to make them, but am very anxious to try. I think that my grandchildren would love them.
ccal 1103733
Mar 12, 2011
These are really cute and would make cute refrig magnets. I have not melted styrofoam in the oven before. But the result looks very cute.
beatricem5 9402555
Mar 11, 2011
Made these for favors years ago they do work, you have to watch them
bhill
Mar 10, 2011
Be sure you do this in a well ventilated area. Styrofoam gives off fumes that are not good to inhale when it is heated..
Member 15424
Feb 19, 2011
These hats are just to cute. If you added a ribbon they would look great hanging on a Easter tree with small eggs.
Report Inappropriate Comment
Are you sure you would like to report this comment? It will be flagged for our moderators to take action.
Thank you for taking the time to improve the content on our site.