This project was submitted by one of our readers, just like you.
Upcycled Crochet Tote Bag Tutorial

Upcycled Crochet Tote Bag Tutorial
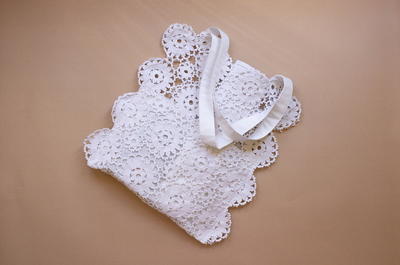
"A beginner’s tutorial on how to make a trendy summer tote using vintage crochet pieces. Crochet tablecloths or pieces are usually white so you can personalize your tote by adding some color. Dye it naturally with avocado seeds, beetroots or Ceylon tea. This tote is very practical and is perfect for holding your beach or everyday essentials. You can choose between thinner or thicker crochet piece just make sure to use a new needle while sewing the pieces together."
Project TypeMake a Project
Time to CompleteIn an evening
Sewn byBoth Hand and Machine

Materials List
- Cotton crochet tablecloth ( 40 cm x 80 cm )
- Lightweight cotton fabric (35 cm x 70 cm)
- Sewing machine
- Scissors
- Iron
- Pins
- Thread
Instructions
-
Before you start, wash and iron the crochet panel and the cotton fabric. The crochet panel I used was 84 cm long and 43 cm wide. But a 80 cm x 40 cm panel is enough to make the tote. *To create this type of tote you can also use square panels of crochets.
-
Turn the crochet panel on the wrong side. Cut a piece of cotton fabric approx. the length of the crochet panel but reduce the width. Zig zag or serge the cotton panel all around. *As you see on the picture below, my cotton panel wasn’t long enough. Because I found this shirt to use as a lining but it wasn’t enough for both the lining and the handles. After positioning the cotton piece on the crochet panel, sew all around using a straight or a zig zag stitch. Before sewing, make sure to sew the cotton lining into the wrong side of the crochet panel. Sometimes it is really hard to differ which one is the right side and which one is the wrong side on crochet pieces.
-
Next, fold the panel in half, wrong sides should face each other and make sure you have an even square in all sides. Pin along both sides and sew using a straight stitch.
-
As for the handles you can make your choice by using small crochet pieces if you have enough. * For example, I initially wanted to make my handles like this but then I preferred making some using the same shirt I used for the lining.
-
If you’re making the straps from the fabric, then cut two fabric stripes 65 cm long and 12 cm wide. Fold the fabric stripe in half and iron it.
-
Next, fold the fabric edges to the center and iron again. Fold again so that the raw edges are enclosed and the folded edges meet, iron and stitch along in one or both long sides close to the edges. Handles should be approximately 2.5- 3 cm wide.
-
Attaching the handles
-
First, attach using pins and test if it is necessary to adjust by either shortening the handles or moving them closer to the center if you prefer. Sew by hand or sewing machine. *On each side of the handles I attached small crochet pieces. But feel free to do this suiting your preferences.

Read NextEasiest Bag, Purse Or Pouch