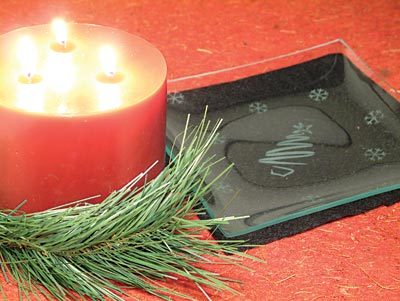
Etched Holiday Candy Dish
This simple etched candy dish from Etchworld Armour works as a great Christmas accent in any room. This beginner etching project makes a great holiday gift.

Materials:
- Sand Etch® Kit
- Sand Etch® Stencil #70-9205
- Sand Etch® Stencil #70-9206
- 8” Clear Square Place
- Several sheets of paper
- Glass Cleaner
- Masking Tape
- Paper Towels
- Scissors
- Running Water
- Cardboard Box
Steps:
- With scissors cut out the tree stencil design from stencil #70-9205.
- Position the design in the center of the reverse side of the plate. Be sure the stencil is flat against the glass.
- Secure in place with masking tape.
- Cover everything that will remain clear (not etched) with paper.
- Begin to blast your project according to the detailed instructions found in the Sand Etch Kit. Hold the nozzle of the blaster approx 1 inch from the glass while blasting in a circular or zig zig motion. Hold the glass up to the light periodically to be sure all areas are etched.
- Carefully remove stencil design, tape and paper to avoid scratching glass with any remaining abrasive.
- Rinse project under running water to remove excess abrasive. Clean project with glass cleaner and dry with paper towels.
- To complete the project, cut out snowflake design stencil #70-9206 and place in a random pattern around the tree repeating steps 2 thru 6.
Read NextCharming Gift Card Holders